Using SSH to access a Server behind a NAT
Diarmuid O'Briain, diarmuid@obriain.com22/02/2022, version 2.0
Last updated: 22-02-2022 09:57
- Cloud Server
- Hostname: Public - middle.com
- IP address: Public - 174.111.111.111
- Username: charles
- Password: babbage
- Computer behind NAT
- Hostname: Private - target.net
- IP address: Private - 192.168.10.10
- Username: ada
- Password: lovelace
- Hostname: Public/Private - laptop.eu
- IP address: Public/Private - 174.222.222.222
- Username: luigi
- Password: menabrea
SSH behind NAT
Sometimes you have a computer (target.net) behind a Network Address Translation (NAT) and you require access it from a workstation with Internet access.
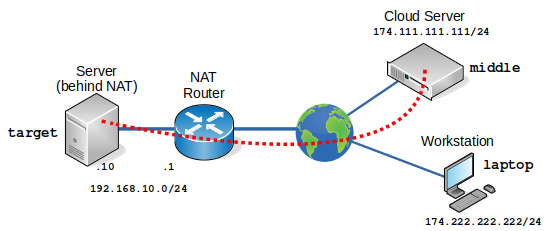
Well from the computer (target.net) it is possible to SSH to a server (middle.com) on the Internet as the SSH connection traverses from the private network to the public one without issue. However it is not possible to perform a straight SSH connection from the a workstation (other) to the computer (target.net) as the latter has a private address. Another application of this is connecting to Virtual Machines (VM) that are behind a NAT. It can be problematic using the Copy/Paste functionality of the Hypervisor to GNU/Linux hosts who do not have X.org installed. Using reverse SSH tunnelling is a means to aviod the problem.
SSH From computer (target.net) to server (middle.com)
ada@target.net~$ ssh charles@middle.com
charles@middle.com's password: babbage

The programs included with the Debian GNU/Linux system are free software;
the exact distribution terms for each program are described in the
individual files in /usr/share/doc/*/copyright.

Debian GNU/Linux comes with ABSOLUTELY NO WARRANTY, to the extent
permitted by applicable law.
Last login: Tue Feb  22 15:52:53 2022 from 196.32.243.24
charles@middle.com~$
SSH from server (middle.com) to computer (target.net)
Well obviously from the server (middle.com) or the workstation (laptop.eu) is is not possible to simply SSH to 192.168.10.10 as that sits behind a NAT. What can be done however is to establish an SSH from the computer (target.net) to the server (middle.com) and use a little known feature of SSH to reverse SSH (-R) back to the computer (target.net) from the server (middle.com). This command binds a remote TCP port to a local TCP port over a secure channel. On the remote server (middle.com), host port 22 traffic is forwarded to port 9999 on the the localhost (computer (target.net)). Note however while 9999 is used here, it can be any unused port number.
ada@target.net~$ ssh -f -N -T -R 9999:localhost:22 charles@middle.com
charles@middle.com's password: babbage

Last login: Tue Feb 22 15:52:53 2022 from 196.32.243.24
charles@middle.com~$
Note: the flags in the command mean:
-f    tells ssh to background itself after it authenticates, so you a shell is not opened from the server.
-N    indicates that an SSH connection is required, but remote commands will not be ran.
-T    disables pseudo-tty allocation, which is appropriate because an interactive shell is not being ran.
Now from the server (middle.com) it is possible via reverse SSH tunneling to connect to the computer (target.net) through this binding.
charles@middle.com~$  ssh ada@localhost -p 9999
ada@localhost's password: lovelace


Last login: Tue Feb  22 16:17:48 2022
ada@target.net~$
Review the TCP connections
Taking a look at the TCP connections between computer (target.net) and server (middle.com). Before the initial -R connection from computer (target.net) to server (middle.com).
ada@target.net~$ netstat -at | grep -E '(9999|ssh)'
tcp        0      0 *:ssh                   *:*                     LISTEN
tcp6       0      0 [::]:ssh                [::]:*                  LISTEN

charles@middle.com~$ netstat -at | grep -E '(9999|ssh)'
tcp        0      0 *:ssh                   *:*                     LISTEN
tcp6       0      0 [::]:ssh                [::]:*                  LISTEN
Now after the bind connection is made from computer (target.net) to server (middle.com). An SSH connection can be seen established and there is a localhost:9999 TCP socket in Listen mode.
ada@target.net~$ netstat -at | grep -E '(9999|ssh)'
tcp        0      0 localhost:9999          *:*                     LISTEN
tcp        0      0 *:ssh                   *:*                     LISTEN
tcp        0      0 174.111.111.111:35140     174.111.111.111:ssh   ESTABLISHED
tcp        0      0 174.111.111.111:ssh       174.111.111.111:35140 ESTABLISHED
tcp6       0      0 ip6-localhost:9999      [::]:*                  LISTEN
tcp6       0      0 [::]:ssh                [::]:*                  LISTEN
Now after the SSH from the server (middle.com) to the computer (target.net), a second SSH connection can be seen established via localhost:9999.
ada@target.net~$ netstat -at | grep -E '(9999|ssh)'
tcp        0      0 localhost:9999          *:*                     LISTEN
tcp        0      0 *:ssh                   *:*                     LISTEN
tcp        0      0 localhost:41728         localhost:9999          ESTABLISHED
tcp        0      0 192.168.10.3:35140      192.168.10.3:ssh        ESTABLISHED
tcp        0      0 localhost:9999          localhost:41728         ESTABLISHED
tcp        0      0 192.168.10.3:ssh        192.168.10.3:35140      ESTABLISHED
tcp6       0      0 ip6-localhost:9999      [::]:*                  LISTEN
tcp6       0      0 [::]:ssh                [::]:*                  LISTEN

charles@middle.com~$ netstat -at | grep -E '(9999|ssh)'
tcp        0      0 *:ssh                   *:*                     LISTEN
tcp        0    116 10.0.2.15:55008         192.168.10.3:ssh        ESTABLISHED
tcp6       0      0 [::]:ssh                [::]:*                  LISTEN
tcp6       0      0 localhost:42366         localhost:ssh           ESTABLISHED
tcp6       0      0 localhost:ssh           localhost:42366         ESTABLISHED
SSH From workstation (laptop.eu) to computer (target.net) via server (middle.com)
SSH to the server (middle.com) first. Once connected there continue with an SSH connection to the computer (target.net) via the tunnel.
luigi@laptop.eu ~ $ ssh charles@middle.com
charles@middle.com's password: babbage

The programs included with the Debian GNU/Linux system are free software;
the exact distribution terms for each program are described in the
individual files in /usr/share/doc/*/copyright.

Debian GNU/Linux comes with ABSOLUTELY NO WARRANTY, to the extent
permitted by applicable law.
Last login: Tue Feb  22 15:52:53 2022 from 196.32.243.24
charles@middle.com~$  ssh ada@localhost -p 9999
ada@localhost's password: lovelace


Last login: Tue Feb  22 16:17:48 2022
ada@target.net~$
Automating the tunnel setup
Generate SSH keys.
ada@target.net~$ ssh-keygen
Generating public/private rsa key pair.
Enter file in which to save the key (/home/ada/.ssh/id_rsa):
Created directory '/home/ada/.ssh'.
Enter passphrase (empty for no passphrase): <leave blank>
Enter same passphrase again: <leave blank>
Your identification has been saved in /home/ada/.ssh/id_rsa.
Your public key has been saved in /home/ada/.ssh/id_rsa.pub.
The key fingerprint is:
SHA256:324ebiYmO4+a5Z9drmXp0ioI6tpQiE6x8vZ31D/2pyU ada@target.net
The key's randomart image is:
+---[RSA 2048]----+
|                 |
|                 |
| .               |
| .o.             |
|oo. .   S.       |
|+. .  . ....   . |
| .+  . o....o.E .|
| . +. .+=.+=OB.o.|
|  .o+.oo+B+OB*=o |
+----[SHA256]-----+
Copy the SSH key to the server (middle.com) computer
ada@target.net~$ ssh-copy-id charles@middle.com
/usr/bin/ssh-copy-id: INFO: Source of key(s) to be installed: "/home/ada/.ssh/id_rsa.pub"
/usr/bin/ssh-copy-id: INFO: attempting to log in with the new key(s), to filter out any that are already installed
/usr/bin/ssh-copy-id: INFO: 1 key(s) remain to be installed -- if you are prompted now it is to install the new keys
charles@middle.com's password: <babbage>
bash: warning: setlocale: LC_ALL: cannot change locale (en_IE.UTF-8)

Number of key(s) added: 1

Now try logging into the machine, with:   "ssh 'charles@middle.com'"
and check to make sure that only the key(s) you wanted were added.
Create the following directory if it does not exist already.
ada@target.net~$ mkdir -p /home/${USER}/.config/systemd/user
- -p, --parents: Make parent directories as needed.
Create an Systemd service for the connection. Note this is NOT as sudo but as a regular user.
ada@target.net~$ cat <<EOF > /home/${USER}/.config/systemd/user/sshtun.service
[Unit]
Description=Setup a secure tunnel to middle.com
After=network.target

[Service]
ExecStart=/usr/bin/ssh -N -T \
-o ServerAliveInterval=60 \
-o ExitOnForwardFailure=yes \
-R 9999:localhost:22 \
-l charles \
middle.com

# Restart Regularly to avoid StartLimitInterval failure
RestartSec=5
Restart=always

# Stop and reload commands
ExecStop=/usr/bin/kill $MAINPID
ExecReload=/usr/bin/kill -HUP $MAINPID

[Install]
WantedBy=default.target
EOF
Enable and start the service.
ada@target.net~$ systemctl --user daemon-reload
ada@target.net~$ systemctl --user enable sshtun.service
ada@target.net~$ systemctl --user start sshtun.service
ada@target.net~$ systemctl --user status sshtun.service
loginctl may be used to introspect and control the state of the systemd and enable-linger enables a specified user such that a user manager is spawned for that user at boot time and kept around after logouts. This permits services owned by users who are not logged in to run long-running services.
ada@target.net~$ sudo loginctl enable-linger ${USER}
Check the service is running
ada@target.net~$ systemctl --user status sshtun.service
● sshtun.service - Setup a secure tunnel to middle.comn
 Loaded: loaded (/home/pi/.config/systemd/user/sshtun.service; enabled; vendor preset: enabled)
 Active: active (running) since Tue 2022-02-22 15:03:26 GMT; 50min ago
 Main PID: 837 (ssh)
 CGroup: /user.slice/user-1000.slice/user@1000.service/sshtun.service
         └─837 /usr/bin/ssh -N -T -o ServerAliveInterval=60 -o ExitOnForwardFailure=yes -R 999:localhost:22 -l charles middle.com

Feb 22 15:03:26 raspberrypi systemd[458]: Started Setup a secure tunnel to middle.com.
Test the full connection from the workstation (laptop.eu)
luigi@laptop.eu ~ $ ssh charles@middle.com
charles@middle.com's password: babbage

The programs included with the Debian GNU/Linux system are free software;
the exact distribution terms for each program are described in the
individual files in /usr/share/doc/*/copyright.

Debian GNU/Linux comes with ABSOLUTELY NO WARRANTY, to the extent
permitted by applicable law.
Last login: Tue Feb  22 15:52:53 2022 from 196.32.243.24
charles@middle.com~$  ssh ada@localhost -p 9999
ada@localhost's password: lovelace

Last login: Tue Feb  22 16:17:48 2022
ada@target.net~$

