Container based Virtualisation with Docker
Diarmuid O'Briain, diarmuid@obriain.com04-08-2016, version 1.0
Last updated: 04-08-2016 15:51
 |
The Container concept
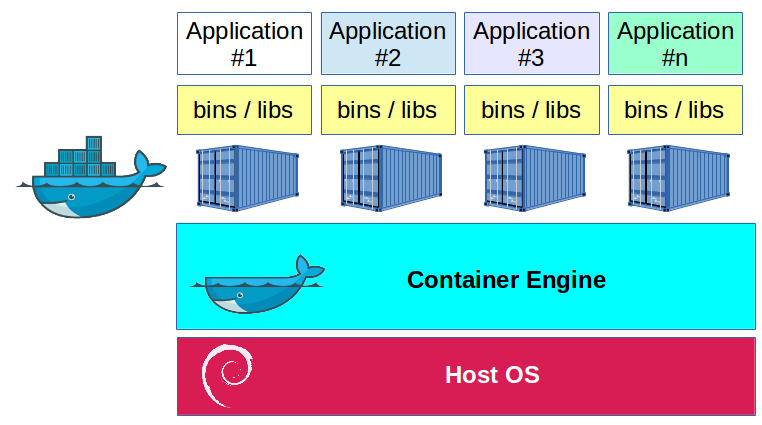 |
With container-based virtualisation the virtualisation layer runs as an application within the Operating System (OS). The OS kernel runs on the hardware node with several isolated guest Virtual Machines (VM) installed on top of it. The isolated guests are called containers. However compared to standard virtualisation where each guest run a completely installed OS, with container based virtualisation there is only one host OS and each container runs a partial instance of the OS. The host OS ensure isolation of resources among all containers making each appear as a VM. The container contains any binaries or libraries that are unique to its function and has access to the binaries and libraries of the host OS. In this way the container is only a partial OS which avoids the performance problems related to hardware access by means of driver virtualisation associated with traditional hypervisors and VMs.
What is Docker
The Linux kernel introduced Control GROUPS (cgroups). cgroups allow for the allocation of resources (CPU, memory, block I/O, network, etc.) to user defined groups of processes on the system. Additionally the kernel has a feature called namespace which allows the creation of different and separate instances of process groups that are isolated from each-other. Bringing cgroups and namespace together GNU/Linux has the concept of the LinuX Container (LXC), where each LXC is an isolated environment for applications or OS virtualisation.
Docker is a utility that uses LXC to package an application and all its dependencies in an LXC that can then run on any GNU/Linux machine in a form of lightweight virtualisation.
Docker Hub
Docker Hub is centralised registry service of docker container images. It allows users to gain access to a vast number of pre-built images.
Install Docker on Debian GNU/Linux
Prepare Debian GNU/Linux
Before starting it is essential that it is a 64-bit version of Debian GNU/Linux. Docker does not work with 32-bit machines.
Install Debian GNU/Linux 64-bit and update.
  $ sudo apt-get update
  $ sudo apt-get dist-upgrade
Confirm Debian version and Kernel. Debian version 8.5 codename "Jessie". The amd64 indicates the kernel is 64-bit.
  $ uname -rv
  3.16.0-4-amd64 #1 SMP Debian 3.16.7-ckt25-2+deb8u3 (2016-07-02)

  $ cat /etc/debian_version
  8.5
Setup APT to work with the https method, and that CA certificates are installed.
$ sudo apt-get install apt-transport-https ca-certificates
IP Forwarding
For Docker containers to access the public networks of the host it is necessary for the host to have IP forwarding enabled. Check the current status as follows; 1 means enables and 0 means disabled.
  $ cat /proc/sys/net/ipv4/ip_forward
  0
If it is disabled as shown then change the value to 1 as follows.
  $ echo 1 | sudo tee /proc/sys/net/ipv4/ip_forward
  [sudo] password for debian:
  1
To make the change permanent it is necessary to adjust the following line in the /etc/sysctl.conf file.
  $ cat /etc/sysctl.conf | grep ip_forward
  #net.ipv4.ip_forward=1

  $ sudo sed -i.bak 's/#net.ipv4.ip_forward=1/net.ipv4.ip_forward=1/' /etc/sysctl.conf

  $ cat /etc/sysctl.conf | grep ip_forward
  net.ipv4.ip_forward=1
Now restart the networking service.
$ sudo systemctl restart networking.service
Prepare for Docker install
Add the Docker GNU Privacy Guard (GPG) key.
  $ sudo apt-key adv --keyserver hkp://p80.pool.sks-keyservers.net:80 --recv-keys 58118E89F3A912897C070ADBF76221572C52609D

  gpg: requesting key 2C52609D from hkp server p80.pool.sks-keyservers.net
  gpg: key 2C52609D: public key "Docker Release Tool (releasedocker) <docker@docker.com>" imported
  gpg: Total number processed: 1
  gpg:               imported: 1  (RSA: 1)
Add the Docker deb source to the Debian sources and update the APT package index to reflect the change.
  $ echo 'deb https://apt.dockerproject.org/repo debian-jessie main' | sudo tee --append /etc/apt/sources.list.d/docker.list
  $ sudo apt-get update
Install, start and test the Docker Engine
Install the Docker engine. This will also install the Docker client which permits access to the engine from the shell with the command docker.
$ sudo apt-get install docker-engine
Run the Docker engine and confirm it is running.
  $ sudo systemctl start docker.service
  $ sudo systemctl | grep docker.service
  docker.service      loaded active running   Docker Application Container Engine
Confirm that the Docker engine is working. Docker has a hello-world image. The docker run command looks for the image locally, not finding it the on-line library at the Docker Hub is accessed, downloading the image, created a container for that image and runs an executable to print back to the terminal that all is well. The container then terminates.
  $ sudo docker run hello-world
  Unable to find image 'hello-world:latest' locally
  latest: Pulling from library/hello-world
  c04b14da8d14: Pull complete
  Digest: sha256:0256e8a36e2070f7bf2d0b0763dbabdd67798512411de4cdcf9431a1feb60fd9
  Status: Downloaded newer image for hello-world:latest

  Hello from Docker!
  This message shows that your installation appears to be working correctly.

  To generate this message, Docker took the following steps:
   1. The Docker client contacted the Docker daemon.
   2. The Docker daemon pulled the "hello-world" image from the Docker Hub.
   3. The Docker daemon created a new container from that image which runs the
      executable that produces the output you are currently reading.
   4. The Docker daemon streamed that output to the Docker client, which sent it
      to your terminal.

  To try something more ambitious, you can run an Ubuntu container with:
   $ docker run -it ubuntu bash

  Share images, automate workflows, and more with a free Docker Hub account:
   https://hub.docker.com

  For more examples and ideas, visit:
   https://docs.docker.com/engine/userguide/
Docker group
During the install a docker group is created. Add the user to that group and now the Docker client can run without sudo privilidges.
  $ cat /etc/group | grep docker
  docker:x:999:

  $ sudo usermod -a -G docker ${USER}
  $ cat /etc/group | grep docker
  docker:x:999:debian

  $ docker run hello-world
The Docker client
With the Docker client access is granted through the docker command. Use the --version and --help switches to see the version as well as the full list of commands available to interact with the Docker engine. As well as the --version switch there is also a version command which gives significantly more detail.
  $ docker --version
  Docker version 1.12.0, build 8eab29e

  $ docker --help
  Usage: docker [OPTIONS] COMMAND [arg...]
         docker [ --help | -v | --version ]

  $ docker version
  Client:
   Version:      1.12.0
   API version:  1.24
   Go version:   go1.6.3
   Git commit:   8eab29e
   Built:        Thu Jul 28 21:40:59 2016
   OS/Arch:      linux/amd64

  Server:
   Version:      1.12.0
   API version:  1.24
   Go version:   go1.6.3
   Git commit:   8eab29e
   Built:        Thu Jul 28 21:40:59 2016
   OS/Arch:      linux/amd64
Running a webserver container
Create a docker directory and switch to it. Build a webpage in this directory.
  $ mkdir docker
  $ echo '<html><p>This is the container index file</p></html>' > ~/docker/index.html
  $ cat ~/docker/index.html
  <html><p>This is the container index file</p></html>
Pull down the httpd image from Docker hub. Confirm it is there.
  $ docker pull httpd
  Using default tag: latest
  latest: Pulling from library/httpd
  Digest: sha256:619b6136504fcaed0d1e1f9fac57cf69eedd174f98889d5b727598ca658d0bfc
  Status: Downloaded newer image for httpd:latest

  $ docker images
  REPOSITORY     TAG       IMAGE ID       CREATED        SIZE
  httpd          2.4       462fca6e7913   5 days ago     195.4 MB
  hello-world    latest    c54a2cc56cbb   4 weeks ago    1.848 kB
Create a Docker container
The docker create command can be used to create a container. The httpd at the end is the image name to be used. The container ID is returned.
- --name <string> Assign a name to the container
- --publish <value> Publish a container's port(s) to the host, See Docker Networking.
- --volume <value> Bind mount a volume, mounts /home/debian/docker on the host to /usr/local/apache2/htdocs/ on the Docker container. See Mounting a Data Volumes.
  $ docker create --name apache1 --publish 80:80 --volume /home/debian/docker:/usr/local/apache2/htdocs/ httpd
  238194b35479db39b9659e828f15b6791e57e0a1d11572785cdd63a64de9a531

  $ docker ps -a
  CONTAINER ID   IMAGE   COMMAND              CREATED          STATUS       PORTS          NAMES
  238194b35479   httpd   "httpd-foreground"   11 seconds ago   Created                     apache1
To start the container use the command docker start.
  $ docker start 238194b35479
  238194b35479
View the container with the docker ps -l command. Note the container ID only shows the first 12 characters.
  $ docker ps -a
  CONTAINER ID   IMAGE   COMMAND              CREATED              STATUS          PORTS                NAMES
  238194b35479   httpd   "httpd-foreground"   About a minute ago   Up 52 seconds   0.0.0.0:80->80/tcp   apache1
Run a Docker container
Before proceeding remove the container just created.
  $ docker stop 238194b35479
  238194b35479

  $ docker rm 238194b35479
  238194b35479
An alternative to the two step docker create and docker start, is to run the container directly with the docker run command and the --detach option. This command is designed to build and then run a command in a new container, though running the command is optional. Again the container ID is returned.
- --detach Run container in background and print container ID
  $ docker run --name apache1 --detach --publish 80:80 --volume ~/docker/:/usr/local/apache2/htdocs/ httpd
  5d067fd94bdb42057ed4bf54fcb1c29f990398f2a6367258c26f4677109e47d
Viewing the container with the docker ps -l command is the same as using the docker create and docker start commands.
  $ docker ps -l
  CONTAINER ID   IMAGE   COMMAND             CREATED        STATUS        PORTS               NAMES
  5d067fd94bdb   httpd   "httpd-foreground"  3 minutes ago  Up 3 minutes  0.0.0.0:80->80/tcp  apache1
List the port mappings for the container with the docker port command.
  $ docker port 5d067fd94bdb
  80/tcp -> 0.0.0.0:80
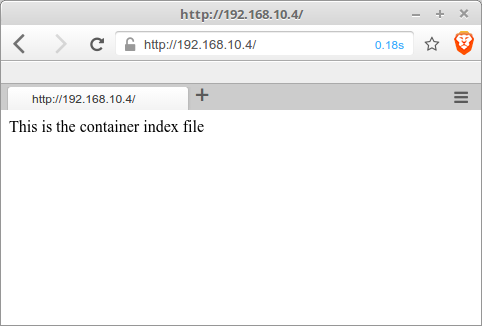
Confirm the webpage is visible with a GNU/Linux shell browser or browse to the host IP Address.
  $ curl localhost
  <html><p>This is the container index file</p></html>
 |
Stopping and killing the container
The docker stop command stops the container. It can be restarted with the docker restart command. To remove the container simply use the docker rm command.
  $ docker stop 5d067fd94bdb
  5d067fd94bdb

  $ docker rm 5d067fd94bdb
  5d067fd94bdb

  $ docker ps
  CONTAINER ID   IMAGE      COMMAND         CREATED      STATUS        PORTS       NAMES
While the container has been removed, the image remains.
  $ docker images
  REPOSITORY     TAG       IMAGE ID       CREATED        SIZE
  httpd          2.4       462fca6e7913   5 days ago     195.4 MB
  hello-world    latest    c54a2cc56cbb   4 weeks ago    1.848 kB
Removing images
To remove the image use the docker rmi command.
  $ docker rmi --force 462fca6e7913
  Untagged: httpd:2.4
  Untagged: httpd@sha256:619b6136504fcaed0d1e1f9fac57cf69eedd174f98889d5b727598ca658d0bfc
  Deleted: sha256:462fca6e7913e7758cbc2b476e61b78670bc9ab2573aeb3f6b22dcd15af32f15

  $ docker rmi --force c54a2cc56cbb
  Untagged: hello-world:latest
  Untagged: hello-world@sha256:0256e8a36e2070f7bf2d0b0763dbabdd67798512411de4cdcf9431a1feb60fd9
  Deleted: sha256:c54a2cc56cbb2f04003c1cd4507e118af7c0d340fe7e2720f70976c4b75237dc

  $ docker images
  REPOSITORY     TAG       IMAGE ID       CREATED        SIZE
Building an image
Lets build an OS container from an image. Looking for Ubuntu images on Docker Hub.
  $ docker search ubuntu
  NAME                              DESCRIPTION                                     STARS     OFFICIAL   AUTOMATED
  ubuntu                            Ubuntu is a Debian-based Linux operating s...   4397      [OK]
  ubuntu-upstart                    Upstart is an event-based replacement for ...   65        [OK]
  rastasheep/ubuntu-sshd            Dockerized SSH service, built on top of of...   30                   [OK]
  torusware/speedus-ubuntu          Always updated official Ubuntu docker imag...   26                   [OK]
  ubuntu-debootstrap                debootstrap --variant=minbase --components...   25        [OK]
  nickistre/ubuntu-lamp             LAMP server on Ubuntu                           8                    [OK]
  nuagebec/ubuntu                   Simple always updated Ubuntu docker images...   6                    [OK]
  nickistre/ubuntu-lamp-wordpress   LAMP on Ubuntu with wp-cli installed            6                    [OK]
  nimmis/ubuntu                     This is a docker images different LTS vers...   5                    [OK]
  maxexcloo/ubuntu                  Docker base image built on Ubuntu with Sup...   2                    [OK]
  admiringworm/ubuntu               Base ubuntu images based on the official u...   1                    [OK]
  darksheer/ubuntu                  Base Ubuntu Image -- Updated hourly             1                    [OK]
  jordi/ubuntu                      Ubuntu Base Image                               1                    [OK]
  life360/ubuntu                    Ubuntu is a Debian-based Linux operating s...   0                    [OK]
  datenbetrieb/ubuntu               custom flavor of the official ubuntu base ...   0                    [OK]
  lynxtp/ubuntu                     https://github.com/lynxtp/docker-ubuntu         0                    [OK]
  esycat/ubuntu                     Ubuntu LTS                                      0                    [OK]
  widerplan/ubuntu                  Our basic Ubuntu images.                        0                    [OK]
  smartentry/ubuntu                 ubuntu with smartentry                          0                    [OK]
  croscon/ubuntu                    Crosconized Ubuntu                              0                    [OK]
  webhippie/ubuntu                  Docker images for ubuntu                        0                    [OK]
  teamrock/ubuntu                   TeamRock's Ubuntu image configured with AW...   0                    [OK]
  ustclug/ubuntu                    ubuntu image for docker with USTC mirror        0                    [OK]
  konstruktoid/ubuntu               Ubuntu base image                               0                    [OK]
  dorapro/ubuntu                    ubuntu image                                    0                    [OK]
Pull the most popular image ubuntu and create a container for it.
  $ docker pull ubuntu
  Using default tag: latest
  latest: Pulling from library/ubuntu
  43db9dbdcb30: Pull complete
  2dc64e8f8d4f: Pull complete
  670a583e1b50: Pull complete
  183b0bfcd10e: Pull complete
  Digest: sha256:c6674c44c6439673bf56536c1a15916639c47ea04c3d6296c5df938add67b54b
  Status: Downloaded newer image for ubuntu:latest

  docker images
  REPOSITORY          TAG                 IMAGE ID            CREATED             SIZE
  ubuntu              latest              42118e3df429        11 days ago         124.8 MB


  $ docker run --name ubuntu --detach --tty --interactive ubuntu
  49b5bb9e9b5b51592285db846cfa8512076ecfa00cdd8165e22d5a5bf6125673
- --interactive Keep STDIN open even if not attached
- --tty Allocate a pseudo-TTY
Use the docker attach command to connect to the Ubuntu container.
  $ docker attach 49b5bb9e9b5b
  root@49b5bb9e9b5b:/# cat /etc/issue
  Ubuntu 16.04 LTS \n \l
Install applications in container
For demonstrational purposes two containers, one with an Ubuntu image and the second with Debian will be launched. An iperf server will run on the Ubuntu image and a client on the Debian image and a bandwidth will be performed between them.
Ubuntu image
Before progressing further it is imperative that APT is updated. IProute2 or IPERF is not installed on the image so must be added.
  root@49b5bb9e9b5b:/# apt-get update
  root@49b5bb9e9b5b:/# apt-get install iproute2
  root@49b5bb9e9b5b:/# apt-get install iperf
Check the IP address assigned to this container and run the IPERF server.
  root@49b5bb9e9b5b:/# ip addr | grep 'inet '| grep eth0
      inet 172.17.0.2/16 scope global eth0

  root@49b5bb9e9b5b:/# iperf -s
  ------------------------------------------------------------
  Server listening on TCP port 5001
  TCP window size: 85.3 KByte (default)
  ------------------------------------------------------------
Debian image
Like for the Ubuntu image update the APT repositories and install IPERF, IProute2 is already installed in the image.
  root@17ff9e52b582:/# apt-get update
  root@17ff9e52b582:/# apt-get install iperf
Test the link to the Ubuntu image.
  root@17ff9e52b582:/# iperf -c 172.17.0.2
  ------------------------------------------------------------
  Client connecting to 172.17.0.2, TCP port 5001
  TCP window size:  340 KByte (default)
  ------------------------------------------------------------
  [  3] local 172.17.0.4 port 35337 connected with 172.17.0.2 port 5001
  [ ID] Interval       Transfer     Bandwidth
  [  3]  0.0-10.0 sec  28.1 GBytes  24.2 Gbits/sec
Create a new image after making changes
A new image can be created from a container in which changes were made. Here a new Ubuntu container called ubuntu-iperf is created.
  $ docker commit --author "Diarmuid O'Briain" --message "My new Ubuntu Template" 49b5bb9e9b5b diarmuid/ubuntu-iperf
  sha256:afe36be87a540f8e39e25b9a4bdde383fb125dbbe8b24492d70c443773b1e02f

  $ docker images
  REPOSITORY              TAG                 IMAGE ID            CREATED             SIZE
  diarmuid/ubuntu-iperf   latest              afe36be87a54        27 seconds ago      124.8 MB
  debian                  latest              17ff9e52b582        6 days ago          125.1 MB
  ubuntu                  latest              49b5bb9e9b5b        12 days ago         124.8 MB
Dockerfile
Dockerfile can be used to build new images. The Dockerfile is a set of instructions on how the image should be built. First, create a directory and a Dockerfile. The Dockerfile specifies the base image with the FROM instruction and a series of RUN instructions contain the commands that need to be run on top of the image.
  $ mkdir ~/docker/Debian
  $ cat <<EOM>> ~/docker/Debian/Dockerfile
  > # Training Debian GNU/Linux Dockerfile
  > FROM debian
  > MAINTAINER Diarmuid O'Briain <diarmuid@debmain.org>
  > RUN apt-get update
  > RUN apt-get install -y iperf
  > EOM

  $ cat ~/docker/Debian/Dockerfile
  # Training Debian GNU/Linux Dockerfile
  FROM debian
  MAINTAINER Diarmuid O'Briain <diarmuid@debmain.org>
  RUN apt-get update
  RUN apt-get install -y iperf
The image is then build with a tag to identify who the image belongs to, the repository and an identity tag to differentiate the image from others. The path at the end points to the Dockerfile.
  $ docker build --tag diarmuid/debian-iperf:v2 ~/docker/Debian
  Sending build context to Docker daemon 2.048 kB
  Step 1 : FROM debian
   ---> 1b01529cc499
  Step 2 : MAINTAINER Diarmuid O'Briain <diarmuid@debmain.org>
   ---> Using cache
   ---> 21137da1564d
  Step 3 : RUN apt-get update
   ---> Using cache
   ---> 6834b99be7ee
  Step 4 : RUN apt-get install -y iperf
   ---> Using cache
   ---> 9f41db1a1140
  Successfully built 9f41db1a1140

  $ docker images
  REPOSITORY              TAG       IMAGE ID       CREATED            SIZE
  diarmuid/debian-iperf   v2        9f41db1a1140   20 minutes ago     135.3 MB
  debian                  latest    1b01529cc499   5 days ago         125.1 MB
  ubuntu                  latest    42118e3df429   11 days ago        124.8 MB
Exiting Containers
Exiting a container will put it in an Exited state.
  root@1b01529cc499:/# exit
  exit
  $ docker ps -l
  CONTAINER ID   IMAGE      COMMAND         CREATED        STATUS                       PORTS   NAMES
  1b01529cc499   debian     "/bin/bash"     7 minutes ago  Exited (130) 7 seconds ago           deb1
The container can be restarted with the docker start command and then reattached to it with the docker attach command.
  $ docker start 1b01529cc499
  1b01529cc499

  $ docker ps -l
  CONTAINER ID   IMAGE      COMMAND         CREATED        STATUS                       PORTS   NAMES
  1b01529cc499   debian     "/bin/bash"     9 minutes ago  Up 4 seconds                         deb1

  $ docker attach 1b01529cc499
It is possible to leave the container without it exiting, leave it running using the keystrokes CTRL-P + CTRL-Q. To reattached with the running container again use the docker attach command.
  root@1b01529cc499:/# [CTRL+P+Q]

  $ docker ps -l
  CONTAINER ID   IMAGE      COMMAND         CREATED        STATUS                       PORTS   NAMES
  1b01529cc499   debian     "/bin/bash"     9 minutes ago  Up 27 seconds                        deb1
Tidying up exited containers
When working with Docker for some time the list of exited containers becomes unweildy. They can be removed with the docker rm command individually or in bulk by extracting the list of Container ID's and passing them to the docker rm command with the aid of xargs.
  $ docker ps -a
  CONTAINER ID  IMAGE           COMMAND                  CREATED             STATUS                    PORTS     NAMES
  22dc3a2d3127  debian          "/bin/bash"              16 hours ago        Exited (0) 11 hours ago             debian9
  3df4ba2755c9  6834b99be7ee    "/bin/sh -c 'apt-get "   17 hours ago        Exited (0) 17 hours ago             jolly_gates
  e36246464720  debian          "/bin/bash"              17 hours ago        Exited (0) 16 hours ago             debian4
  17ff9e52b582  debian          "/bin/bash"              18 hours ago        Exited (0) 17 hours ago             debian3
  d9e5b671cca8  debian          "/bin/bash"              18 hours ago        Exited (0) 16 hours ago             debian2
  d4caadada7f4  ubuntu          "/bin/bash"              18 hours ago        Exited (0) 16 hours ago             ubuntu2
  87a36da02033  ubuntu          "/bin/bash"              18 hours ago        Exited (0) 18 hours ago             ubuntu
  64581def7fb2  462fca6e7913    "httpd-foreground"       20 hours ago        Exited (0) 20 hours ago             my-apache-app
  f8af6e0cc47d  c54a2cc56cbb    "/hello"                 21 hours ago        Exited (0) 21 hours ago             dreamy_spence
  87f7a903c63b  c54a2cc56cbb    "/hello"                 21 hours ago        Exited (0) 21 hours ago             prickly_wilson

  $ docker rm 22dc3a2d3127
  22dc3a2d3127


  $ docker ps -a | grep Exit | cut -d ' ' -f 1 | xargs docker rm
  3df4ba2755c9
  e36246464720
  17ff9e52b582
  d9e5b671cca8
  d4caadada7f4
  87a36da02033
  64581def7fb2
  f8af6e0cc47d
  87f7a903c63b

  $ docker ps -a
  CONTAINER ID  IMAGE    COMMAND       CREATED          STATUS         PORTS     NAMES
Mounting a Data Volumes
You can add a data volume to a container using the --volume option during the docker run command. Multiple mounts can be created simply by using multiple --volume options. To demonstrate create a directory ~/docker/Ubuntu2/ with a file in it.
  $ mkdir ~/docker/Ubuntu2
  $ echo "This is a sample text file" >> ~/docker/Ubuntu2/sampleFile.txt
  $ cat  ~/docker/Ubuntu2/sampleFile.txt
  This is a sample text file
When using the docker run command add a mount point /opt/Ubuntu2 in the container mounted to the directory created on the host.
$ docker run --name Ubuntu2 --detach --tty --interactive --volume ~/docker/Ubuntu2:/opt/Ubuntu2 ubuntu
Attach to the container and confirm access to the file on the host.
  $ docker attach 9277c3802f4e

  root@9277c3802f4e:~# cat /opt/Ubuntu2/sampleFile.txt
  This is a sample text file
Mounting a Data Volume as read only by adding :ro at the end of the --volume string.
$ docker run --name Ubuntu2 --detach --tty --interactive --volume ~/docker/Ubuntu2:/opt/Ubuntu2:ro ubuntu
Docker networking
 |
Before starting this section, there are two containers running in two shells on the host.
  $ docker run --name deb1 --detach --tty --interactive debian
  539e0844b2a7485442eaf1c73e4ea228df3dda5cfd8d52295122a7d47795d172

  $ docker run --name deb2 --detach --tty --interactive debian
  f8cd2f240023da32d2357e3197fd38755b7fb0bb609ce6469276a477b2964746

  $ docker ps -a
  CONTAINER ID  IMAGE    COMMAND       CREATED          STATUS         PORTS     NAMES
  f8cd2f240023  debian   "/bin/bash"   12 seconds ago   Up 12 seconds            deb2
  539e0844b2a7  debian   "/bin/bash"   30 minutes ago   Up 22 minutes            deb1
docker0
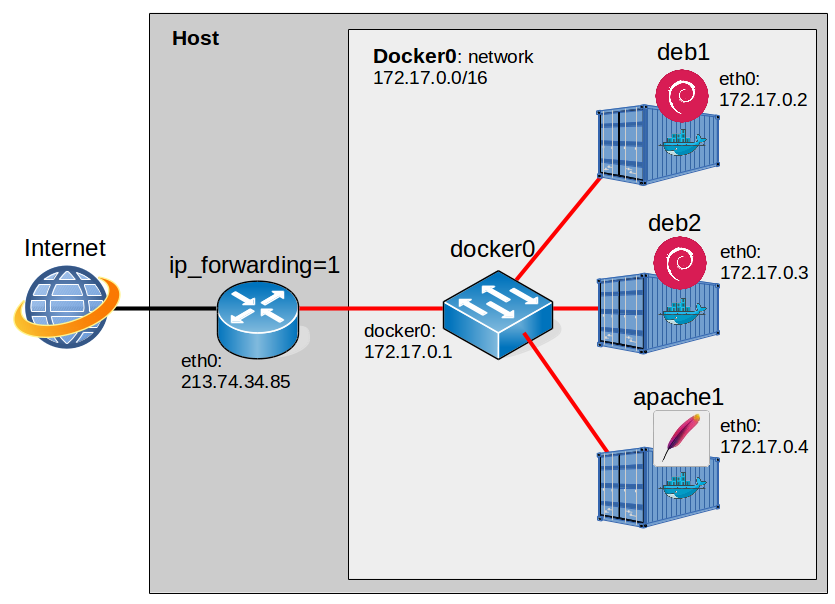
When Docker is installed on the host it adds a bridge, docker0 for the containers as part of the installation. Docker adds a free range of IP addresses from the RFC 1918 for IPv4, and RFC 4193 IPv6 to the bridge to be used for containers. When a new container is added Docker selects a free IP address from the range and assigns it to the container's eth0 interface and the docker0 IP address as the default gateway. Using the docker0 IP address and the subnet Docker manipulates the hosts filtering and NAT tables to ensure that containers have access to the public network on the hosts physical interface. This bridge can be viewed by the hosts brctl show command. Also on show are the two interfaces which were added for each of the containers created.
  $ sudo brctl show
  [sudo] password for debian:
  bridge name     bridge id            STP enabled     interfaces
  docker0         8000.0242e243f55b    no              veth2957c1c
                                                       veth46911d0
Docker connects containers to the docker0 bridge by default. On the host, this bridge can be seen to be the master for the container interfaces veth2957c1c and veth46911d0 confirming what was shown with the brctl show command. The bridge also has an IP address associated with it 172.17.0.1/16.
  $ ip addr list
  1: lo: <LOOPBACK,UP,LOWER_UP> mtu 65536 qdisc noqueue state UNKNOWN group default
      link/loopback 00:00:00:00:00:00 brd 00:00:00:00:00:00
      inet 127.0.0.1/8 scope host lo
         valid_lft forever preferred_lft forever
      inet6 ::1/128 scope host
         valid_lft forever preferred_lft forever
  2: eth0: <BROADCAST,MULTICAST,UP,LOWER_UP> mtu 1500 qdisc pfifo_fast state UP group default qlen 1000
      link/ether 08:00:27:c8:30:2c brd ff:ff:ff:ff:ff:ff
      inet 192.168.10.4/24 brd 192.168.10.255 scope global eth0
         valid_lft forever preferred_lft forever
      inet6 fe80::a00:27ff:fec8:302c/64 scope link
         valid_lft forever preferred_lft forever
  3: docker0: <BROADCAST,MULTICAST,UP,LOWER_UP> mtu 1500 qdisc noqueue state UP group default
      link/ether 02:42:e2:43:f5:5b brd ff:ff:ff:ff:ff:ff
      inet 172.17.0.1/16 scope global docker0
         valid_lft forever preferred_lft forever
      inet6 fe80::42:e2ff:fe43:f55b/64 scope link
         valid_lft forever preferred_lft forever
  7: veth2957c1c: <BROADCAST,MULTICAST,UP,LOWER_UP> mtu 1500 qdisc noqueue master docker0 state UP group default
      link/ether 26:80:9e:ae:d5:7b brd ff:ff:ff:ff:ff:ff
      inet6 fe80::2480:9eff:feae:d57b/64 scope link
         valid_lft forever preferred_lft forever
  9: veth46911d0: <BROADCAST,MULTICAST,UP,LOWER_UP> mtu 1500 qdisc noqueue master docker0 state UP group default
      link/ether 3e:6d:d2:2c:2f:96 brd ff:ff:ff:ff:ff:ff
      inet6 fe80::3c6d:d2ff:fe2c:2f96/64 scope link
         valid_lft forever preferred_lft forever
With the docker network commands it is possible to inspect this docker0 bridge further. Using the command docker network inspect bridge it can be seen that the network 172.17.0.0/16 has been assigned to containers, with the docker0 IP Address 172.17.0.1 as the gateway. It is also possible to see the IP addresses assigned to the individual containers. In the options section IP masquerade ip_masquerade or Network Address Translation (NAT) is enabled to insure the containers can access the network on the host physical network.
  $ docker network ls
  NETWORK ID          NAME                DRIVER              SCOPE
  5e4b1f069bba        bridge              bridge              local
  24e4301c2c59        host                host                local
  1b9f6273f6eb        none                null                local

  $ docker network inspect 5e4b1f069bba
  [
      {
          "Name": "bridge",
          "Id": "5e4b1f069bbacb39a30854d45dbd85cafc537b1bcc42ab6dc568a00b6cf5911e",
          "Scope": "local",
          "Driver": "bridge",
          "EnableIPv6": false,
          "IPAM": {
              "Driver": "default",
              "Options": null,
              "Config": [
                  {
                      "Subnet": "172.17.0.0/16",
                      "Gateway": "172.17.0.1"
                  }
              ]
          },
          "Internal": false,
          "Containers": {
              "539e0844b2a7485442eaf1c73e4ea228df3dda5cfd8d52295122a7d47795d172": {
                  "Name": "deb1",
                  "EndpointID": "6aeccd20f2ae892721e1c6b9bc0af6d2842eb0c18f430bcb0e594c34fa706af2",
                  "MacAddress": "02:42:ac:11:00:02",
                  "IPv4Address": "172.17.0.2/16",
                  "IPv6Address": ""
              },
              "f8cd2f240023da32d2357e3197fd38755b7fb0bb609ce6469276a477b2964746": {
                  "Name": "deb2",
                  "EndpointID": "4f1fc9094995aac5e369364625a90dd11465a56c079b80413d29a888676767e3",
                  "MacAddress": "02:42:ac:11:00:03",
                  "IPv4Address": "172.17.0.3/16",
                  "IPv6Address": ""
              }
          },
          "Options": {
              "com.docker.network.bridge.default_bridge": "true",
              "com.docker.network.bridge.enable_icc": "true",
              "com.docker.network.bridge.enable_ip_masquerade": "true",
              "com.docker.network.bridge.host_binding_ipv4": "0.0.0.0",
              "com.docker.network.bridge.name": "docker0",
              "com.docker.network.driver.mtu": "1500"
          },
          "Labels": {}
      }
  ]
These IP address assignments can be confirmed first by inspecting the containers and then from within the individual containers.
  $ docker inspect 539e0844b2a7 | grep '"IPAddress":'
              "IPAddress": "172.17.0.2",
                      "IPAddress": "172.17.0.2",

  $ docker inspect f8cd2f240023 | grep '"IPAddress":'
              "IPAddress": "172.17.0.3",
                      "IPAddress": "172.17.0.3",

  root@539e0844b2a7:/# ip addr list
  1: lo: <LOOPBACK,UP,LOWER_UP> mtu 65536 qdisc noqueue state UNKNOWN group default
      link/loopback 00:00:00:00:00:00 brd 00:00:00:00:00:00
      inet 127.0.0.1/8 scope host lo
         valid_lft forever preferred_lft forever
      inet6 ::1/128 scope host
         valid_lft forever preferred_lft forever
  6: eth0: <BROADCAST,MULTICAST,UP,LOWER_UP> mtu 1500 qdisc noqueue state UP group default
      link/ether 02:42:ac:11:00:02 brd ff:ff:ff:ff:ff:ff
      inet 172.17.0.2/16 scope global eth0
         valid_lft forever preferred_lft forever
      inet6 fe80::42:acff:fe11:2/64 scope link
         valid_lft forever preferred_lft forever

  root@f8cd2f240023:/# ip addr list
  1: lo: <LOOPBACK,UP,LOWER_UP> mtu 65536 qdisc noqueue state UNKNOWN group default
      link/loopback 00:00:00:00:00:00 brd 00:00:00:00:00:00
      inet 127.0.0.1/8 scope host lo
         valid_lft forever preferred_lft forever
      inet6 ::1/128 scope host
         valid_lft forever preferred_lft forever
  8: eth0: <BROADCAST,MULTICAST,UP,LOWER_UP> mtu 1500 qdisc noqueue state UP group default
      link/ether 02:42:ac:11:00:03 brd ff:ff:ff:ff:ff:ff
      inet 172.17.0.3/16 scope global eth0
         valid_lft forever preferred_lft forever
      inet6 fe80::42:acff:fe11:3/64 scope link
         valid_lft forever preferred_lft forever
IP Tables
Docker manipulates the host packet filtering and NAT masquerade tables. In this case in the POSTROUTING Chain adding a MASQUERADE rule for all protocols from the 172.17.0.0/16 subnet to anywhere allows the containers access to the Internet.
  $ sudo iptables --list --ipv4 --table nat
  Chain PREROUTING (policy ACCEPT)
  target     prot opt source               destination
  DOCKER     all  --  anywhere             anywhere             ADDRTYPE match dst-type LOCAL

  Chain INPUT (policy ACCEPT)
  target     prot opt source               destination

  Chain OUTPUT (policy ACCEPT)
  target     prot opt source               destination
  DOCKER     all  --  anywhere            !loopback/8           ADDRTYPE match dst-type LOCAL

  Chain POSTROUTING (policy ACCEPT)
  target     prot opt source               destination
  MASQUERADE  all  --  172.17.0.0/16        anywhere

  Chain DOCKER (2 references)
  target     prot opt source               destination
  RETURN     all  --  anywhere             anywhere
Connectivity can be confirmed between the containers and to the Internet.
  root@f8cd2f240023:/# ping -c1 172.17.0.2
  PING 172.17.0.2 (172.17.0.2): 56 data bytes
  64 bytes from 172.17.0.2: icmp_seq=0 ttl=64 time=0.054 ms
  --- 172.17.0.2 ping statistics ---
  1 packets transmitted, 1 packets received, 0% packet loss
  round-trip min/avg/max/stddev = 0.054/0.054/0.054/0.000 ms

  root@f8cd2f240023:/# ping -c1 8.8.8.8
  PING 8.8.8.8 (8.8.8.8): 56 data bytes
  64 bytes from 8.8.8.8: icmp_seq=0 ttl=56 time=591.236 ms
  --- 8.8.8.8 ping statistics ---
  1 packets transmitted, 1 packets received, 0% packet loss
  round-trip min/avg/max/stddev = 591.236/591.236/591.236/0.000 ms
Port binding
What of port binding. To consider it recreate the HTTP webserver from earlier, this time make the port on the host 8080.
  $ docker run --name apache1 --detach --publish 8080:80 --volume /home/debian/docker:/usr/local/apache2/htdocs/ httpd
  11babc86c51664464e73be12b250170ac14d8c77557cf85457c0eb6e7047f12f
Now re-review the IPTABLES NAT masquerade table. A Specific entry for Transmission Control Protocol (TCP) traffic received on port 8080 is added to the DOCKER chain as a Destination NAT (DNAT) rule to redirect to the container's port 80.
  $ sudo iptables --list --numeric --table nat
  Chain PREROUTING (policy ACCEPT)
  target     prot opt source               destination
  DOCKER     all  --  0.0.0.0/0            0.0.0.0/0            ADDRTYPE match dst-type LOCAL

  Chain INPUT (policy ACCEPT)
  target     prot opt source               destination

  Chain OUTPUT (policy ACCEPT)
  target     prot opt source               destination
  DOCKER     all  --  0.0.0.0/0           !127.0.0.0/8          ADDRTYPE match dst-type LOCAL

  Chain POSTROUTING (policy ACCEPT)
  target     prot opt source               destination
  MASQUERADE  all  --  172.17.0.0/16        0.0.0.0/0
  MASQUERADE  tcp  --  172.17.0.4           172.17.0.4           tcp dpt:80

  Chain DOCKER (2 references)
  target     prot opt source               destination
  RETURN     all  --  0.0.0.0/0            0.0.0.0/0
  DNAT       tcp  --  0.0.0.0/0            0.0.0.0/0            tcp dpt:8080 to:172.17.0.4:80

