|
| EI4LF | Primers | LoRa Satellite |
Welcome to the EI4LF amateur radio page |
Build a LoRa Satellite Ground StationLong Range (LoRa) Radio CommunicationLoRa is a wireless data communication technology that uses a radio modulation technique that allows long range communication of low data. It is highly immune to interference, with minimal power consumption. This facilitates long distance communication with low power requirements. LoRa uses unlicensed frequencies as follows:
LoRa long range and low power features, makes it perfect for battery-operated sensors and low-power applications in:
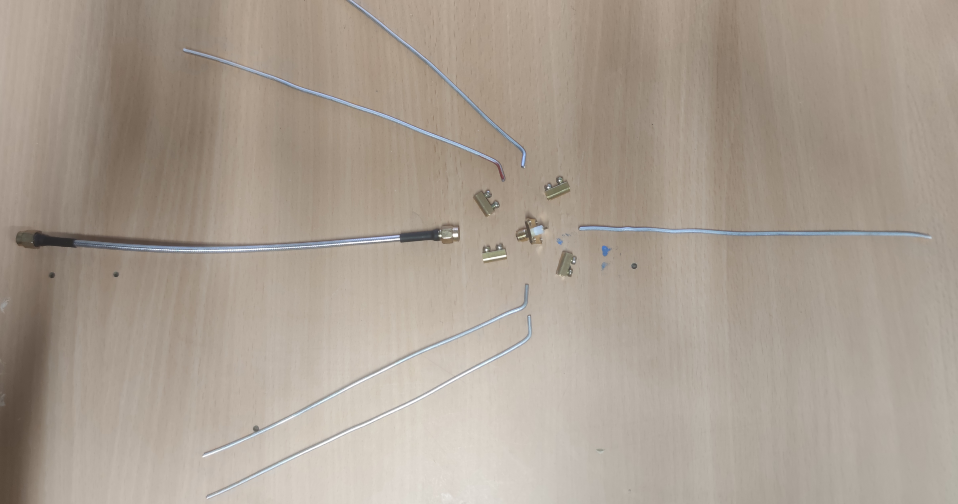
This primer is focused on using LoRa to connect to satellites, or balloons, at ≈ 433MHz. Tiny Ground Station (TinyGS)TinyGS is an open network of Ground Stations distributed around the world to receive and operate LoRa satellites, weather probes and other flying objects, using cheap and versatile modules. The project was inspired by the FossaSAT-1 LoRa satellite. Today there are many satellites that are listed on the TinyGS website. With a TinyGS ground station, data from a variety of sources, such as CubeSats, can be received. 1⁄4-wave Ground plane AntennaThis antenna is an unbalanced quarter wave monopole. Mounted on the perfect ground will present an impedance of 36Ω however, by adding four to six radials, angled at 45°, will increase the impedance to 50Ω which both matches the LoRa board impedance and lowers the radiation angle towards the horizon making communications with satellites more favourable.
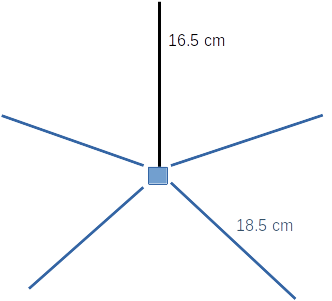
Given the frequency of 433MHz Velocity factor (VF) in vacuum matches the speed of light, and therefore has a vp of 1.0; however, in air the VP drops slightly to a figure between 0.95 and 0.99. For the purpose of this primer 0.95 is employed. For the monopole (mp) the formula is: mp = λ × 1⁄4 × vf and the rp = mp × 1.12 (12% longer than mp) So, for 433 MHz mp = 300⁄433 × 1⁄4 × 0.95 = 0.1645m = 16.5cm and the rp = 16.5 × 1.12 = 18.5cm Building the Antenna
Follow these steps to build the antenna:
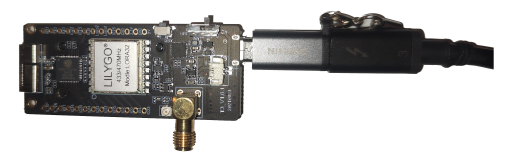
TTGO LoRa32 BoardThe TTGO LoRa32 V2 is an inexpensive (< €15) ESP32 radio board with a 0.96 Inch Organic Light-Emitting Diode (OLED) and a single 2.4 GHz Wi-Fi-and-Bluetooth combo Wi-Fi Module that supports the LOng RAnge (LoRa) protocol. Load the firmware onto the TTGO
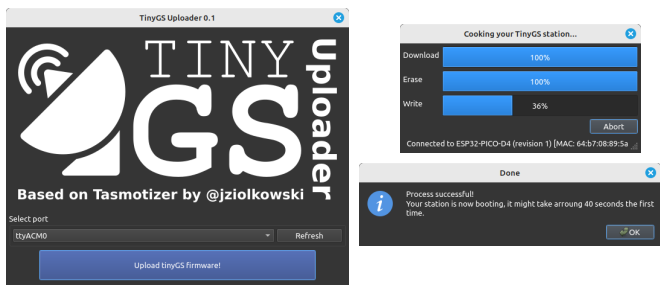
From TinyGS releases download the firmware and the tinyGS uploader appropriate to your computer operating system.
~$ chmod +x TinyGS_Uploader_LINUX Connect the Micros USB port on the ESP32 Board to the USB port on the computer. Check the serial interface name that is given by the Operating System to this connection. ~$ dmesg | grep tty [ 0.342466] printk: console [tty0] enabled [ 7.611983] dw-apb-uart.1: ttyS4 at MMIO 0x604110f000 (irq = 20, base_baud = 115200) is a 16550A [11335.129988] cdc_acm 1-7:1.0: ttyACM0: USB ACM device Run the TinyGS loader, select the identified port and click Upload tinyGS firmware! . ~$ ./TinyGS_Uploader_LINUX Serial port /dev/ttyACM0 Connecting.... Chip is ESP32-PICO-D4 (revision 1) Features: WiFi, BT, Dual Core, 240MHz, Embedded Flash, VRef calibration in efuse, Coding Scheme None Crystal is 40MHz Uploading stub... Running stub... Stub running... Configuring flash size... Auto-detected Flash size: 4MB Erasing flash (this may take a while)... Chip erase completed successfully in 4.1s Compressed 1286672 bytes to 705716... Wrote 1286672 bytes (705716 compressed) at 0x00000000 in 61.9 seconds (effective 166.2 kbit/s)... Hash of data verified. Leaving... Hard resetting via RTS pin...
Get a TinyGS AccountThe TinyGS project uses the Telegram messaging app as a conduit for distributing unique usernames and passwords. Install the app on your preferred platform and connect to the @tinygs_personal_bot (https://t.me/tinygs_personal_bot). The automated bot accepts the following commands:
Create an MQ Telemetry Transport (MQTT) account. MQTT is a lightweight, publish-subscribe, machine-to-machine network protocol for message queue/message queuing service. Issue the command: A unique Username and password are then shared, these are private, do not share them.
Configure the LoRa Ground StationAs WiFi is not configured the TTGO board will spin up a WiFi network that can be connected with to configure it. Connect to the local WiFi network on the Lola board with the laptop and browse to the default IP address that is presented to the computer.~$ ip route | grep default default via 192.168.4.1 dev wlp82s0 proto dhcp metric 20600 192.168.4.0/24 dev wlp82s0 proto kernel scope link src 192.168.4.2 metric 600  Select
Configure parameters
and make the following changes:
System configuration
Select
Configure parameters
and make the following changes:
System configuration
MQTT credentials
ObservationSelect Restart Station and change the computer back to the same WiFi network that has been configured on the LoRa ground station.
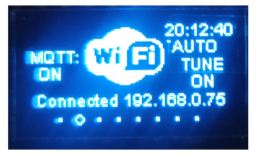
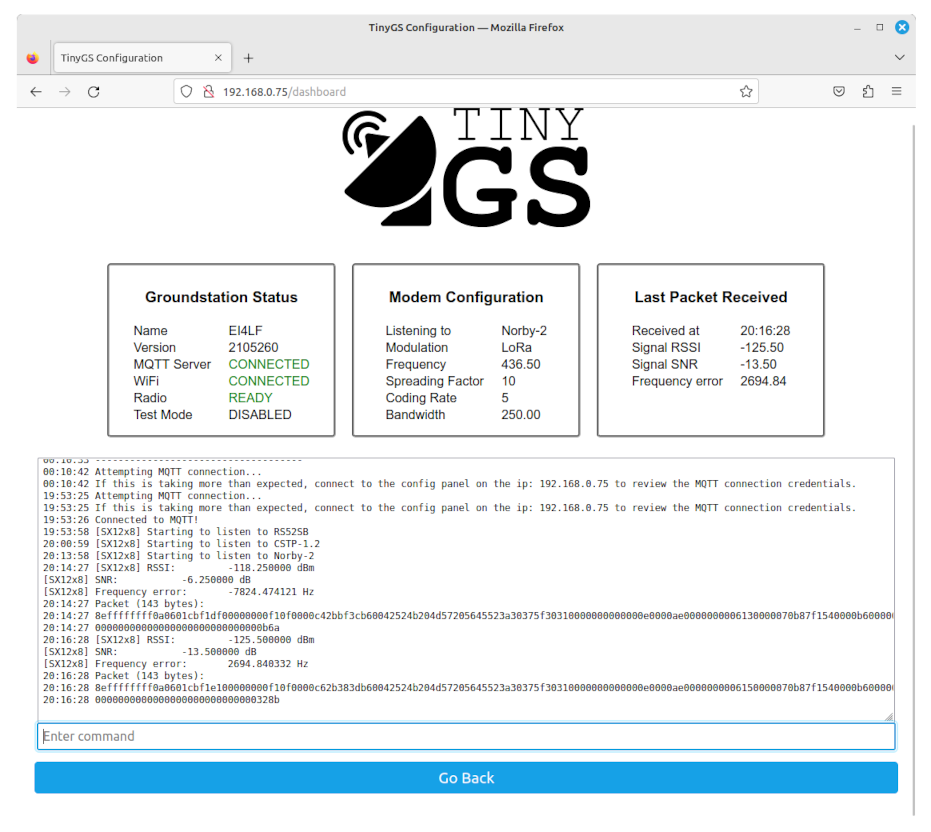
The IP assigned to the LoRa ground station will appear on the screen on the TTGO board as is illustrated above. Browse to it, login with the user Select Station Dashboard and the following dashboard is displayed. After some time elapses the LoRa Ground Station will start to receive data. It can be seen from the figure below that data has been received from the Norby-2 satellite.
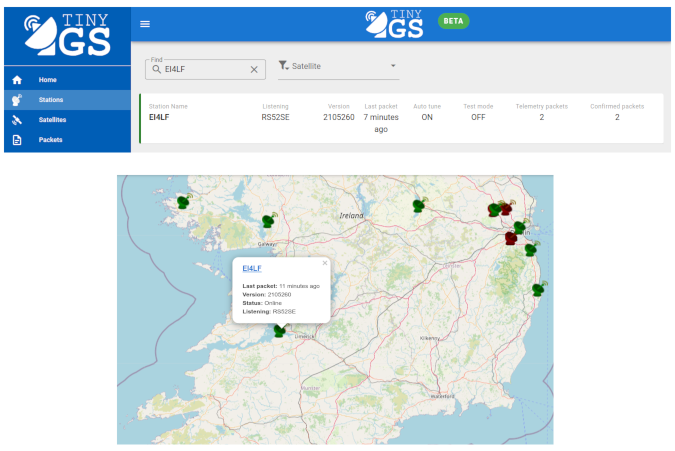
The LoRa Ground Stations connection can also be seen in the TinyGS logs as illustrated in the figure below and the station will also appear on the global map as illustrated below also.
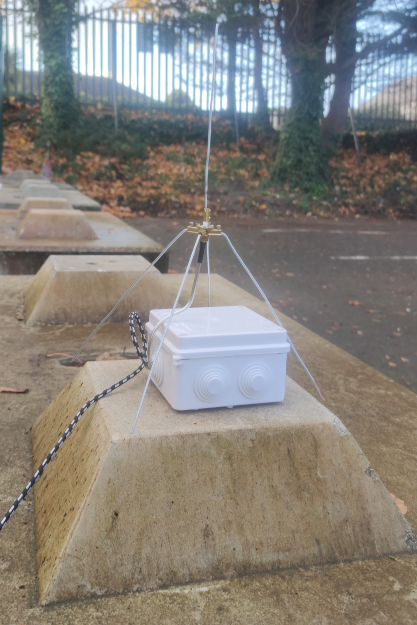
Here is a view of the completed LoRa Ground Station.
The unit was set up inside the window of an upstairs room and left it overnight. Looking at the logs the ground station received telemetry from seven different satellites overnight. ~$ cat 20231113-LoRa_log.txt | grep "listen to" 00:15:58 [SX12x8] Starting to listen to FEES 00:41:59 [SX12x8] Starting to listen to GaoFen-7 00:53:59 [SX12x8] Starting to listen to FossaSat-2E13 01:49:09 [SX12x8] Starting to listen to FEES 02:06:10 [SX12x8] Starting to listen to Norbi 02:15:10 [SX12x8] Starting to listen to GaoFen-7 02:29:10 [SX12x8] Starting to listen to FossaSat-2E13 03:30:10 [SX12x8] Starting to listen to Norbi 03:53:09 [SX12x8] Starting to listen to GaoFen-7 05:05:09 [SX12x8] Starting to listen to Norbi 07:35:10 [SX12x8] Starting to listen to Norby-2 07:48:10 [SX12x8] Starting to listen to RS52SD 07:50:10 [SX12x8] Starting to listen to RS52SE Consider the last on the list, RS52SE, from the illustration below it can be observed that the satellite is centred over Greece currently. Waiting a few minutes and checking again the satellite has tracked down over Chad as it heads across Africa while Flexible Experimental Embedded Satellite (FEES), then RS52SG and RS52SV track over Europe in its wake.
Taking FEES as an example, this is a self funded, collaborative project by the Italian GP Advanced Projects aimed at developing a low-cost platform for In Orbit Testing and Validation of Electronics components that was launched on 22 March 2021. The whole 0.3kg satellite, including the electronics boards, is entirely design and manufactured within the project and is a 10cm × 10cm × 3cm form factor. The satellite was developed to obtain an in-orbit qualification of both an attitude determination architecture and a commercial GPS receiveras a means to test a low cost Ultra High Frequency (UHF) receivers with advanced modulation protocols. TinyGS Application Programming Interface (API)Find your Telegram ID
In the Telegram app go to Hi! Welcome to @raw_data_bot! Help: /help Bot news: @idbotnews P.S. Your ID: 6104953407 Either browse to the URL Here is an example working to the data stored from my station:
~$ curl https://api.tinygs.com/v1/stations?userId=6104953407; echo
[{"name":"EI4LF","userId":6104953407,"lastSeen":1700401220624,"version":2105260,"location":[52.706,-8.882],
Create a log fileTo create a log file to record the data at regular intervals then write a program to access and record the data regularly. Here is a simple program to do so. ~$ cat lora_station.py #!/usr/bin/env python3 import requests import os import time __author__ = "Diarmuid O'Briain" __copyright__ = "Copyright 2023, Limerick Clare Amateur Radio Club" __licence__ = "European Union Public Licence v1.2" __version__ = "1.0" telegram_id = "<Telegram-ID>" API = f"https://api.tinygs.com/v1/stations?userId={telegram_id}" LOG = "/path/to/lora_station.log" TIME=5 # Wait for 5 minutes def access_api(): """Access the TinyGS API""" # Download the data from the URL response = requests.get(API) # Check if the download was successful if response.status_code == 200: # Append the data to the file with open(LOG, mode="a") as fh: fh.write(response.text) fh.write("\n\n") else: print(f"Error downloading data: {response.status_code}") if __name__ == "__main__": while True: access_api() time.sleep(TIME*60) # Time in seconds Replace On GNU/Linux run the program as follows:
~$ python3 lora_station.py
On Microsoft Windows, install Python and then run the program as follows:
~$ python lora_station.py
The script will now run every 5 minutes, downloading the data from the specified URL and appending it to the lora_station.py file. StatisticsAnother interesting API is the statistics page associated with each station.
The format for this is: Replace For example:
~$ curl https://api.tinygs.com/v1/station/EI4LF@6104953407/statistics;echo
[{"day":1699747200000,"frames":[{"satellite":"Norby-2","satPos":{"lat":49.22370301843874,"lng":1.9571704230621536,
"alt":560.0525226914715}},{"satellite":"Norby-2","satPos":{"lat":56.62055399830903,"lng":-1.3342836354969956,
"alt":559.9374356259186}}],"nFrames":2,"telemetryPkt":2},{"day":1699833600000,"frames":[{"satellite":"GaoFen-7",
"satPos":{"lat":47.24546082195436,"lng":-0.7771238945459531,"alt":526.0683497768332}},{"satellite":"GaoFen-7",
"satPos":{"lat":48.17442515433458,"lng":-1.1139023242579351,"alt":526.1871325140437}}]
Commands and TransmittingIf you have an amateur radio licence you can transmit test messages to the satellites also. Select: Configure parameters and make the following changes to enable transmission. Board config
Here are the available commands, in the command prompt, of the TinyGS. ------------- Controls ------------- t - change the test mode and restart e - erase board config and reset b - reboot the board p - send test packet to nearby stations (to check transmission) Select “p” to transmit. COMMAND: p 11:20:27 Sending test packet to nearby stations!.I haven’t had much luck with receiving a response to transmissions yet, I guess I need to play with the antenna further and bring it outside. |
  |
Copyright © 2026 C²S Consulting |