Deep dive into networking through Scapy
Last updated: 08-02-2021 12:24
| Scapy VM (lubuntu)...... |  |
............ |
Scapy VM (xubuntu)...... | |
............ |
............ |
| Create a Scapy VM...... |  |
............ |
DNS Lookup Script...... |  |
- Python Scapy
- Install scapy
- Run the scapy interactive shell
- Address Resolution Protocol (ARP)
- Ethernet frames
- Create IP packet
- Segment headers at layer 4
- Create a combined frame with packet and segment
- Sending packets
- Domain Name System (DNS)
- Access an application
- A final simple browser program
1. Python Scapy
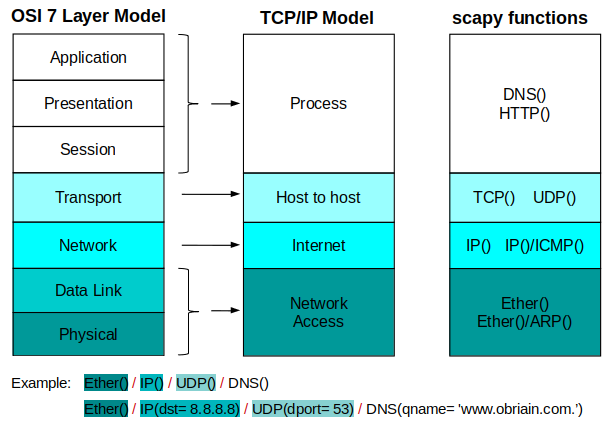
Scapy is a powerful interactive packet manipulation program and python module. It has an interactive shell through iPython. It can be used to build or decode packets, send them to the wire and trap responses. This tutorial is an introduction to scapy used to explain computer networking beyond the superficial level. On computer networking courses it is common to use tools like tcpdump, wireshark and tshark to allow students understand what passes on the wire between hosts. This tutorial takes this a step further and allows the student to build frames and packets, put them on the wire and observe the responses. The diagram maps the Open System Interconnection (OSI) 7 layer and Transmission Control Protocol/Internet Protocol (TCP/IP), Department of Defence (DoD), models to functions in scapy used to build frames and packets. As you can see these function names match the protocols expected at these layers.
2. Install scapy
This tutorial was developed on a GNU/Linux Ubuntu 18.04 platform and using Python3; however, as scapy is Python based it can be adapted for most platforms. Having said that it is probably best exercised on a GNU/Linux Virtual Machine (VM).
Installation of scapy on GNU/Linux is as simple as:
  ~$ sudo apt-get install texlive
  ~$ pip3 install --pre scapy[complete]
  ~$ pip3 install scapy-http
3. Run the scapy interactive shell
As the tutorial uses Python3, the version of scapy matches, so launch scapy3.
  ~$ scapy3

                       aSPY//YASa
               apyyyyCY//////////YCa       |
              sY//////YSpcs  scpCY//Pp     | Welcome to Scapy
   ayp ayyyyyyySCP//Pp           syY//C    | Version 2.4.3
   AYAsAYYYYYYYY///Ps              cY//S   |
           pCCCCY//p          cSSps y//Y   | https://github.com/secdev/scapy
           SPPPP///a          pP///AC//Y   |
                A//A            cyP////C   | Have fun!
                p///Ac            sC///a   |
                P////YCpc           A//A   | Wanna support scapy? Rate it on
         scccccp///pSP///p          p//Y   | sectools!
        sY/////////y  caa           S//P   | http://sectools.org/tool/scapy/
         cayCyayP//Ya              pY/Ya   |             -- Satoshi Nakamoto
          sY/PsY////YCc          aC//Yp    |
           sc  sccaCY//PCypaapyCP//YSs
                    spCPY//////YPSps
                         ccaacs
                                         using IPython 7.14.0
  >>>
4. Address Resolution Protocol (ARP)
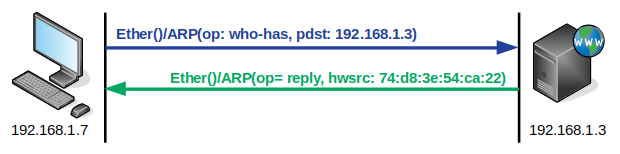
Start the tutorial with a simple ARP request for a known IP address on the same network.
Creating a basic Ethernet frame at layer 2 and review.
  >>> my_frame = Ether()


  >>> my_frame.show()
  WARNING: Mac address to reach destination not found. Using broadcast.
  ###[ Ethernet ]###
    dst= ff:ff:ff:ff:ff:ff
    src= 74:d8:3e:54:ca:22
    type= 0x9000
Now create a layer 2 ARP request for IP address 192.168.1.3 and review.
  >>> my_arp = ARP(pdst='192.168.1.3')


  >>> my_arp.show()
  ###[ ARP ]###
    hwtype= 0x1
    ptype= IPv4
    hwlen= None
    plen= None
    op= who-has
    hwsrc= 74:d8:3e:54:ca:22
    psrc= 192.168.1.7
    hwdst= 00:00:00:00:00:00
    pdst= 192.168.1.3
Bring the two together in a frame.
>>> arp_req = my_frame/my_arp
Review the new loaded frame.
  >>> arp_req.summary()
  'Ether / ARP who has 192.168.1.3 says 192.168.1.7'


  >>> arp_req.show()
  ###[ Ethernet ]###
    dst= 34:e6:ad:05:51:bd
    src= 74:d8:3e:54:ca:22
    type= ARP
  ###[ ARP ]###
       hwtype= 0x1
       ptype= IPv4
       hwlen= None
       plen= None
       op= who-has
       hwsrc= 74:d8:3e:54:ca:22
       psrc= 192.168.1.7
       hwdst= 00:00:00:00:00:00
       pdst= 192.168.1.3
Send the frame on the wire and trap the response. To send layer 2 frames the sendp() function is employed. Review the help on the sendp function first.
  >>> help(sendp)

  Help on function sendp in module scapy.sendrecv:

  sendp(x, inter=0, loop=0, iface=None, iface_hint=None, count=None, verbose=None, realtime=None, return_packets=False, socket=None, *args, **kargs)
      Send packets at layer 2
      sendp(packets, [inter=0], [loop=0], [iface=None], [iface_hint=None], [count=None], [verbose=conf.verb],  # noqa: E501
            [realtime=None], [return_packets=False], [socket=None]) -> None
Send the frame on the wire, but in another terminal setup tcpdump to capture the frame on the wire.
  ~$ sudo tcpdump -n -i wlp82s0 arp
  tcpdump: verbose output suppressed, use -v or -vv for full protocol decode
  listening on wlp82s0, link-type EN10MB (Ethernet), capture size 262144 bytes
Now send the ARP query.
  >>> sendp(arp_req)
  .
  Sent 1 packets.
Review what happened in the tcpdump window.
  08:34:13.549255 ARP, Request who-has 192.168.1.3 tell 192.168.1.7, length 28
  08:34:13.551500 ARP, Reply 192.168.1.3 is-at 34:e6:ad:05:51:bd, length 28
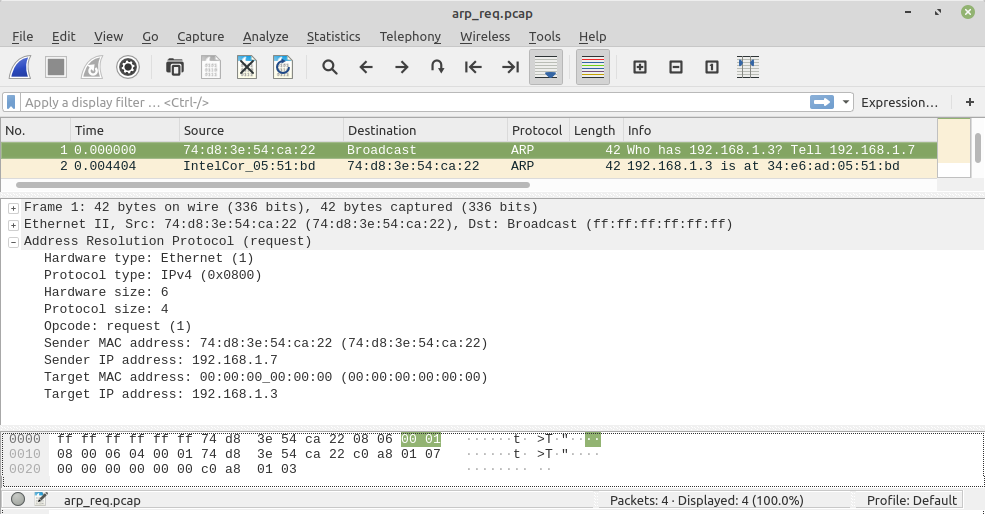
Repeat the exercise but this time trap the output to a pcap file (arp_req.pcap) for later use. Use Control-C to stop when the frames have been sent.
  ~$ sudo tcpdump -w arp_req.pcap -n -i wlp82s0 arp
  tcpdump: listening on wlp82s0, link-type EN10MB (Ethernet), capture size 262144 bytes


  >>> sendp(arp_req)
  .
  Sent 1 packets.


  ^C4 packets captured
  4 packets received by filter
  0 packets dropped by kernel
Open the arp_req.pcap with wireshark to review. Run wireshark and File => Open:
4.1. Notes
While the tutorial has described multiple steps, building first an Ethernet frame, then ARP data at layer 2, it could have been made in a single step as follows:
  >>> arp_req = Ether()/ARP(pdst='192.168.1.3')
  >>> arp_req.summary()
  'Ether / ARP who has 192.168.1.3 says 192.168.1.7'
or even as an empty shell of a frame and the detail added, or edited, later using a field name and value.
  >>> arp_req = Ether()/ARP()
  >>> arp_req.summary()
  'Ether / ARP who has 0.0.0.0 says 192.168.1.7'


  >>> arp_req[ARP].pdst = "192.168.1.3"
  >>> arp_req.summary()
  'Ether / ARP who has 192.168.1.3 says 192.168.1.7'
5. Ethernet frames
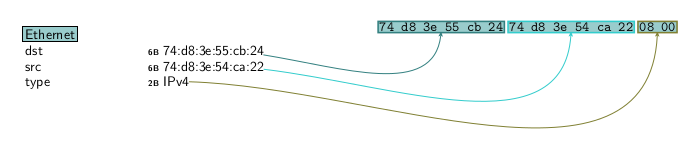
After the ARP introduction the tutorial moves to focus on Ethernet frames at layer 2. Create an Ethernet frame as follows:
  >>> Ether(dst='74:d8:3e:55:cb:24', type=0x0800)
  <Ether  dst=74:d8:3e:55:cb:24 type=IPv4 |>
Assign the Ethernet frame to the variable my_frame.
  >>> my_frame = Ether(dst='74:d8:3e:55:cb:24', type=0x0800)


  >>> my_frame
  <Ether  dst=74:d8:3e:55:cb:24 type=IPv4 |>


  >>> ls(my_frame)
  dst        : DestMACField                        = '74:d8:3e:55:cb:24' (None)
  src        : SourceMACField                      = '74:d8:3e:54:ca:22' (None)
  type       : XShortEnumField                     = 2048            (36864)
This creates a special Python scapy, Layer2, Ethernet variable type.
  >>> type(my_frame)
  scapy.layers.l2.Ether
Analyse the frame further.
  >>> my_frame.summary()
  '74:d8:3e:54:ca:22 > 74:d8:3e:55:cb:24 (IPv4)'


  >>> my_frame.show()
  ###[ Ethernet ]###
    dst= 74:d8:3e:55:cb:24
    src= 74:d8:3e:54:ca:22
    type= IPv4


  >>> my_frame.show2()
  ###[ Ethernet ]###
    dst= 74:d8:3e:55:cb:24
    src= 74:d8:3e:54:ca:22
    type= IPv4


  >>> raw(my_frame)
  b't\xd8>U\xcb$t\xd8>T\xca"\x08\x00'


  >>> hexdump(my_frame)
  0000  74 D8 3E 55 CB 24 74 D8 3E 54 CA 22 08 00        t.>U.$t.>T."..
  >>>
Get a visual display of the frame from scapy.
>>> my_frame.pdfdump()
6. Create IP packet
Moving to layer 3, create an IP packet as follows:
  >>> IP(dst='192.168.1.1')
  <IP  dst=192.168.1.1 |>
Assign it to a variable.
>>> my_packet = IP(dst='192.168.1.1')
What type is the packet? Another special variable type for IP packets.
  >>> type(my_packet)
  scapy.layers.inet.IP
Now analyse the packet in a similar way as was carried out on the frame earlier.
  >>> ls(my_packet)
  version    : BitField (4 bits)                   = 4               (4)
  ihl        : BitField (4 bits)                   = None            (None)
  tos        : XByteField                          = 0               (0)
  len        : ShortField                          = None            (None)
  id         : ShortField                          = 1               (1)
  flags      : FlagsField (3 bits)                 = <Flag 0 ()>     (<Flag 0 ()>)
  frag       : BitField (13 bits)                  = 0               (0)
  ttl        : ByteField                           = 64              (64)
  proto      : ByteEnumField                       = 0               (0)
  chksum     : XShortField                         = None            (None)
  src        : SourceIPField                       = '192.168.1.7'   (None)
  dst        : DestIPField                         = '192.168.1.1'   (None)
  options    : PacketListField                     = []              ([])


  >>> my_packet.summary()
  '192.168.1.7 > 192.168.1.1 hopopt'


  >>> my_packet.show()
  ###[ IP ]###
    version= 4
    ihl= None
    tos= 0x0
    len= None
    id= 1
    flags=
    frag= 0
    ttl= 64
    proto= hopopt
    chksum= None
    src= 192.168.1.7
    dst= 192.168.1.1
    \options\

  >>> raw(my_packet)
  b'E\x00\x00\x14\x00\x01\x00\x00@\x00\xf7\x90\xc0\xa8\x01\x07\xc0\xa8\x01\x01'

  >>> hexdump(my_packet)
  0000  45 00 00 14 00 01 00 00 40 00 F7 90 C0 A8 01 07  E.......@.......
  0010  C0 A8 01 01
7. Segment headers at layer 4
7.1. Create a TCP segment
Now moving further up the DoD model, create a TCP segment at layer 4, review it. Again there is a special Python scapy variable type for TCP segments.
  >>> TCP(dport=80)/"GET 192.168.1.3 HTTP/1.0 \n\n"
  <TCP  dport=http |<Raw  load='GET 192.168.1.3 HTTP/1.0 \n\n' |>>


  >>> my_tcp = TCP(dport=80)/"GET 192.168.1.3 HTTP/1.0 \n\n"


  >>> type(my_tcp)
  scapy.layers.inet.TCP
Analyse the TCP segment.
  >>> my_tcp
  <TCP  dport=http |<Raw  load='GET 192.168.1.3 HTTP/1.0 \n\n' |>>


  >>> ls(my_tcp)
  sport      : ShortEnumField                      = 20              (20)
  dport      : ShortEnumField                      = 80              (80)
  seq        : IntField                            = 0               (0)
  ack        : IntField                            = 0               (0)
  dataofs    : BitField (4 bits)                   = None            (None)
  reserved   : BitField (3 bits)                   = 0               (0)
  flags      : FlagsField (9 bits)                 = <Flag 2 (S)>    (<Flag 2 (S)>)
  window     : ShortField                          = 8192            (8192)
  chksum     : XShortField                         = None            (None)
  urgptr     : ShortField                          = 0               (0)
  options    : TCPOptionsField                     = []              (b'')
  --
  load       : StrField                            = b'GET 192.168.1.3 HTTP/1.0 \n\n' (b'')


  >>> my_tcp.summary()
  'TCP ftp_data > http S / Raw'


  >>>  my_tcp.show()
  ###[ TCP ]###
    sport= ftp_data
    dport= http
    seq= 0
    ack= 0
    dataofs= None
    reserved= 0
    flags= S
    window= 8192
    chksum= None
    urgptr= 0
    options= []
  ###[ Raw ]###
       load= 'GET 192.168.1.3 HTTP/1.0 \n\n'


  >>> raw(my_tcp)
  WARNING: No IP underlayer to compute checksum. Leaving null.
  b'\x00\x14\x00P\x00\x00\x00\x00\x00\x00\x00\x00P\x02 \x00\x00\x00\x00\x00GET 192.168.1.3 HTTP/1.0 \n\n'


  >>> hexdump(my_tcp)
  WARNING: No IP underlayer to compute checksum. Leaving null.
  0000  00 14 00 50 00 00 00 00 00 00 00 00 50 02 20 00  ...P........P. .
  0010  00 00 00 00 47 45 54 20 31 39 32 2E 31 36 38 2E  ....GET 192.168.
  0020  31 2E 33 20 48 54 54 50 2F 31 2E 30 20 0A 0A     1.3 HTTP/1.0 ..
                                            ..
7.2. Creating User Datagram Protocol (UDP) segments
In a similar way create a UDP segment and analyse it.
  >>> UDP(dport=1087)
  <UDP  dport=1087 |>


  >>> my_udp = UDP(dport=1087)


  >>> ls(my_udp)
  sport      : ShortEnumField                      = 53              (53)
  dport      : ShortEnumField                      = 1087            (53)
  len        : ShortField                          = None            (None)
  chksum     : XShortField                         = None            (None)


  >>> my_udp.summary()
  'UDP domain > 1087'


  >>> my_udp.show()
  ###[ UDP ]###
    sport= domain
    dport= 1087
    len= None
    chksum= None


  >>> raw(my_udp)
  WARNING: No IP underlayer to compute checksum. Leaving null.
  b'\x005\x04?\x00\x08\x00\x00'


  >>> hexdump(my_udp)
  WARNING: No IP underlayer to compute checksum. Leaving null.
  0000  00 35 04 3F 00 08 00 00                          .5.?....
8. Create a combined frame with packet and segment

This section of the tutorial will consider the Ethernet frame, embedding the IP header within it, the TCP segment header within that to create a complete unit.
Embed the TCP segment header in the IP packet and embed the packet in the Ethernet frame and analyse.
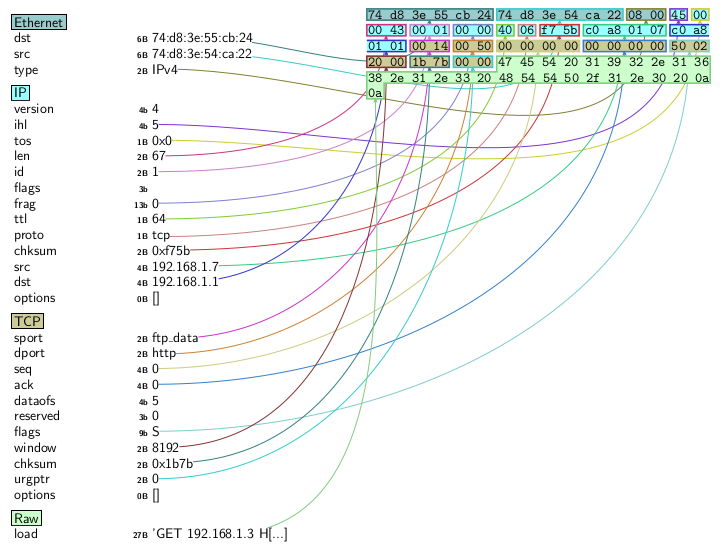
  >>> my_frame/my_packet/my_tcp
  <Ether  dst=74:d8:3e:55:cb:24 type=IPv4 |<IP  frag=0 proto=tcp dst=192.168.1.1 |<TCP  dport=http |<Raw  load='GET 192.168.1.3 HTTP/1.0 \n\n' |>>>>


  >>> full_frame=my_frame/my_packet/my_tcp


  >>> ls(full_frame)
  dst        : DestMACField                        = '74:d8:3e:55:cb:24' (None)
  src        : SourceMACField                      = '74:d8:3e:54:ca:22' (None)
  type       : XShortEnumField                     = 2048            (36864)
  --
  version    : BitField (4 bits)                   = 4               (4)
  ihl        : BitField (4 bits)                   = None            (None)
  tos        : XByteField                          = 0               (0)
  len        : ShortField                          = None            (None)
  id         : ShortField                          = 1               (1)
  flags      : FlagsField (3 bits)                 = <Flag 0 ()>     (<Flag 0 ()>)
  frag       : BitField (13 bits)                  = 0               (0)
  ttl        : ByteField                           = 64              (64)
  proto      : ByteEnumField                       = 6               (0)
  chksum     : XShortField                         = None            (None)
  src        : SourceIPField                       = '192.168.1.7'   (None)
  dst        : DestIPField                         = '192.168.1.1'   (None)
  options    : PacketListField                     = []              ([])
  --
  sport      : ShortEnumField                      = 20              (20)
  dport      : ShortEnumField                      = 80              (80)
  seq        : IntField                            = 0               (0)
  ack        : IntField                            = 0               (0)
  dataofs    : BitField (4 bits)                   = None            (None)
  reserved   : BitField (3 bits)                   = 0               (0)
  flags      : FlagsField (9 bits)                 = <Flag 2 (S)>    (<Flag 2 (S)>)
  window     : ShortField                          = 8192            (8192)
  chksum     : XShortField                         = None            (None)
  urgptr     : ShortField                          = 0               (0)
  options    : TCPOptionsField                     = []              (b'')
  --
  load       : StrField                            = b'GET 192.168.1.3 HTTP/1.0 \n\n' (b'')


  >>> full_frame.summary()
  'Ether / IP / TCP 192.168.1.7:ftp_data > 192.168.1.1:http S / Raw'


  >>> full_frame.show()
  ###[ Ethernet ]###
    dst= 74:d8:3e:55:cb:24
    src= 74:d8:3e:54:ca:22
    type= IPv4
  ###[ IP ]###
       version= 4
       ihl= None
       tos= 0x0
       len= None
       id= 1
       flags=
       frag= 0
       ttl= 64
       proto= tcp
       chksum= None
       src= 192.168.1.7
       dst= 192.168.1.1
       \options\
  ###[ TCP ]###
          sport= ftp_data
          dport= http
          seq= 0
          ack= 0
          dataofs= None
          reserved= 0
          flags= S
          window= 8192
          chksum= None
          urgptr= 0
          options= []
  ###[ Raw ]###
             load= 'GET 192.168.1.3 HTTP/1.0 \n\n'


  >>> raw(full_frame)
  b't\xd8>U\xcb$t\xd8>T\xca"\x08\x00E\x00\x00C\x00\x01\x00\x00@\x06\xf7[\xc0\xa8\x01\x07\xc0\xa8\x01\x01\x00\x14\x00P\x00\x00\x00\x00\x00\x00\x00\x00P\x02 \x00\x1b{\x00\x00GET 192.168.1.3 HTTP/1.0 \n\n'


  >>> hexdump(full_frame)
  0000  74 D8 3E 55 CB 24 74 D8 3E 54 CA 22 08 00 45 00  t.>U.$t.>T."..E.
  0010  00 43 00 01 00 00 40 06 F7 5B C0 A8 01 07 C0 A8  .C....@..[......
  0020  01 01 00 14 00 50 00 00 00 00 00 00 00 00 50 02  .....P........P.
  0030  20 00 1B 7B 00 00 47 45 54 20 31 39 32 2E 31 36   ..{..GET 192.16
  0040  38 2E 31 2E 33 20 48 54 54 50 2F 31 2E 30 20 0A  8.1.3 HTTP/1.0 .
  0050  0A
Dump a graphical view of the full frame.
>>> full_frame.pdfdump()
9. Sending packets
To send a packet to the wire a different set of functions, than the sendp() function used earlier, is required. sendp() is only used at layer 2. Look at the help messages for the send(), sr() and sr1() functions to understand the difference between them.
  >>> help(send)
  Help on function send in module scapy.sendrecv:

  send(x, inter=0, loop=0, count=None, verbose=None, realtime=None, return_packets=False, socket=None, *args, **kargs)
      Send packets at layer 3
      send(packets, [inter=0], [loop=0], [count=None], [verbose=conf.verb], [realtime=None], [return_packets=False],  # noqa: E501
           [socket=None]) -> None


  >>> help(sr)
  Help on function sr in module scapy.sendrecv:

  sr(x, promisc=None, filter=None, iface=None, nofilter=0, *args, **kargs)
      Send and receive packets at layer 3
      pks: SuperSocket instance to send/receive packets
      pkt: the packet to send
      rcv_pks: if set, will be used instead of pks to receive packets.
               packets will still be sent through pks
      nofilter: put 1 to avoid use of BPF filters
      retry:    if positive, how many times to resend unanswered packets
                if negative, how many times to retry when no more packets
                are answered
      timeout:  how much time to wait after the last packet has been sent
      verbose:  set verbosity level
      multi:    whether to accept multiple answers for the same stimulus
      store_unanswered: whether to store not-answered packets or not.
                        setting it to False will increase speed, and will return
                        None as the unans list.
      process:  if specified, only result from process(pkt) will be stored.
                the function should follow the following format:
                  lambda sent, received: (func(sent), func2(received))
                if the packet is unanswered, `received` will be None.
                if `store_unanswered` is False, the function won't be called on
                un-answered packets.
      prebuild: pre-build the packets before starting to send them. Automatically
                enabled when a generator is passed as the packet


  >>> help(sr1)
  Help on function sr1 in module scapy.sendrecv:

  sr1(x, promisc=None, filter=None, iface=None, nofilter=0, *args, **kargs)
      Send packets at layer 3 and return only the first answer
      pks: SuperSocket instance to send/receive packets
      pkt: the packet to send
      rcv_pks: if set, will be used instead of pks to receive packets.
               packets will still be sent through pks
      nofilter: put 1 to avoid use of BPF filters
      retry:    if positive, how many times to resend unanswered packets
                if negative, how many times to retry when no more packets
                are answered
      timeout:  how much time to wait after the last packet has been sent
      verbose:  set verbosity level
      multi:    whether to accept multiple answers for the same stimulus
      store_unanswered: whether to store not-answered packets or not.
                        setting it to False will increase speed, and will return
                        None as the unans list.
      process:  if specified, only result from process(pkt) will be stored.
                the function should follow the following format:
                  lambda sent, received: (func(sent), func2(received))
                if the packet is unanswered, `received` will be None.
                if `store_unanswered` is False, the function won't be called on
                un-answered packets.
      prebuild: pre-build the packets before starting to send them. Automatically
                enabled when a generator is passed as the packet
In summary:
| Function | Application | |
|---|---|---|
| sendp() | Send frames at layer 2 only | |
| send() | Send packets at layer 3, do not wait for reply | |
| sr() | Send and receive packets at layer 3 | |
| sr1() | Send packets at layer 3 and return only the first answer | |
9.1. Create and send an ICMP request
Create a simple Internet Control Message Protocol (ICMP) request to send to the other computer.
  >>> my_icmp = IP(dst="192.168.1.3")/ICMP()


  >>> my_icmp.summary()
  'IP / ICMP 192.168.1.7 > 192.168.1.3 echo-request 0'


  >>> my_icmp.show()
  ###[ IP ]###
    version= 4
    ihl= None
    tos= 0x0
    len= None
    id= 1
    flags=
    frag= 0
    ttl= 64
    proto= icmp
    chksum= None
    src= 192.168.1.7
    dst= 192.168.1.3
    \options\
  ###[ ICMP ]###
       type= echo-request
       code= 0
       chksum= None
       id= 0x0
       seq= 0x0
Try sending a packet on the wire with the send() function.
  >>> send(my_icmp)
  PermissionError: [Errno 1] Operation not permitted
Ooops this results in a permissions error. The user doesn't have the right to access the interfaces directly. The Linux kernel will not allow access to raw sockets as the CAP_NET_RAW capability is required, which is normally only granted to the superuser. Run scapy3 as a superuser and try again.
  ~$ sudo scapy3
  >>> send(my_icmp)
  .
  Sent 1 packets.
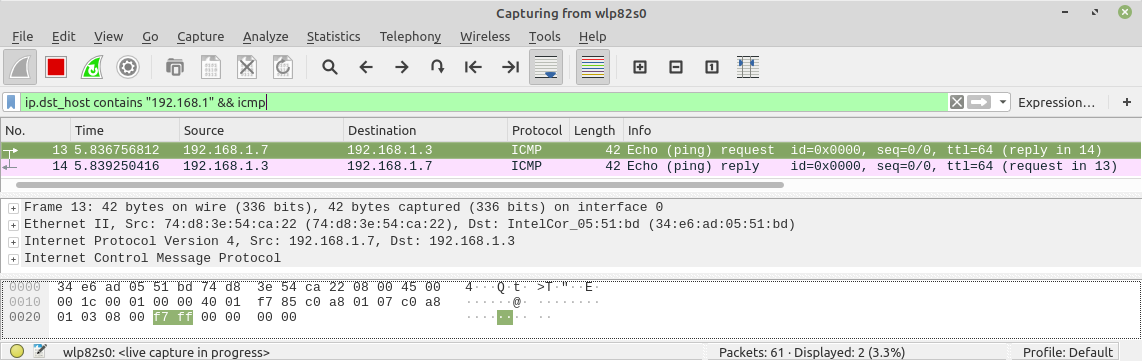
So what happened, I guess an ICMP packet was sent on the wire. Do it again but have tcpdump, tshark or wireshark monitoring for the packet this time. For example:
  ~$ sudo tcpdump -n -i wlp82s0 dst net 192.168.1.0/24 and icmp
  tcpdump: verbose output suppressed, use -v or -vv for full protocol decode
Now send the packet again.
  >>> send(my_icmp)
  .
  Sent 1 packets.
Notice tcpdump capturing the outgoing echo request as well as the returning echo reply.
  listening on wlp82s0, link-type EN10MB (Ethernet), capture size 262144 bytes
  17:33:29.908234 IP 192.168.1.7 > 192.168.1.3: ICMP echo request, id 0, seq 0, length 8
  17:33:29.911709 IP 192.168.1.3 > 192.168.1.7: ICMP echo reply, id 0, seq 0, length 8
9.2. Capture the reply
The reply can be captured directly by scapy and even assigned to a variable.
  >>> sr1(my_icmp)
  Begin emission:
  .Finished sending 1 packets.
  *
  Received 2 packets, got 1 answers, remaining 0 packets
  <IP  version=4 ihl=5 tos=0x0 len=28 id=57251 flags= frag=0 ttl=64 proto=icmp chksum=0x17e3 src=192.168.1.3 dst=192.168.1.7 |<ICMP  type=echo-reply code=0 chksum=0xffff id=0x0 seq=0x0 |>>


  >>> echo_reply = sr1(my_icmp)
  Begin emission:
  Finished sending 1 packets.
  *
  Received 1 packets, got 1 answers, remaining 0 packets


  >>> type(echo_reply)
  scapy.layers.inet.IP


  >>> echo_reply.show()
  ###[ IP ]###
    version= 4
    ihl= 5
    tos= 0x0
    len= 28
    id= 63003
    flags=
    frag= 0
    ttl= 64
    proto= icmp
    chksum= 0x16b
    src= 192.168.1.3
    dst= 192.168.1.7
    \options\
  ###[ ICMP ]###
       type= echo-reply
       code= 0
       chksum= 0xffff
       id= 0x0
       seq= 0x0
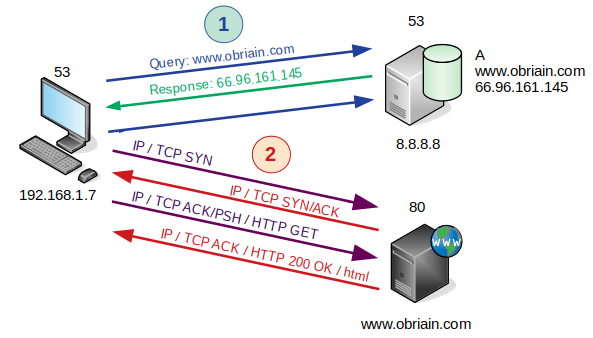
10. Domain Name System (DNS)
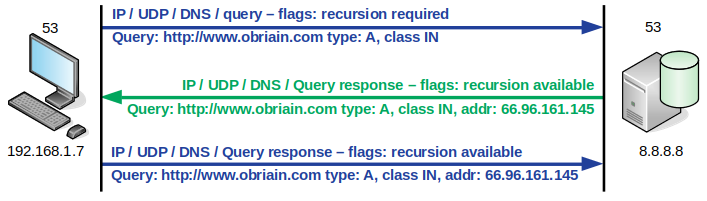
Making a DNS query and processing the response is simple with scapy. Consider the request and the handling of the response. The DNS query sends a Uniform Resource Locator (URL) to the DNS Server, which consults its A records for an associated IPv4 address. For example the A record in the DNS server would look something like this:
www.obriain.com. A 172.104.252.215
Now build a DNS query.
  >>> ip_packet = IP(dst="8.8.8.8")


  >>> udp_segment = UDP(dport=53)


  >>> dns_query = DNS(rd=1,qd=DNSQR(qname="www.obriain.com"))


  >>> dns_packet = ip_packet/udp_segment/dns_query


  >>> dns_packet.summary()
  'DNS Qry "b\'www.obriain.com\'" '


  >>> dns_packet[DNS].show()
  ###[ DNS ]###
    id= 0
    qr= 0
    opcode= QUERY
    aa= 0
    tc= 0
    rd= 1
    ra= 0
    z= 0
    ad= 0
    cd= 0
    rcode= ok
    qdcount= 1
    ancount= 0
    nscount= 0
    arcount= 0
    \qd\
     |###[ DNS Question Record ]###
     |  qname= 'www.obriain.com'
     |  qtype= A
     |  qclass= IN
    an= None
    ns= None
    ar= None
Send the DNS query and analyse the response.
  >>> response = sr1(dns_packet)
  Begin emission:
  ..Finished sending 1 packets.
  *
  Received 3 packets, got 1 answers, remaining 0 packets


  >>> response.summary()
  IP / UDP / DNS Ans "172.104.252.215"


  >>> response.show()
  ###[ IP ]###
    version= 4
    ihl= 5
    tos= 0x0
    len= 77
    id= 40939
    flags=
    frag= 0
    ttl= 57
    proto= udp
    chksum= 0xff6
    src= 8.8.8.8
    dst= 192.168.1.7
    \options\
  ###[ UDP ]###
       sport= domain
       dport= domain
       len= 57
       chksum= 0x8eec
  ###[ DNS ]###
          id= 0
          qr= 1
          opcode= QUERY
          aa= 0
          tc= 0
          rd= 1
          ra= 1
          z= 0
          ad= 0
          cd= 0
          rcode= ok
          qdcount= 1
          ancount= 1
          nscount= 0
          arcount= 0
          \qd\
           |###[ DNS Question Record ]###
           |  qname= 'www.obriain.com.'
           |  qtype= A
           |  qclass= IN
          \an\
           |###[ DNS Resource Record ]###
           |  rrname= 'www.obriain.com.'
           |  type= A
           |  rclass= IN
           |  ttl= 2717
           |  rdlen= None
           |  rdata= 172.104.252.215
          ns= None
          ar= None
Extract only the DNS information from the response.
  >>> response[DNS].summary()
  'DNS Ans "172.104.252.215" '


  >>> response[DNS].show()
  ###[ DNS ]###
    id= 0
    qr= 1
    opcode= QUERY
    aa= 0
    tc= 0
    rd= 1
    ra= 1
    z= 0
    ad= 0
    cd= 0
    rcode= ok
    qdcount= 1
    ancount= 1
    nscount= 0
    arcount= 0
    \qd\
     |###[ DNS Question Record ]###
     |  qname= 'www.obriain.com.'
     |  qtype= A
     |  qclass= IN
    \an\
     |###[ DNS Resource Record ]###
     |  rrname= 'www.obriain.com.'
     |  type= A
     |  rclass= IN
     |  ttl= 2717
     |  rdlen= None
     |  rdata= 172.104.252.215
    ns= None
    ar= None
Just extract the received IP address.
  >>> response[DNS].an.rdata
  172.104.252.215
10.1. DNS lookup tool
Bring all this together to develop a simple DNS tool that can accept a simple Uniform Resource Locator (URL) and lookup the associated IP address, the A record, from Google (8.8.8.8).
  ~$ cat dns_lookup.py

  #!/usr/bin/env python3
  # -*- coding: utf-8 -*-

  __title__      = "dns_lookup.py"
  __author__      = "Diarmuid O'Briain"
  __copyright__   = "Copyright 2020, C²S Consulting"
  __license__     = "European Union Public Licence v1.2"
  __version__     = "Version 1.0"

  """
  Note: DNS lookup tool

  """
  from scapy.all import *

  # DNS Server IP address
  dns_svr = '8.8.8.8'
  dns_port = 53

  # Help and arguments
  if (len(sys.argv) == 1):
      sys.exit(f'Error! - Not enough arguments given, try $ {sys.argv[0]} help\n')

  elif (sys.argv[1].lower() in '--help'):
      sys.exit(f'Help! - ~$ sudo {sys.argv[0]} <URL>\n')

  else:
  	url = sys.argv[1]

  # Check for sudo privileges
  if os.geteuid() != 0:
      sys.exit("You require root privileges to run this script, please use 'sudo'\n")

  def dns_request(svr, dport, url):
  	# DNS packet
  	ip = IP(dst=svr)

  	# DNS Segment
  	udp = UDP(dport=dport)

  	# DNS Request
  	dns = DNS(rd=1,qd=DNSQR(qname=f"{url}"))

  	dns_req = sr1(ip/udp/dns)

  	return (dns_req)

  response = dns_request(dns_svr, dns_port, url)
  ip = response[DNS].an.rdata

  print(f"The IP address associated with URL: '{url}' is: {ip}\n")
Make the new tool executable.
~$ chmod +x dns_lookup_tool.py
Test the new tool.
  ~$ sudo ./dns_lookup_tool.py www.obriain.com
  The IP address associated with URL: 'www.obriain.com' is: 172.104.252.215
11. Access an application
Before considering access to a daemon offering a service it is necessary to have such a daemon running. Build a webserver on one computer and access from the other via scrapy.
11.1. Create a simple test webserver
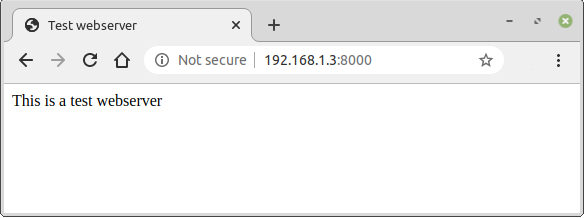
Create a simple test webserver daemon, if possible on another computer. Create a directory and add an index.html file. Then run up a webserver and test.
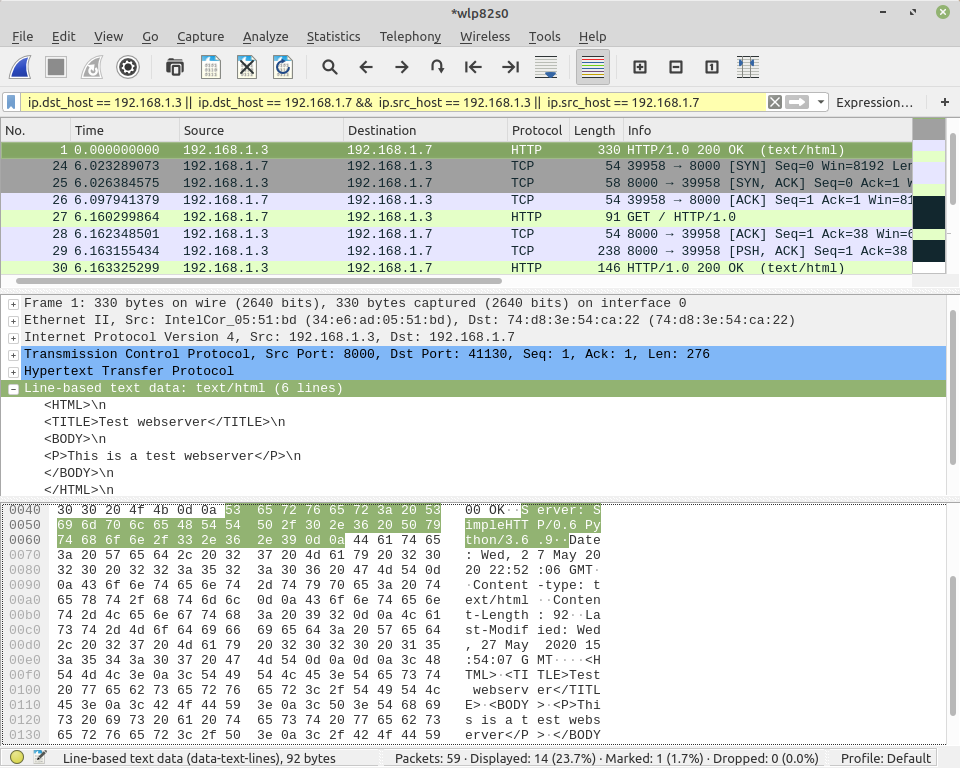
  ~$ mkdir webserver


  ~$ cd webserver/


  ~/webserver$ cat << EOF >> index.html
  <HTML>
  <TITLE>Test webserver</TITLE>
  <BODY>
  <P>This is a test webserver</P>
  </BODY>
  </HTML>
  EOF


  ~/webserver$ python3 -m http.server 8000
  Serving HTTP on 0.0.0.0 port 7800 (http://0.0.0.0:8000/) ...
  192.168.1.7 - - [27/May/2020 16:45:53] "GET / HTTP/1.1" 200 -
  192.168.1.7 - - [27/May/2020 16:46:22] "GET / HTTP/1.1" 200 -
  192.168.1.7 - - [27/May/2020 16:46:40] "GET / HTTP/1.1" 200 -
Browse to the webserver to confirm it is working.
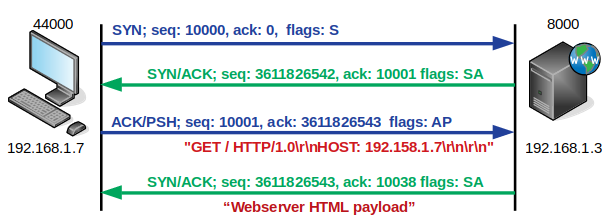
11.2. The TCP 3-way handshake
So now the webserver daemon is running, using scapy, this tutorial will demonstrate how to access it. Before doing so consider the 3-way handshake process of TCP. The originator sends a synchronise, SYN message to the server hosting the daemon. The server responds with a Synchronise/acknowledge, SYN/ACK message. The originator responds with a ACK of its own as well as a Push, PSH to send embedded Hypertext Markup Language (HTML) payload data. The server responds with the payload HTML 200 OK response data using a TCP ACK flag. The TCP Finish, FIN flag indicates the end of data transmission to finish a TCP connection.
11.3. Access the application daemon
As demonstrated earlier create an IP packet header.
>>> ip_packet = IP(dst='192.168.1.3')
Create a TCP SYN segment header.
>>> syn_segment = TCP(sport=1026, dport=8000, flags='S', seq=1000)
Assemble a complete IP packet with the SYN segment and review.
  >>> syn_packet = ip_packet/syn_segment


  >>> syn_packet.summary()
  'IP / TCP 192.168.1.7:1026 > 192.168.1.3:8000 S'


  >>> syn_packet.show()
  ###[ IP ]###
    version= 4
    ihl= None
    tos= 0x0
    len= None
    id= 1
    flags=
    frag= 0
    ttl= 64
    proto= tcp
    chksum= None
    src= 192.168.1.7
    dst= 192.168.1.3
    \options\
  ###[ TCP ]###
       sport= 1026
       dport= 8000
       seq= 1000
       ack= 0
       dataofs= None
       reserved= 0
       flags= S
       window= 8192
       chksum= None
       urgptr= 0
       options= []
Send TCP SYN and trap using the sr1() function to grab the first response packet from webserver.
  >>> synack_response = sr1(syn_packet)


  >>> synack_response.summary()
  'IP / TCP 192.168.1.3:8000 > 192.168.1.7:1026 SA'

  >>> synack_response.show()
  ###[ IP ]###
    version= 4
    ihl= 5
    tos= 0x0
    len= 44
    id= 0
    flags= DF
    frag= 0
    ttl= 64
    proto= tcp
    chksum= 0xb771
    src= 192.168.1.3
    dst= 192.168.1.7
    \options\
  ###[ TCP ]###
       sport= 8000
       dport= 1026
       seq= 1294044316
       ack= 1001
       dataofs= 6
       reserved= 0
       flags= SA
       window= 64240
       chksum= 0x18e2
       urgptr= 0
       options= [('MSS', 1460)]
Take the received ack value (1001), increment it to 1002 it and take the seq sent from the SYN/ACK (1294044316) and increment for the next ack value (1294044317). Now generate the ACK/PSH segment.
>>> ackpsh_segment = TCP(sport=1026, dport=8000, flags='A' 'P', seq=1002, ack=1294044317)
Assemble an IP packet with TCP segment and the HTTP GET payload data.
>>> ackpsh_packet = ip_packet/ackpsh_segment/"GET / HTTP/1.0\r\nHOST: 192.168.1.7\r\n\r\n"
Send the HTTP GET request, using the sr() function, along with the final ACK of the 3-way handshake, in payload and trap all responses, note the multi setting allows scapy to accept multiple answers for this request and timeout setting determines how much time scapy will wait after the last packet has been sent.
  >>> reply, err = sr(ackpsh_packet, multi=1, timeout=1)
  Begin emission:
  .Finished sending 1 packets.
  *
  Received 2 packets, got 1 answers, remaining 0 packets
11.4. Execute handshake at higher speed
From a programming perspective it is not good to manually take the ack and seq values to integrate them for the corresponding responding packets in the handshake. These two lines demonstrate how this step can be automated:
  next_seq = synack_response.ack
  next_ack = synack_response.seq + 1
The value synack_response.ack is extracted from the incoming packet and used as the seq of the outgoing packet as the other side expects its ack to be the seq of the next packet. The received synack_response.seq is the incoming seq and the other sided expects the ack of the next packet to be incremented. Therefore the outgoing ack is the incoming seq + 1.
Copy an paste all these lines, that have already been explained, into the scapy terminal together.
  ip_packet = IP(dst='192.168.1.3')
  syn_segment = TCP(sport=1026, dport=8000, flags='S', seq=1000)
  syn_packet = ip_packet/syn_segment
  synack_response = sr1(syn_packet)
  next_seq = synack_response.ack
  next_ack = synack_response.seq + 1
  ackpsh_segment = TCP(sport=1026, dport=8000, flags='A' 'P', seq=next_seq, ack=next_ack)
  ackpsh_packet = ip_packet/ackpsh_segment/"GET / HTTP/1.0\r\nHOST: 192.168.1.7\r\n\r\n"
  reply, err = sr(ackpsh_packet, multi=1, timeout=1)
This will respond as follows:
  Begin emission:
  .Finished sending 1 packets.
  *
  Received 2 packets, got 1 answers, remaining 0 packets
  .
  Sent 1 packets.
  Begin emission:
  Finished sending 1 packets.
  **.*.
  Received 5 packets, got 3 answers, remaining 0 packets
Analyse the reply.
  >>> print(type(reply))
  <class 'scapy.plist.SndRcvList'>


  >>> print(len(reply))
  3
  >>> print(len(reply[0]))
  2
  >>> print(len(reply[1]))
  2
  >>> print(len(reply[2]))
  2
Look at the second element in the tuple, which contains the payload if it exists.
  >>> print(reply[0][1])
  WARNING: Calling str(pkt) on Python 3 makes no sense!
  b'E\x00\x00(7S@\x00@\x06\x80"\xc0\xa8\x01\x03\xc0\xa8\x01\x07\x1f@\x04\x02 \xac0\xb4\x00\x00+\x8dP\x10\xfa\xcb\x91~\x00\x00'
Ooops it returns bytes so decode to a string value first.
  >>> print(r[0][1][Raw].load.decode('utf-8'))
  GET / HTTP/1.0
  HOST: 192.168.1.7


  >>> print(r[1][1][Raw].load.decode('utf-8'))
  HTTP/1.0 200 OK
  Server: SimpleHTTP/0.6 Python/3.6.9
  Date: Wed, 27 May 2020 21:58:42 GMT
  Content-type: text/html
  Content-Length: 92
  Last-Modified: Wed, 27 May 2020 15:54:07 GMT

  <HTML>
  <TITLE>Test webserver</TITLE>
  <BODY>
  <P>This is a test webserver</P>
  </BODY>
  </HTML>


  >>> print(reply[2][1][Raw].load.decode('utf-8'))
  HTTP/1.0 200 OK
  Server: SimpleHTTP/0.6 Python/3.6.9
  Date: Wed, 27 May 2020 21:58:42 GMT
  Content-type: text/html
  Content-Length: 92
  Last-Modified: Wed, 27 May 2020 15:54:07 GMT

  <HTML>
  <TITLE>Test webserver</TITLE>
  <BODY>
  <P>This is a test webserver</P>
  </BODY>
  </HTML>
The webserver page has been accessed and is part of the payload of the responding message.
11.5. Bring this all together
Write a simple application in Python to bring this all together. The application will engage in a 3-way TCP handshake with a webserver running on the IP address 192.168.1.3 over TCP port 8000 and pull down the page there.
Create a script with the following content.
  ~$ cat http_retriever.py

  #!/usr/bin/env python3
  # -*- coding: utf-8 -*-

  __title__      = "http_retriever.py"
  __author__      = "Diarmuid O'Briain"
  __copyright__   = "Copyright 2020, C²S Consulting"
  __license__     = "European Union Public Licence v1.2"
  __version__     = "Version 1.0"

  """
  Note:

  The Linux kernel doesn't originate the SYN so when it received a SNY/ACK
  it responds with an RST, prevent this my dropping using iptables.

  $ sudo iptables -A OUTPUT -p tcp --tcp-flags RST RST -s 192.168.1.7 -j DROP

  """
  from scapy.all import *

  seq = int(RandNum(10000, 19999))
  ipaddr = '192.168.1.3'
  sport = int(RandNum(1025, 65535))
  dport = 8000
  payload = f"GET / HTTP/1.0\r\nHOST: {ipaddr}\r\n\r\n"

  # IP packet header will be reused for multiple packets
  ip_packet = IP(dst=ipaddr)

  # SYN segment
  syn_segment = TCP(sport=sport, dport=dport, flags='S', seq=seq)

  # Assemble IP packet with SYN segment
  syn_packet = ip_packet/syn_segment

  # Send TCP SYN and trap, only the first, response from webserver
  synack_response = sr1(syn_packet)

  # Take the SEQ and ACK from the SYN/ACK and increment as the out ACK and SEQ
  next_seq = synack_response.ack
  new_ack = synack_response.seq + 1

  # Generate ACK, PSH and Payload segment
  ackpsh_segment = TCP(sport=sport, dport=dport, flags='A' 'P', seq=next_seq, ack=new_ack)

  # Assemble IP packet with TCP segment and Payload
  ackpsh_packet = ip_packet/ackpsh_segment/payload
  print (ackpsh_packet.show())
  # Send HTTP GET request in payload and trap all responses
  #  - multi: accept multiple answers for this request
  #  - timeout: how much time to wait after the last packet has been sent
  reply, err = sr(ackpsh_packet, multi=1, timeout=1)

  # Loop through all the responses and show
  for r in reply:
      for p in range(0, len(r)):
          if Raw in r[p]:
              bytesload = r[p][Raw].load
              strload = bytesload.decode('utf-8')
              print(strload)
Now make the script executable and run it for the same effect as running the commands via the scapy ipython shell.
  ~$ chmod +x http_retriever.py


  ~$ sudo ./http_retriever.py
  Begin emission:
  .Finished sending 1 packets.
  *
  Received 2 packets, got 1 answers, remaining 0 packets
  .
  Sent 1 packets.
  Begin emission:
  Finished sending 1 packets.
  **.**
  Received 5 packets, got 4 answers, remaining 0 packets
  GET / HTTP/1.0
  HOST: 192.168.1.3


  GET / HTTP/1.0
  HOST: 192.168.1.3


  HTTP/1.0 200 OK
  Server: SimpleHTTP/0.6 Python/3.6.9
  Date: Wed, 27 May 2020 22:18:21 GMT
  Content-type: text/html
  Content-Length: 92
  Last-Modified: Wed, 27 May 2020 15:54:07 GMT


  GET / HTTP/1.0
  HOST: 192.168.1.3


  HTTP/1.0 200 OK
  Server: SimpleHTTP/0.6 Python/3.6.9
  Date: Wed, 27 May 2020 22:18:21 GMT
  Content-type: text/html
  Content-Length: 92
  Last-Modified: Wed, 27 May 2020 15:54:07 GMT

  <HTML>
  <TITLE>Test webserver</TITLE>
  <BODY>
  <P>This is a test webserver</P>
  </BODY>
  </HTML>
The received packets are of the following form.
12. A final simple browser program
Write a final Python program that will send a DNS query to resolve a given URL to the DNS Server (8.8.8.8). Once received the program should establish a 3-way handshake with the webserver followed by a HTTP GET request to which it will accept a HTTP 200 OK and output the received page data to the terminal.
The program should be of the form:
~$ ./simple_browser.py <URL> [<destination port>] [<source interface>]
You can download a sample program here. Running the program.
  ~$ ./simple_browser.py www.obriain.com 80
  You require root privileges to run this script, please use 'sudo'
Get some help.
  ~$ ./simple_browser.py help
  Help! - ~$ ./simple_browser.py <URL> [<destination port>] [<source interface>]
OK, it has to be run with root privileges. Actually all of the following gives the same output, assuming there is only a single interface with an IPv4 address on the host, otherwise if no interface name is supplied there maybe some difference depending on which interface that the program picks.
  ~$ sudo ./simple_browser.py www.obriain.com
  ~$ sudo ./simple_browser.py www.obriain.com 80
  ~$ sudo ./simple_browser.py www.obriain.com wlp82s0
  ~$ sudo ./simple_browser.py www.obriain.com 80 wlp82s0
  ~$ sudo ./simple_browser.py www.obriain.com wlp82s0 80
Output generated by the simple_browser.py.
  Begin emission:
  .Finished sending 1 packets.
  *
  Received 2 packets, got 1 answers, remaining 0 packets
  Begin emission:
  Finished sending 1 packets.
  *
  Received 1 packets, got 1 answers, remaining 0 packets
  Begin emission:
  Finished sending 1 packets.
  **.....*
  Received 8 packets, got 3 answers, remaining 0 packets
  GET / HTTP/1.0
  HOST: 192.168.1.7


  GET / HTTP/1.0
  HOST: 192.168.1.7


  HTTP/1.1 200 OK
  Date: Fri, 29 May 2020 14:35:51 GMT
  Server: Apache/2.4.25 (Debian)
  Vary: Accept-Encoding
  Content-Length: 3966
  Connection: close
  Content-Type: text/html; charset=UTF-8


  <HTML>
  <HEAD>
  <TITLE>O'Briain | Home</TITLE>
  </HEAD>
  <BODY>
  <P>This is a test page</P>
  </BODY>
  </HTML>

