Last updated: 30-05-2014 16:06
| << Back | HOME | Next >> |
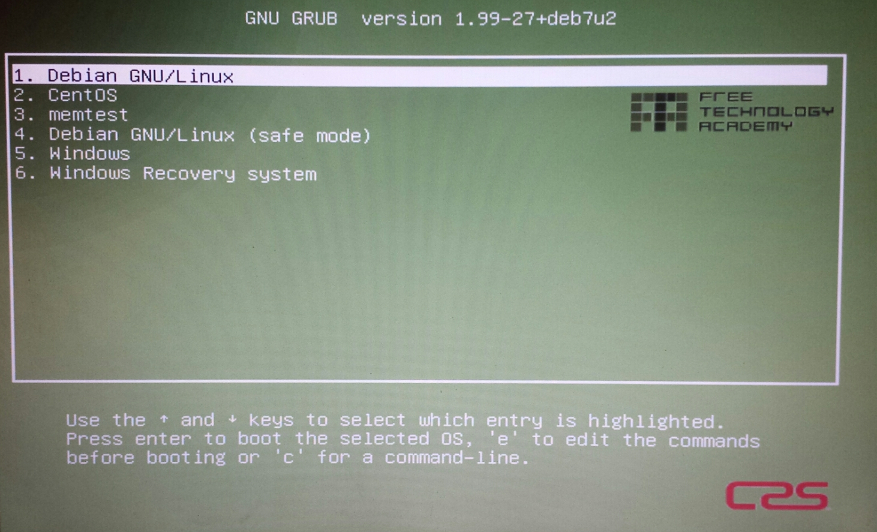
      1.  Debian (or Ubuntu)
      2.  Fedora (or any other distribution **not** derived by Debian or Ubuntu)
      3.  memtest
      4.  Debian (or Ubuntu) safe mode
      5.  Windows
      6.  Windows Recovery system
Installing three Operating Systems (OS) on the computer is best done in a First In First Out (FIFO) order. This means that the last installed OS will write the working boot loader to the Master Boot Record (MBR) on the primary disk /dev/sda. In this case the OS are installed as follows:
Microsoft Windows 8.1 image: 9600.17050.WINBLUE_REFRESH.140317-1640_X86FRE_ENTERPRISE_EVAL_EN-US-IR3_CENA_X86FREE_EN-US_DV9.ISO
Install Microsoft Windows 8
Download 90 day trial image from the Microsoft TechNet Evaluation Center (Accessed: 28/04/2014). Before downloading Microsoft will require an account to be established first.
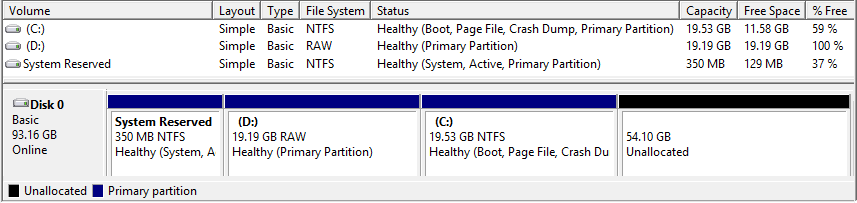
The computer hardrive is 100 GB so create two partitions one for the Windows 8 install and a second for the Windows Recovery system. I note that Windows 8 creates an additional partition of 350 MB as a System partition.
|
uEFI is a software interface between the OS and platform firmware. UEFI is meant to replace the Basic Input/Output System (BIOS). It is being added in new computers and OS support is being included. An addon to this is the Secure Boot feature which is a security standard to force hardware to boot only firmware and software that share trusted X.509 root certificates installed in the uEFI by the manufacturer, thereby preventing the execution of unsigned code. If the installed OS doesn't provide UEFI boot loaders, or if those boot loader signatures are not recognised, the system will not boot.
It is easier to install a dual boot system if uEFI support is disabled. During the system boot enter the system BIOS and disable uEFI by selecting the Legacy boot option.
CentOS image: CentOS-6.5-i386-netinstall.iso
Install a CentOS from CD/DVD or USB Stick and select the Boot Options key, (F12 on the Dell Precision M70 for example). Boot from the CentOS installation media. Note that as there is a limit of 4 Primary partitions it is necessary to use Logical partitions for this OS. Logocal partitions is the way to get around this limitation on the number of primary partitions. Some OS, require it be installed in and booted from a primary partition, however GNU/Linux does not. During the CentOS install do NOT check the Primary Partition option when creating the partitions and CentOS will create Logical partitions within /dev/sda4.
Download, install and run CentOS
$ sudo mkfs /dev/sdb1
$ sudo cp CentOS-6.5-i386-netinstall.iso /dev/sdb; sync
Check installation partition table after CentOS install
  debianM70:centos6~$ su
  Password: centosroot
  debianM70:centos6~# fdisk -l /dev/sda

  Disk /dev/sda: 100.0 GB, 100030242816 bytes
  255 heads, 63 sectors/track, 12161 cylinders
  Units = cylinders of 16065 * 512 = 8225280 bytes
  Sector size (logical/physical): 512 bytes / 512 bytes
  I/O size (minimum/optimal): 512 bytes / 512 bytes
  Disk identifier: 0x000b05b2

     Device Boot      Start         End      Blocks   Id  System
  /dev/sda1   *           1          45      358400    7  HPFS/NTFS
  /dev/sda2              45        2550    20121600    6  FAT16
  /dev/sda3            2550        5100    20480000    7  HPFS/NTFS
  /dev/sda4            5100       12162    56724480    5  Extended
  /dev/sda5            5100        8287    25600000   83  Linux
  /dev/sda6            8287        8975     5521408   82  Linux swap
Breaking this down.
Debian GNU/Linux image: debian-7.5.0-i386-netinst.iso
During the CentOS installation 25 GB was left for the install of Debian GNU/Linux. This will leave three OS on the computer, Microsoft Windows 8.1, CentOS 6.5 and Debian GNU/Linux 7. Installing the OS in a First In First Out (FIFO) order means that the last installed OS will write the working boot loader to the Master Boot Record (MBR) on the primary disk /dev/sda.
Download and install Debian GNU/Linux
$ sudo mkfs /dev/sdb1
$ sudo cp debian-7.5.0-i386-netinst.iso /dev/sdb; sync

      [*] Debian Desktop environment
      [ ] Web server
      [ ] Print server
      [ ] SQL server
      [ ] DNS server
      [ ] File server
      [ ] Mail server
      [*] SSH server
      [*] Laptop
      [*] Standard system utilities
Check installation partition table after Debian GNU/Linux install
  debianM70:debiangnu~$ sudo fdisk -l /dev/sda

  Disk /dev/sda: 100.0 GB, 100030242816 bytes
  255 heads, 63 sectors/track, 12161 cylinders, total 195371568 sectors
  Units = sectors of 1 * 512 = 512 bytes
  Sector size (logical/physical): 512 bytes / 512 bytes
  I/O size (minimum/optimal): 512 bytes / 512 bytes
  Disk identifier: 0x000b05b2

     Device Boot      Start         End      Blocks   Id  System
  /dev/sda1   *        2048      718847      358400    7  HPFS/NTFS/exFAT
  /dev/sda2          718848    40962047    20121600    6  FAT16
  /dev/sda3        40962048    81922047    20480000    7  HPFS/NTFS/exFAT
  /dev/sda4        81926142   192999423    55536641    5  Extended
  /dev/sda5        81926144   133126143    25600000   83  Linux
  /dev/sda6       133128192   144171007     5521408   82  Linux swap / Solaris
  /dev/sda7       144173056   192999423    24413184   83  Linux
Breaking this down.
Memory Test (memtest86+) is not installed on Debian GNU/Linux by default so install it. This will add a file called 20_memtest86+ to the /etc/grub.d directory and Memory test options in the GRUB boot menu.
Reviewing the files in /etc/grub.d/:
  debianM70:debiangnu~$ sudo apt-get install memtest86+

  debianM70:debiangnu~$ ls /etc/grub.d/

  00_header        10_linux      20_memtest86+  40_custom  README
  05_debian_theme  20_linux_xen  30_os-prober   41_custom
The default boot order at this stage is:
Unfortunately with GRUB version 2 there is not a simple way to change the order in the menu except to move the memtest86+ after the probed OS's by changing the file number to greater than 30 number in /etc/grub.d/. For the kind of boot menu required in the question it is necessary to edit the /boot/grub/grub.cfg file despite the warnings that this is not a good idea. Also do not run the update-grub utility afterwards as this will rebuild the menu from the scripts in /etc/grub.d/.
Create suitable background graphic like this and copy it to the Debian GNU/Linux /usr/share/images/desktop-base/ directory.
 |
Backup the existing /boot/grub/grub.cfg file and then edit the original.
  debianM70:debiangnu~$ sudo mv /boot/grub/grub.cfg /boot/grub/grub.cfg.bak

  debianM70:debiangnu~$ sudo vi /boot/grub/grub.cfg

  #
  # EDITED FOR FTA CAA2
  #
  # 'Diarmuid O'Briain' <diarmuid@obriain.com>
  #

  ### BEGIN header ###

  if [ -s $prefix/grubenv ]; then
    load_env
  fi
  set default="0"
  if [ "${prev_saved_entry}" ]; then
    set saved_entry="${prev_saved_entry}"
    save_env saved_entry
    set prev_saved_entry=
    save_env prev_saved_entry
    set boot_once=true
  fi

  function savedefault {
    if [ -z "${boot_once}" ]; then
      saved_entry="${chosen}"
      save_env saved_entry
    fi
  }

  function load_video {
    insmod vbe
    insmod vga
    insmod video_bochs
    insmod video_cirrus
  }

  insmod part_msdos
  insmod ext2
  set root='(hd0,msdos7)'
  search --no-floppy --fs-uuid --set=root 221923e6-9658-4786-8feb-77942422e460
  if loadfont /usr/share/grub/unicode.pf2 ; then
    set gfxmode=640x480
    load_video
    insmod gfxterm
    insmod part_msdos
    insmod ext2
    set root='(hd0,msdos7)'
    search --no-floppy --fs-uuid --set=root 221923e6-9658-4786-8feb-77942422e460
    set locale_dir=($root)/boot/grub/locale
    set lang=en_IE
    insmod gettext
  fi
  terminal_output gfxterm
  set timeout=5

  ### END header ###

  ### BEGIN Debian theme ###

  insmod part_msdos
  insmod ext2
  set root='(hd0,msdos7)'
  search --no-floppy --fs-uuid --set=root 221923e6-9658-4786-8feb-77942422e460
  insmod png
  if background_image /usr/share/images/desktop-base/fta-grub.png; then
    set color_normal=white/black
    set color_highlight=black/white
  else
    set menu_color_normal=cyan/blue
    set menu_color_highlight=white/blue
  fi
  ### END Debian theme ###

  ### BEGIN Menu Entries ###

  menuentry "1. Debian GNU/Linux" --class debian --class gnu-linux --class gnu --class os {
          load_video
          insmod gzio
          insmod part_msdos
          insmod ext2
          set root='(hd0,msdos7)'
          search --no-floppy --fs-uuid --set=root 221923e6-9658-4786-8feb-77942422e460
          echo    'Loading Linux 3.2.0-4-686-pae ...'
          linux   /boot/vmlinuz-3.2.0-4-686-pae root=UUID=221923e6-9658-4786-8feb-77942422e460 ro  quiet
          echo    'Loading initial ramdisk ...'
          initrd  /boot/initrd.img-3.2.0-4-686-pae
  }

  menuentry "2. CentOS" --class gnu-linux --class gnu --class os {
          insmod part_msdos
          insmod ext2
          set root='(hd0,msdos5)'
          search --no-floppy --fs-uuid --set=root b45887c5-b770-4d4d-b354-6dfe8bdd6eba
          linux /boot/vmlinuz-2.6.32-431.el6.i686 ro root=UUID=b45887c5-b770-4d4d-b354-6dfe8bdd6eba rd_NO_LUKS KEYBOARDTYPE=pc KEYTABLE=uk LANG=en_US.UTF-8 rd_NO_MD SYSFONT=latarcyrheb-sun16 crashkernel=auto rd_NO_LVM rd_NO_DM rhgb quiet
          initrd /boot/initramfs-2.6.32-431.el6.i686.img
  }

  menuentry "3. memtest" {
          insmod part_msdos
          insmod ext2
          set root='(hd0,msdos7)'
          search --no-floppy --fs-uuid --set=root 221923e6-9658-4786-8feb-77942422e460
          linux16 /boot/memtest86+.bin
  }

  menuentry "4. Debian GNU/Linux (safe mode)" --class debian --class gnu-linux --class gnu --class os {
          load_video
          insmod gzio
          insmod part_msdos
          insmod ext2
          set root='(hd0,msdos7)'
          search --no-floppy --fs-uuid --set=root 221923e6-9658-4786-8feb-77942422e460
          echo    'Loading Linux 3.2.0-4-686-pae ...'
          linux   /boot/vmlinuz-3.2.0-4-686-pae root=UUID=221923e6-9658-4786-8feb-77942422e460 ro single
          echo    'Loading initial ramdisk ...'
          initrd  /boot/initrd.img-3.2.0-4-686-pae
  }

  menuentry "5. Windows" --class windows --class os {
          insmod part_msdos
          insmod ntfs
          set root='(hd0,msdos1)'
          search --no-floppy --fs-uuid --set=root 2654B74C54B71E0D
          drivemap -s (hd0) ${root}
          chainloader +1
  }

  menuentry "6. Windows Recovery system" --class windows --class os {
          insmod part_msdos
          insmod ntfs
          set root='(hd0,msdos2)'
          search --no-floppy --fs-uuid --set=root 2654B74C54B71E0D
          drivemap -s (hd0) ${root}
          chainloader +1
  }

  ### END Menu Entries ###
Boot computer and review the GRUB menu.
 |
  $ uname -r

  3.2.0-4-686-pae

  $ cat /proc/version

  Linux version 3.2.0-4-686-pae (debian-kernel@lists.debian.org) (gcc version 4.6.3 (Debian 4.6.3-14) ) #1 SMP Debian 3.2.57-3+deb7u1
Dell Laptop Support
  $ cat /proc/cpuinfo

  processor	: 0
  vendor_id	: GenuineIntel
  cpu family	: 6
  model		: 13
  model name	: Intel(R) Pentium(R) M processor 1.86GHz
  stepping	: 8
  microcode	: 0x20
  cpu MHz		: 800.000
  cache size	: 2048 KB
  fdiv_bug	: no
  hlt_bug		: no
  f00f_bug	: no
  coma_bug	: no
  fpu		: yes
  fpu_exception	: yes
  cpuid level	: 2
  wp		: yes
  flags		: fpu vme de pse tsc msr pae mce cx8 apic sep mtrr pge mca cmov clflush dts acpi mmx fxsr sse sse2 ss tm pbe nx up bts est tm2
  bogomips	: 1595.61
  clflush size	: 64
  cache_alignment	: 64
  address sizes	: 32 bits physical, 32 bits virtual
  power management:
Check the apt repositories for a newer kernel, unfortunately the latest is already installed.
  $ apt-cache search kernel |grep ^linux-source

  linux-source-3.2 - Linux kernel source for version 3.2 with Debian patches
  linux-source - Linux kernel source (meta-package)
  linux-source-2.6 - Linux kernel source (dummy package)
Download the latest stable kernel from the kernel storage site.
  $ lynx https://www.kernel.org

     mainline:   3.15-rc7      2014-05-25 [tar.xz] [pgp] [patch] [view patch]            [cgit]
     stable:     3.14.4        2014-05-13 [tar.xz] [pgp] [patch] [view patch] [view inc] [cgit] [changelog]
     longterm:   3.12.20       2014-05-15 [tar.xz] [pgp] [patch] [view patch] [view inc] [cgit] [changelog]
     longterm:   3.10.40       2014-05-13 [tar.xz] [pgp] [patch] [view patch] [view inc] [cgit] [changelog]
     longterm:   3.4.91        2014-05-18 [tar.xz] [pgp] [patch] [view patch] [view inc] [cgit] [changelog]
     longterm:   3.2.59        2014-05-18 [tar.xz] [pgp] [patch] [view patch] [view inc] [cgit] [changelog]
     longterm:   2.6.32.62     2014-05-19 [tar.xz] [pgp] [patch] [view patch] [view inc] [cgit] [changelog]
     linux-next: next-20140529 2014-05-29                                                [cgit]


  $ cd /usr/src/

  $ sudo wget https://www.kernel.org/pub/linux/kernel/v3.x/linux-3.14.4.tar.gz

  --2014-05-29 18:28:30--  https://www.kernel.org/pub/linux/kernel/v3.x/linux-3.14.4.tar.gz
  Resolving www.kernel.org (www.kernel.org)... 198.145.20.140, 199.204.44.194, 149.20.4.69, ...
  Connecting to www.kernel.org (www.kernel.org)|198.145.20.140|:443... connected.
  HTTP request sent, awaiting response... 200 OK
  Length: 118307132 (113M) [application/x-gzip]
  Saving to: `linux-3.14.4.tar.gz'

  100%[=====================================================================>] 118,307,132  624K/s   in 2m 19s

  2014-05-29 18:32:00 (831 KB/s) - `linux-3.14.4.tar.gz.1' saved [118307132/118307132]

  $ cd /usr/src/
  /usr/src/~$ tar -xzvf linux-3.14.4.tar.gz
Install libncurses and libncurses-devel packages before going any further, these are essential to the menuconfig utility.
$ sudo apt-get install libncurses5 libncurses5-dev build-essential
Use the make menuconfig utility to make the required selections.
  $ cd /usr/src/linux-3.14.4

  /usr/src/linux-3.14.4/~$ sudo make menuconfig
 |
For the purpose of the exercise I have selected some items for compiling directly within the kernel, the Intel Pentium M processor was shown by the cpuinfo from /proc so I specifically selected this processor instead of the more generic option. I also selected the System Management Mode of the CPU on the Dell Inspiron 8000 as it may also work with other Dell laptops (will see if this is OK). Additionally I selected the Linux wireless LAN (802.11) configuration Application Programming Interface (API).
[Support-files/My-3.14.4-kernel.config]
Compile the kernel and the modules. The kernel compile in particular will take some time.
  /usr/src/linux-3.14.4/~$ sudo make

    ...
    ...
    IHEX2FW firmware/keyspan_pda/xircom_pgs.fw
    IHEX    firmware/sb16/mulaw_main.csp
    IHEX    firmware/sb16/alaw_main.csp
    IHEX    firmware/sb16/ima_adpcm_init.csp
    IHEX    firmware/sb16/ima_adpcm_playback.csp
    IHEX    firmware/sb16/ima_adpcm_capture.csp

  /usr/src/linux-3.14.4/~$ sudo make modules

    make[1]: Nothing to be done for `all'.
    make[1]: Nothing to be done for `relocs'.
    CHK     include/config/kernel.release
    CHK     include/generated/uapi/linux/version.h
    CHK     include/generated/utsrelease.h
    CALL    scripts/checksyscalls.sh
    Building modules, stage 2.
    MODPOST 2342 modules
  /usr/src/linux-3.14.4/~$ sudo make modules_install

    ...
    ...
    MKDIR   /lib/firmware/sb16
    INSTALL /lib/firmware/sb16/mulaw_main.csp
    INSTALL /lib/firmware/sb16/alaw_main.csp
    INSTALL /lib/firmware/sb16/ima_adpcm_init.csp
    INSTALL /lib/firmware/sb16/ima_adpcm_playback.csp
    INSTALL /lib/firmware/sb16/ima_adpcm_capture.csp
    DEPMOD  3.14.4
This will create a directory named /lib/modules/3.14.4/ on the system.
  $ ls /lib/modules/3.14.4/
  build              modules.builtin      modules.devname  modules.symbols.bin
  kernel             modules.builtin.bin  modules.order    source
  modules.alias      modules.dep          modules.softdep
  modules.alias.bin  modules.dep.bin      modules.symbols
  /usr/src/linux-3.14.4/~$ sudo make install
  sh /usr/src/linux-3.14.4/arch/x86/boot/install.sh 3.14.4 arch/x86/boot/bzImage \
  		System.map "/boot"
  run-parts: executing /etc/kernel/postinst.d/initramfs-tools 3.14.4 /boot/vmlinuz-3.14.4
  update-initramfs: Generating /boot/initrd.img-3.14.4
  run-parts: executing /etc/kernel/postinst.d/pm-utils 3.14.4 /boot/vmlinuz-3.14.4
  run-parts: executing /etc/kernel/postinst.d/zz-update-grub 3.14.4 /boot/vmlinuz-3.14.4
  Generating grub.cfg ...
  Found background image: /usr/share/images/desktop-base/desktop-grub.png
  Found linux image: /boot/vmlinuz-3.14.4
  Found initrd image: /boot/initrd.img-3.14.4
  Found linux image: /boot/vmlinuz-3.2.0-4-686-pae
  Found initrd image: /boot/initrd.img-3.2.0-4-686-pae
  Found memtest86+ image: /boot/memtest86+.bin
  Found memtest86+ multiboot image: /boot/memtest86+_multiboot.bin
  Found Windows 8 (loader) on /dev/sda1
  Found CentOS release 6.5 (Final) on /dev/sda5
  done
As a result of this step the following files are created in the /boot directory. The GRUB bootloader grub.cfg is overwritten at the same time so it is necessary to replace that file with the one created above, however an additional menuentry is necessary.
  $ ls /boot
  config-3.14.4           initrd.img-3.2.0-4-686-pae  System.map-3.2.0-4-686-pae
  config-3.2.0-4-686-pae  memtest86+.bin              vmlinuz-3.14.4
  grub                    memtest86+_multiboot.bin    vmlinuz-3.2.0-4-686-pae
  initrd.img-3.14.4       System.map-3.14.4
Extract the menuentry from /boot/grub/grub.cfg and add within the handmade grub.cfg file created earlier.
[Support-files/grub.cfg]
  menuentry "Debian GNU/Linux, with Linux kernel 3.14.4" --class debian --class gnu-linux --class gnu --class os {
          load_video
          insmod gzio
          insmod part_msdos
          insmod ext2
          set root='(hd0,msdos7)'
          search --no-floppy --fs-uuid --set=root 221923e6-9658-4786-8feb-77942422e460
          echo    'Loading Linux 3.14.4 ...'
          linux   /boot/vmlinuz-3.14.4 root=UUID=221923e6-9658-4786-8feb-77942422e460 ro  quiet
          echo    'Loading initial ramdisk ...'
          initrd  /boot/initrd.img-3.14.4
  }

  $ sudo mv /boot/grub/grub.cfg /boot/grub/grub.cfg.bak2

  $ sudo vi /boot/grub/grub.cfg

  #
  # EDITED FOR FTA CAA2
  #
  # Adjusted to include support for kernel 3.14.4
  #
  # 'Diarmuid O'Briain' <diarmuid@obriain.com>
  #

  ### BEGIN header ###

  if [ -s $prefix/grubenv ]; then
    load_env
  fi
  set default="0"
  if [ "${prev_saved_entry}" ]; then
    set saved_entry="${prev_saved_entry}"
    save_env saved_entry
    set prev_saved_entry=
    save_env prev_saved_entry
    set boot_once=true
  fi

  function savedefault {
    if [ -z "${boot_once}" ]; then
      saved_entry="${chosen}"
      save_env saved_entry
    fi
  }

  function load_video {
    insmod vbe
    insmod vga
    insmod video_bochs
    insmod video_cirrus
  }

  insmod part_msdos
  insmod ext2
  set root='(hd0,msdos7)'
  search --no-floppy --fs-uuid --set=root 221923e6-9658-4786-8feb-77942422e460
  if loadfont /usr/share/grub/unicode.pf2 ; then
    set gfxmode=640x480
    load_video
    insmod gfxterm
    insmod part_msdos
    insmod ext2
    set root='(hd0,msdos7)'
    search --no-floppy --fs-uuid --set=root 221923e6-9658-4786-8feb-77942422e460
    set locale_dir=($root)/boot/grub/locale
    set lang=en_IE
    insmod gettext
  fi
  terminal_output gfxterm
  set timeout=5

  ### END header ###

  ### BEGIN Debian theme ###

  insmod part_msdos
  insmod ext2
  set root='(hd0,msdos7)'
  search --no-floppy --fs-uuid --set=root 221923e6-9658-4786-8feb-77942422e460
  insmod png
  if background_image /usr/share/images/desktop-base/fta-grub.png; then
    set color_normal=white/black
    set color_highlight=black/white
  else
    set menu_color_normal=cyan/blue
    set menu_color_highlight=white/blue
  fi
  ### END Debian theme ###

  ### BEGIN Menu Entries ###

  menuentry "1. Debian GNU/Linux" --class debian --class gnu-linux --class gnu --class os {
          load_video
          insmod gzio
          insmod part_msdos
          insmod ext2
          set root='(hd0,msdos7)'
          search --no-floppy --fs-uuid --set=root 221923e6-9658-4786-8feb-77942422e460
          echo    'Loading Linux 3.2.0-4-686-pae ...'
          linux   /boot/vmlinuz-3.2.0-4-686-pae root=UUID=221923e6-9658-4786-8feb-77942422e460 ro  quiet
          echo    'Loading initial ramdisk ...'
          initrd  /boot/initrd.img-3.2.0-4-686-pae
  }

  menuentry "1.1 Debian GNU/Linux, with Linux kernel 3.14.4" --class debian --class gnu-linux --class gnu --class os {
          load_video
          insmod gzio
          insmod part_msdos
          insmod ext2
          set root='(hd0,msdos7)'
          search --no-floppy --fs-uuid --set=root 221923e6-9658-4786-8feb-77942422e460
          echo    'Loading Linux 3.14.4 ...'
          linux   /boot/vmlinuz-3.14.4 root=UUID=221923e6-9658-4786-8feb-77942422e460 ro  quiet
          echo    'Loading initial ramdisk ...'
          initrd  /boot/initrd.img-3.14.4
  }

  menuentry "2. CentOS" --class gnu-linux --class gnu --class os {
          insmod part_msdos
          insmod ext2
          set root='(hd0,msdos5)'
          search --no-floppy --fs-uuid --set=root b45887c5-b770-4d4d-b354-6dfe8bdd6eba
          linux /boot/vmlinuz-2.6.32-431.el6.i686 ro root=UUID=b45887c5-b770-4d4d-b354-6dfe8bdd6eba rd_NO_LUKS KEYBOARDTYPE=pc KEYTABLE=uk LANG=en_US.UTF-8 rd_NO_MD SYSFONT=latarcyrheb-sun16 crashkernel=auto rd_NO_LVM rd_NO_DM rhgb quiet
          initrd /boot/initramfs-2.6.32-431.el6.i686.img
  }

  menuentry "3. memtest" {
          insmod part_msdos
          insmod ext2
          set root='(hd0,msdos7)'
          search --no-floppy --fs-uuid --set=root 221923e6-9658-4786-8feb-77942422e460
          linux16 /boot/memtest86+.bin
  }

  menuentry "4. Debian GNU/Linux (safe mode)" --class debian --class gnu-linux --class gnu --class os {
          load_video
          insmod gzio
          insmod part_msdos
          insmod ext2
          set root='(hd0,msdos7)'
          search --no-floppy --fs-uuid --set=root 221923e6-9658-4786-8feb-77942422e460
          echo    'Loading Linux 3.2.0-4-686-pae ...'
          linux   /boot/vmlinuz-3.2.0-4-686-pae root=UUID=221923e6-9658-4786-8feb-77942422e460 ro single
          echo    'Loading initial ramdisk ...'
          initrd  /boot/initrd.img-3.2.0-4-686-pae
  }

  menuentry "5. Windows" --class windows --class os {
          insmod part_msdos
          insmod ntfs
          set root='(hd0,msdos1)'
          search --no-floppy --fs-uuid --set=root 2654B74C54B71E0D
          drivemap -s (hd0) ${root}
          chainloader +1
  }

  menuentry "6. Windows Recovery system" --class windows --class os {
          insmod part_msdos
          insmod ntfs
          set root='(hd0,msdos2)'
          search --no-floppy --fs-uuid --set=root 2654B74C54B71E0D
          drivemap -s (hd0) ${root}
          chainloader +1
  }

  ### END Menu Entries ###
The system must be rebooted to implement the newly compiled kernel. If during the boot of the new kernel 3.14.4 a problem occurs, the grub.cfg file will boot the older proven 3.2.0 kernel by default. Simply reboot the computer and either select option 1. or let it timeout to boot into 3.2.0.
Try the new kernel 3.14.4 by rebooting and selecting option 1.1. Confirm the kernel with the uname -r command once booted.
$ sudo init 6
 |
After reboot test that the new kernel has booted OK.
  $ uname -r

  3.14.4

  $ cat /proc/version

  Linux version 3.14.4 (root@debiangnu) (gcc version 4.7.2 (Debian 4.7.2-5) ) #1 SMP Thu May 29 21:58:19 IST 2014
Beucler, S. (2014). How to rebuild an Official Debian Kernel Package. (Accessed: 27/5/2014)
Debian. (2014). (Accessed: 27/5/2014)
GNU GRUB Homepage. (Accessed: 27/5/2014)
McIntyre, S. (2013). Grub. (Accessed: 27/5/2014)
Microsoft TechNet Evaluation Center. (Accessed: 19/5/2014)
Other, AN. (2011). Blah Blab. (Accessed: 25/04/2014)
Simmons, G. (2012). Kernel. (Accessed: 27/5/2014)
Simmons, G. (2012). Windows Dual Boot. (Accessed: 27/5/2014)
The Linux Kernel Archives. (Accessed: 27/5/2014)
Ubuntu. How-to Partition Operating Systems and Partitions. (Accessed: 27/5/2014)
With RAID technology it is possible to achieve high levels of storage reliability from low cost and less reliable harddisk components. This is possible by arranging the devices into arrays for redundancy. RAID describes a number of methods to divide and replicate data among multiple harddisk drives. Each RAID Type offers different levels of data reliability and/or Input/Output (I/O) performance. Physical disks grouped in such configurations are termed RAID arrays. The RAID array distributes data across multiple disks, but from the OS perspective the array is seen as one single disk.
In GNU/Linux RAID is often grouped with Logical Volume Manager (LVM) as they share functionality however they are not the same. LVM allows for the clustering of disks, Physical Volumes (PV) into Volume Groups (VG), these VGs are mapped to Logical Volumes (LV) that are interpreted by the OS as partitions.
Here is a description of the basic concepts on some RAID types:
 |
Create and format a RAID-1 partition using these two units. Configure the system to automatically mount it into a given location and so that users without administrative rights are allowed to read and write files in the partition.
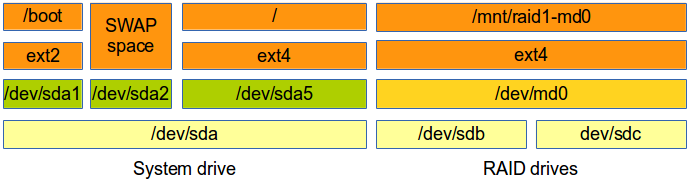 |
The GNU/Linux mdadm utility provides GNU/Linux Software RAID. Each RAID device is a virtual device created from two or more real block devices. This allows multiple devices to be combined into a single device upon which a single filesystem is installed. This example will demonstrate RAID 1 across two USB Sticks. The USB Sticks will have a filesystem created across the RAID array md0.
$ sudo apt-get install mdadm
Plug in two USB Sticks, the first is assigned the device name sdb and the second sdc.
  $ sudo dmesg --clear

  $ dmesg

  [11812.842203] usb 1-1.2: new high-speed USB device number 12 using ehci-pci
  [11812.935115] usb 1-1.2: New USB device found, idVendor=0781, idProduct=557c
  [11812.935123] usb 1-1.2: New USB device strings: Mfr=1, Product=2, SerialNumber=3
  [11812.935127] usb 1-1.2: Product: Cruzer Orbit
  [11812.935130] usb 1-1.2: Manufacturer: SanDisk
  [11812.935133] usb 1-1.2: SerialNumber: 4C530006020326110033
  [11812.935558] usb-storage 1-1.2:1.0: USB Mass Storage device detected
  [11812.935814] scsi9 : usb-storage 1-1.2:1.0
  [11813.936669] scsi 9:0:0:0: Direct-Access     SanDisk  Cruzer Orbit     1.27 PQ: 0 ANSI: 6
  [11813.937222] sd 9:0:0:0: Attached scsi generic sg2 type 0
  [11813.938856] sd 9:0:0:0: [sdb] 15633408 512-byte logical blocks: (8.00 GB/7.45 GiB)
  [11813.941206] sd 9:0:0:0: [sdb] Write Protect is off
  [11813.941214] sd 9:0:0:0: [sdb] Mode Sense: 43 00 00 00
  [11813.942306] sd 9:0:0:0: [sdb] Write cache: disabled, read cache: enabled, doesn't support DPO or FUA
  [11813.959652]  sdb: sdb1
  [11813.965473] sd 9:0:0:0: [sdb] Attached SCSI removable disk
  [11814.189686] FAT-fs (sdb1): Volume was not properly unmounted. Some data may be corrupt. Please run fsck.

  [11880.789055] usb 3-3: new high-speed USB device number 12 using xhci_hcd
  [11880.805751] usb 3-3: New USB device found, idVendor=0781, idProduct=557c
  [11880.805758] usb 3-3: New USB device strings: Mfr=1, Product=2, SerialNumber=3
  [11880.805762] usb 3-3: Product: Cruzer Orbit
  [11880.805765] usb 3-3: Manufacturer: SanDisk
  [11880.805768] usb 3-3: SerialNumber: 4C530101970326110163
  [11880.806130] usb-storage 3-3:1.0: USB Mass Storage device detected
  [11880.806375] scsi10 : usb-storage 3-3:1.0
  [11881.807203] scsi 10:0:0:0: Direct-Access     SanDisk  Cruzer Orbit     1.27 PQ: 0 ANSI: 6
  [11881.807821] sd 10:0:0:0: Attached scsi generic sg3 type 0
  [11881.809030] sd 10:0:0:0: [sdc] 15633408 512-byte logical blocks: (8.00 GB/7.45 GiB)
  [11881.810928] sd 10:0:0:0: [sdc] Write Protect is off
  [11881.810938] sd 10:0:0:0: [sdc] Mode Sense: 43 00 00 00
  [11881.811232] sd 10:0:0:0: [sdc] Write cache: disabled, read cache: enabled, doesn't support DPO or FUA
  [11881.825638]  sdc: sdc1
  [11881.829394] sd 10:0:0:0: [sdc] Attached SCSI removable disk
  [11882.022366] FAT-fs (sdc1): Volume was not properly unmounted. Some data may be corrupt. Please run fsck.
Delete existing partitions on the USB Sticks.
dev/sdb
  $ sudo fdisk /dev/sdb

  Command (m for help): d
  Selected partition 1

  Command (m for help): p

  Disk /dev/sdc: 8004 MB, 8004304896 bytes
  35 heads, 21 sectors/track, 21269 cylinders, total 15633408 sectors
  Units = sectors of 1 * 512 = 512 bytes
  Sector size (logical/physical): 512 bytes / 512 bytes
  I/O size (minimum/optimal): 512 bytes / 512 bytes
  Disk identifier: 0x00000000

     Device Boot      Start         End      Blocks   Id  System

  Command (m for help): w
  The partition table has been altered!

  Calling ioctl() to re-read partition table.

  WARNING: Re-reading the partition table failed with error 16: Device or resource busy.
  The kernel still uses the old table. The new table will be used at
  the next reboot or after you run partprobe(8) or kpartx(8)
  Syncing disks.
dev/sdb
  $ sudo fdisk /dev/sdc

  Command (m for help): d
  Selected partition 1

  Command (m for help): p

  Disk /dev/sdc: 8004 MB, 8004304896 bytes
  35 heads, 21 sectors/track, 21269 cylinders, total 15633408 sectors
  Units = sectors of 1 * 512 = 512 bytes
  Sector size (logical/physical): 512 bytes / 512 bytes
  I/O size (minimum/optimal): 512 bytes / 512 bytes
  Disk identifier: 0x00000000

     Device Boot      Start         End      Blocks   Id  System

  Command (m for help): w
  The partition table has been altered!

  Calling ioctl() to re-read partition table.

  WARNING: Re-reading the partition table failed with error 16: Device or resource busy.
  The kernel still uses the old table. The new table will be used at
  the next reboot or after you run partprobe(8) or kpartx(8)
  Syncing disks.
Create a RAID Array /dev/md0 from the two USB Sticks /dev/sdb and /dev/sdc.
  $ sudo mdadm --create /dev/md0 --level=1 --raid-devices=2 /dev/sdb /dev/sdc

  mdadm: /dev/sdb appears to be part of a raid array:
      level=raid0 devices=2 ctime=Tue May 27 09:26:15 2014
  mdadm: partition table exists on /dev/sdb but will be lost or
         meaningless after creating array
  mdadm: Note: this array has metadata at the start and
      may not be suitable as a boot device.  If you plan to
      store '/boot' on this device please ensure that
      your boot-loader understands md/v1.x metadata, or use
      --metadata=0.90
  mdadm: /dev/sdc appears to be part of a raid array:
      level=raid0 devices=2 ctime=Tue May 27 09:26:15 2014
  mdadm: partition table exists on /dev/sdc but will be lost or
         meaningless after creating array
  Continue creating array? yes
  mdadm: Defaulting to version 1.2 metadata
  mdadm: array /dev/md0 started.
Confirm array is started.
  $ cat /proc/mdstat
  Personalities : [raid0] [raid1]
  md0 : active raid1 sdc[1] sdb[0]
        7812544 blocks super 1.2 [2/2] [UU]
        [>....................]  resync =  1.6% (125824/7812544) finish=48.8min speed=2619K/sec


  $ sudo mdadm --detail /dev/md0
  /dev/md0:
          Version : 1.2
    Creation Time : Tue May 27 09:33:51 2014
       Raid Level : raid1
       Array Size : 7812544 (7.45 GiB 8.00 GB)
    Used Dev Size : 7812544 (7.45 GiB 8.00 GB)
     Raid Devices : 2
    Total Devices : 2
      Persistence : Superblock is persistent

      Update Time : Tue May 27 09:33:51 2014
            State : clean, resyncing
   Active Devices : 2
  Working Devices : 2
   Failed Devices : 0
    Spare Devices : 0

    Resync Status : 2% complete

             Name : riomhairePAD:0  (local to host riomhairePAD)
             UUID : 50ca6035:dfa9701c:212aa43b:709ca81c
           Events : 0

      Number   Major   Minor   RaidDevice State
         0       8       16        0      active sync   /dev/sdb
         1       8       32        1      active sync   /dev/sdc
Make a filesystem on the new RAID Array. In this case an GNU/Linux fourth EXTended filesystem (ext4).
  $ sudo mkfs --type ext4 /dev/md0

  mke2fs 1.42.8 (20-Jun-2013)
  Filesystem label=
  OS type: Linux
  Block size=4096 (log=2)
  Fragment size=4096 (log=2)
  Stride=0 blocks, Stripe width=0 blocks
  488640 inodes, 1953136 blocks
  97656 blocks (5.00%) reserved for the super user
  First data block=0
  Maximum filesystem blocks=2000683008
  60 block groups
  32768 blocks per group, 32768 fragments per group
  8144 inodes per group
  Superblock backups stored on blocks:
  	32768, 98304, 163840, 229376, 294912, 819200, 884736, 1605632

  Allocating group tables: done
  Writing inode tables: done
  Creating journal (32768 blocks): done
  Writing superblocks and filesystem accounting information: done
Mount the new filesystem on the OS.
  $ sudo mkdir /mnt/raid1-md0
  $ sudo chown root:disk /mnt/raid1-md0/
  $ sudo chmod 775 /mnt/raid1-md0/
Add users that require access to the drive to the disk group.
  $ sudo vi /etc/group

  ...
  disk:x:100:dobriain
  ...
Make persistent, such that after a reboot the RAID array will reform. The initramfs needs to be updated so it contains the /etc/mdadm/mdadm.conf settings during boot.
  $ sudo -s
  # echo -e "\n# RAID1 Array of USB Sticks" >> /etc/mdadm/mdadm.conf
  # mdadm --detail --scan >> /etc/mdadm/mdadm.conf
  # echo -e "\n# Mount for RAID 1\n/dev/md0\t/mnt/raid1-md0\text4\tdefaults\t0\t0" >> /etc/fstab
  # mount -a
  # update-initramfs -u
  # exit
  $
Review the new filesystem.
  $ sudo df -h /mnt/raid1-md0/

  Filesystem      Size  Used Avail Use% Mounted on
  /dev/md0        7.3G   17M  6.9G   1% /mnt/raid1-md0
Test that members of the disk group can create files on the RAID array partition.
  $ echo "This is a test" > /mnt/raid1-md0/testfile
  $ cat /mnt/raid1-md0/testfile
  This is a test
After a reboot check the RAID device exists.
  $ sudo mdadm --detail --scan
  ARRAY /dev/md0 metadata=1.2 name=riomhairePAD:0 UUID=b775b70c:e8d82e72:39e88cc4:e0c79c0f

  $ sudo mdadm --detail /dev/md0

  /dev/md0:
          Version : 1.2
    Creation Time : Tue May 27 15:28:05 2014
       Raid Level : raid1
       Array Size : 7812544 (7.45 GiB 8.00 GB)
    Used Dev Size : 7812544 (7.45 GiB 8.00 GB)
     Raid Devices : 2
    Total Devices : 2
      Persistence : Superblock is persistent

      Update Time : Tue May 27 15:33:10 2014
            State : active, resyncing
   Active Devices : 2
  Working Devices : 2
   Failed Devices : 0
    Spare Devices : 0

    Resync Status : 12% complete

             Name : riomhairePAD:0  (local to host riomhairePAD)
             UUID : b775b70c:e8d82e72:39e88cc4:e0c79c0f
           Events : 5

      Number   Major   Minor   RaidDevice State
         0       8       16        0      active sync   /dev/sdb
         1       8       32        1      active sync   /dev/sdc
Start copying a rather large file, stop the machine and remove one of the disks (or disconnect it if you're using a virtual machine). With this we are simulating a physical disk failure. Boot again and check the accessibility and integrity of data in the remaining device. Document the process of replacing the faulty unit and rebuilding the RAID table.
Start copying a rather large file, stop the machine and remove one of the disks to simulate a physical disk failure.
  $ ls -l ~/Downloads/debian-live-7.4-i386-standard.iso
  -rw-r--r-- 1 dobriain dobriain 565182464 May  4 07:04 /home/dobriain/Downloads/debian-live-7.4-i386-standard.iso

  $ sudo cp ~/Downloads/debian-live-7.4-i386-standard.iso /mnt/raid1-md0/
During copy stop computer, remove one of the disks and reboot. As the computer reboots the following message is displayed.
  ***           Warning degraded device detected           ***

  Press Y to start degraded RAID or N to launch recovery shell
Press Y and as the computer continues to boot it displays the following message.
Starting the RAID in degraded mode.
Upon reboot review the RAID. Notice that /dev/sdc is marked as removed.
  $ sudo mdadm --detail /dev/md0

  /dev/md0:
          Version : 1.2
    Creation Time : Tue May 27 15:28:05 2014
       Raid Level : raid1
       Array Size : 7812544 (7.45 GiB 8.00 GB)
    Used Dev Size : 7812544 (7.45 GiB 8.00 GB)
     Raid Devices : 2
    Total Devices : 1
      Persistence : Superblock is persistent

      Update Time : Tue May 27 15:56:55 2014
            State : clean, degraded
   Active Devices : 1
  Working Devices : 1
   Failed Devices : 0
    Spare Devices : 0

             Name : riomhairePAD:0  (local to host riomhairePAD)
             UUID : b775b70c:e8d82e72:39e88cc4:e0c79c0f
           Events : 13

      Number   Major   Minor   RaidDevice State
         0       8       16        0      active sync   /dev/sdb
         1       0        0        1      removed
Existing data on the drive is intact.
   $ sudo df -h /mnt/raid1-md0/
  Filesystem      Size  Used Avail Use% Mounted on
  /dev/md0        7.3G   17M  6.9G   1% /mnt/raid1-md0

  $ cat /mnt/raid1-md0/testfile
  This is a test
Check failed disk. Note that [2/1] [U_] replaces [2/2] [UU] from the earlier runs of the command.
  $ cat /proc/mdstat
  Personalities : [linear] [multipath] [raid0] [raid1] [raid6] [raid5] [raid4] [raid10]
  md0 : active raid1 sdb[0]
        7812544 blocks super 1.2 [2/1] [U_]

  unused devices: <none>
Remove the failed drive from the RAID array.
$ mdadm --manage /dev/md0 --fail /dev/sdc
Replace the physical drive.
  $ dmesg

  ...
  [  731.411863] usb 1-1.2: new high-speed USB device number 6 using ehci-pci
  [  731.505089] usb 1-1.2: New USB device found, idVendor=0781, idProduct=557c
  [  731.505098] usb 1-1.2: New USB device strings: Mfr=1, Product=2, SerialNumber=3
  [  731.505102] usb 1-1.2: Product: Cruzer Orbit
  [  731.505105] usb 1-1.2: Manufacturer: SanDisk
  [  731.505108] usb 1-1.2: SerialNumber: 4C530006020326110033
  [  731.505542] usb-storage 1-1.2:1.0: USB Mass Storage device detected
  [  731.505749] scsi7 : usb-storage 1-1.2:1.0
  [  732.506834] scsi 7:0:0:0: Direct-Access     SanDisk  Cruzer Orbit     1.27 PQ: 0 ANSI: 6
  [  732.507436] sd 7:0:0:0: Attached scsi generic sg3 type 0
  [  732.508903] sd 7:0:0:0: [sdc] 15633408 512-byte logical blocks: (8.00 GB/7.45 GiB)
  [  732.511286] sd 7:0:0:0: [sdc] Write Protect is off
  [  732.511296] sd 7:0:0:0: [sdc] Mode Sense: 43 00 00 00
  [  732.512391] sd 7:0:0:0: [sdc] Write cache: disabled, read cache: enabled, doesn't support DPO or FUA
  [  732.525679]  sdc:
  [  732.531656] sd 7:0:0:0: [sdc] Attached SCSI removable disk
Dump the partitions /dev/sdb to the new /dev/sdc.
  $ sudo sfdisk --dump /dev/sdb | sfdisk /dev/sdc

  Checking that no-one is using this disk right now ...
  BLKRRPART: Permission denied
  OK

  Disk /dev/sdc: 1020 cylinders, 247 heads, 62 sectors/track
  Old situation:
  Units = cylinders of 7840768 bytes, blocks of 1024 bytes, counting from 0

     Device Boot Start     End   #cyls    #blocks   Id  System
  /dev/sdc1          0       -       0          0    0  Empty
  /dev/sdc2          0       -       0          0    0  Empty
  /dev/sdc3          0       -       0          0    0  Empty
  /dev/sdc4          0       -       0          0    0  Empty
  New situation:
  Units = sectors of 512 bytes, counting from 0

     Device Boot    Start       End   #sectors  Id  System
  /dev/sdc1             0         -          0   0  Empty
  /dev/sdc2             0         -          0   0  Empty
  /dev/sdc3             0         -          0   0  Empty
  /dev/sdc4             0         -          0   0  Empty
  Warning: no primary partition is marked bootable (active)
  This does not matter for LILO, but the DOS MBR will not boot this disk.
  Successfully wrote the new partition table

  Re-reading the partition table ...
  BLKRRPART: Permission denied

  If you created or changed a DOS partition, /dev/foo7, say, then use dd(1)
  to zero the first 512 bytes:  dd if=/dev/zero of=/dev/foo7 bs=512 count=1
  (See fdisk(8).)
Now add the new physical disk to the RAID array. The new drive will be synchronised and while it does it will be shown as md0 : active raid1 sdc[2] sdb[0] and the recovery will be shown as a percentage. This can be reviewed by re-running the command regularly.
  $ sudo mdadm --manage /dev/md0 --add /dev/sdc
  mdadm: added /dev/sdc

  $ cat /proc/mdstat
  Personalities : [linear] [multipath] [raid0] [raid1] [raid6] [raid5] [raid4] [raid10]
  md0 : active raid1 sdc[2] sdb[0]
        7812544 blocks super 1.2 [2/1] [U_]
        [>....................]  recovery =  0.9% (75136/7812544) finish=48.0min speed=2683K/sec

  unused devices: <none>

  $ cat /proc/mdstat |grep recovery
        [=>...................]  recovery =  9.8% (770496/7812544) finish=44.8min speed=2617K/sec
  $ cat /proc/mdstat |grep recovery
        [============>........]  recovery = 61.7% (4826880/7812544) finish=18.7min speed=2650K/sec
  $ cat /proc/mdstat |grep recovery
        [==============>......]  recovery = 72.4% (5657152/7812544) finish=13.6min speed=2638K/sec
  $ cat /proc/mdstat |grep recovery
        [==================>..]  recovery = 91.5% (7150336/7812544) finish=4.2min speed=2617K/sec
  $ cat /proc/mdstat |grep recovery
        [===================>.]  recovery = 96.0% (7507456/7812544) finish=1.9min speed=2611K/sec

  $ cat /proc/mdstat
  Personalities : [linear] [multipath] [raid0] [raid1] [raid6] [raid5] [raid4] [raid10]
  md0 : active raid1 sdc[2] sdb[0]
        7812544 blocks super 1.2 [2/2] [UU]

  unused devices: <none>


  $ sudo mdadm --detail /dev/md0

  /dev/md0:
          Version : 1.2
    Creation Time : Tue May 27 15:28:05 2014
       Raid Level : raid1
       Array Size : 7812544 (7.45 GiB 8.00 GB)
    Used Dev Size : 7812544 (7.45 GiB 8.00 GB)
     Raid Devices : 2
    Total Devices : 2
      Persistence : Superblock is persistent

      Update Time : Tue May 27 17:06:09 2014
            State : clean
   Active Devices : 2
  Working Devices : 2
   Failed Devices : 0
    Spare Devices : 0

             Name : riomhairePAD:0  (local to host riomhairePAD)
             UUID : b775b70c:e8d82e72:39e88cc4:e0c79c0f
           Events : 40

      Number   Major   Minor   RaidDevice State
         0       8       16        0      active sync   /dev/sdb
         2       8       32        1      active sync   /dev/sdc
The RAID array is now fully recovered with two disks.
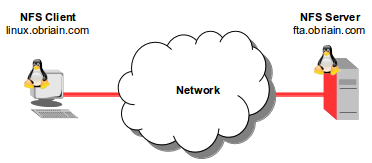
Install an NFS server on a Linux computer, configure it to make available the directory /library directory to users listed in the local /etc/passwd file, on the local LAN. Describe the whole procedure, testing access to that folder from another Linux computer (that may even be a virtual machine, if you do not have two computers.
NFS is a Client/Server solution that offers the ability to share the resources of a server with many clients. It is also possible to have clients without harddrives and they mount a virtual harddrive on a remote NFS Server. In this way all files are stored on the NFS Server.
 |
  fta:~$ mkdir library
  fta:~$ sudo ln -s /home/dobriain/library /library
  fta:~$ echo "This is a test file" > /library/testfile
Install the following packages on the NFS Server.
fta:~$ sudo apt-get install nfs-kernel-server nfs-common rpcbind
Under the line #Domain = localdomain add the domain name.
  fta:~$ vi /etc/idmapd.conf

  ...
  Domain = obriain.com
  ...
  fta:~$ ping -c1 linux.obriain.com
  PING linux.obriain.com (78.143.141.205) 56(84) bytes of data.
  64 bytes from 78.143.141.205: icmp_req=1 ttl=61 time=5.51 ms

  --- linux.obriain.com ping statistics ---
  1 packets transmitted, 1 received, 0% packet loss, time 0ms
  rtt min/avg/max/mdev = 5.519/5.519/5.519/0.000 ms
NFS exports are configured in the file /etc/exports. Each line begins with the absolute path of the directory to be exported, followed by a space separated list of allowed clients and their associated options. In this case the options are:
  fta:~$ sudo -s
  fta:~# echo -e "\n# /library access" >> /etc/exports
  fta:~# echo "/library linux.obriain.com(rw,sync,fsid=0,no_subtree_check)" >> /etc/exports
  fta:~# service nfs-kernel-server start
  [ ok ] Exporting directories for NFS kernel daemon....
  [ ok ] Starting NFS kernel daemon: nfsd mountd.

  fta:~# exportfs -a
  fta:~# exit
  fta:~$
  linux:~$ ping -c1 fta.obriain.com
  PING fta.obriain.com (109.106.96.158) 56(84) bytes of data.
  64 bytes from 109.106.96.158: icmp_req=1 ttl=62 time=8.12 ms

  --- fta.obriain.com ping statistics ---
  1 packets transmitted, 1 received, 0% packet loss, time 0ms
  rtt min/avg/max/mdev = 8.122/8.122/8.122/0.000 ms
Install the following packages for a Debian GNU/Linux NFS client.
linux:~$ sudo apt-get install nfs-common rpcbind
As on the Server add the shared Domain name.
  fta:~$ vi /etc/idmapd.conf
  ...
  Domain = obriain.com
  ...

  $ sudo /etc/init.d/nfs-common restart
Add an entry in the /etc/fstab file that mounts the remote NFS Server export to a local directory /mnt/library. Establish a number of options to allow user Read/Write (rw) access and the NO Set owner User ID (nosuid) option to block the operation of suid, and sgid bits being transferred from files on the NFS Server. Initially using the verbose -v option switch with the mount command highlights any potential problems that may exist.
  linux:~$ sudo -s
  linux:~# mkdir /mnt/library

  linux:~# echo -e "\n# /Mount to fta.obriain.com:/library" >> /etc/fstab
  linux:~# echo -e "fta.obriain.com:/library\t/mnt/library\tnfs\tuser,rw,nosuid\t0\t0" >> /etc/fstab

  linux:~# mount -v fta.obriain.com:/library

  mount.nfs: timeout set for Tue May 27 20:06:59 2014
  mount.nfs: trying text-based options 'vers=4,addr=109.106.96.158,clientaddr=78.143.141.205'
  mount.nfs: mount(2): No such file or directory
  mount.nfs: trying text-based options 'addr=109.106.96.158'
  mount.nfs: prog 100003, trying vers=3, prot=6
  mount.nfs: trying 109.106.96.158 prog 100003 vers 3 prot TCP port 2049
  mount.nfs: prog 100005, trying vers=3, prot=17
  mount.nfs: trying 109.106.96.158 prog 100005 vers 3 prot UDP port 37778
It is essential that users have the same User ID (UID) and Group ID (GID) at each side as NFS uses the ID numbers to implement permissions. In the example below note that the permissions in both cases are UID=1001 and GID=1001.
NFS Server
  fta:~$ id

  uid=1001(dobriain) gid=1001(dobriain) groups=1001(dobriain)
NFS Client
  linux:~$ id

  uid=1001(dobriain) gid=1001(dobriain) groups=1001(dobriain)
Confirm a successful mount.
  linux:~$ df -h | grep library

  fta.obriain.com:/library       29G  3.3G   24G  13% /mnt/library
Create a file on the NFS Share from the Client, use the user dobriain.
  linux:~$ echo "This is a client side write test" > /mnt/library/clienttestfile
  linux:~$ cat /mnt/library/clienttestfile

  This is a client side write test
Check the file in the /library directory on the Server and create a server side file for test with the user dobriain.
  fta:~$ cat /library/clienttestfile
  This is a client side write test

  fta:~$ echo "This is a Server side write test" > /library/servertestfile
  fta:~$ cat /library/servertestfile

  This is a Server side write test
Check the servertestfile on the NFS Client from the dobriain user.
  linux:~$ cat /mnt/library/servertestfile

  This is a Server side write test
Linux Software RAID. (Accessed: 27/5/2014)
Østergaard, J. The Software-RAID HOWTO. (Accessed: 27/5/2014)
Server World Info. (Accessed: 28/5/2014)
Timme, F. (2007). Replacing A Failed Hard Drive In A Software RAID1 Array. (Accessed: 27/5/2014)
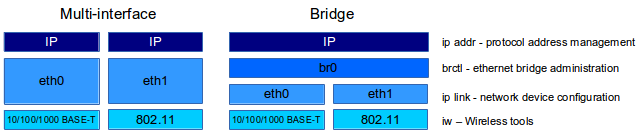 |
The configuration of the network interface on GNU/Linux depends on the networking need as the OS has incorporated much of the functionality one has come to expect of the typical switch or router. The graphic above shows a typical system with a wired Ethernet interface 10/100/1000 Base-T/TX called eth0 and an 802.11x WiFi interface called eth1 (obviously this is dependent on the hardware makeup of the system). Wireless interfaces are configured with the iw command from the nl80211 package. Interfaces in general are configured with the ip link commands from the iproute2 package. Interfaces are typically configured and addressed separately however using the brctl Ethernet bridge administration tools from the bridge-utils package it is possible to put multiple interfaces in the same Ethernet bridge and then apply addressing to the bridge instead of the individual interfaces. Finally IPv4 and IPv6 addressing are both carried out using the iproute2 tools ip addr and ip -6 addr tools which will be explored below.
GNU/Linux comes with a package called network-manager which attempts to keep an active network connection available at all times. Network Manager is a fantastic tool for computers that switch networks regularly like laptops, connect to wired network, remove from wired network, connect to WiFi, move into different WiFi network etc.. and all the time connected to the Internet. This functionality is not necessary for static computers like servers and can even be counter productive. For the type of testing in the next section it is essential that the network-manager is disabled.
$ sudo service network-manager stop
In order to configure Wi-Fi interfaces, the wireless-tools package is used. This package uses the commands starting with iw to configure a wireless interface, but configuration can also be carried out through the /etc/network/interfaces file.
The iw tool is from the nl80211 package and is used for configuring GNU/Linux wireless devices. This tool can show and manipulate wireless devices and their configurations. (It replaces the iwconfig tool from the wireless-tools package).
$ apt-get install iw
Before getting into the iw tool it is important to understand the WiFi card chipset information.
  $ lspci | grep Network
  04:00.0 Network controller: Broadcom Corporation BCM43228 802.11a/b/g/n
Search for the interface on the host that is wireless capable.
  $ iw dev eth1 info
  Interface eth1
  	ifindex 3
  	type managed
  	wiphy 0
Now bring up the discovered wireless interface.
$ sudo ip link set dev eth1 up
Run a scan to see if there are any Wireless Access Points (AP) available in the area.
  $ sudo iw dev eth1 scan |grep SSID
  	SSID: fta_ssid
  	SSID: 20snh
  	SSID: OB
  	SSID: SKYBF102
  	SSID: UPC1373998
The full scan is quite long so extract the data for the Basic Service Set (BSS) associated with the SSID fta_ssid only. In this case there is no security set.
  $ sudo iw dev eth1 scan ssid fta_ssid
  BSS d4:ca:6d:61:dd:8d (on eth1)
  	TSF: 0 usec (0d, 00:00:00)
  	freq: 2412
  	beacon interval: 100
  	capability: ESS ShortPreamble ShortSlotTime (0x0421)
  	signal: -11.00 dBm
  	last seen: 0 ms ago
  	Information elements from Probe Response frame:
  	SSID: fta_ssid
  	Supported rates: 1.0* 2.0 5.5 11.0
  	DS Parameter set: channel 1
Connect to the BSS with the SSID of fta_ssid.
  $ sudo iw dev eth1 connect -w fta_ssid
  eth1 (phy #0): connected to d4:ca:6d:61:dd:8d
This can be confirmed with the iw link command.
  $ iw dev eth1 link
  Connected to d4:ca:6d:61:dd:8d (on eth1)
  	SSID: fta_ssid
  	freq: 2412
Wi-Fi Protected Access (WPA) and Wi-Fi Protected Access II (WPA2) are two security protocols developed by the Wi-Fi Alliance to secure wireless computer networks as the Wired Equivalent Privacy (WEP) from the original IEEE 802.11 standard proved insecure. WPA is the implementation of the IEEE 802.11i DRAFT standard and WPA2 is the implementation of the full IEEE 802.11i-2004 standard. WPA2 introduced Counter Mode Cipher Block Chaining Message Authentication Code Protocol (CCMP), a new Advanced Encryption Standard (AES) based encryption mode with strong security. WPA2 became mandatory for all new devices since March 2006.
wpa_supplicant is the WPA Supplicant implementation for GNU/Linux. It implements key negotiation with a WPA Authenticator and it controls the roaming and IEEE 802.11 authentication/association of the Wireless LAN (WLAN) driver.
wpa_supplicant is designed to be a daemon that runs in the background and acts as the backend component controlling the wireless connection. It supports separate frontend programs and a text-based frontend (wpa_cli) and a GUI (wpa_gui) are included with wpa_supplicant.
To install the wpa_gui utility the wpagui needs to be installed.
$ sudo apt-get install wpagui
With a wpa2 key added to the AP rerun the scan on the BSS fta_ssid. Note that the security information shows, is that a Pre Shared Key (PSK) is set on the AP. The CCMP ciphers show that WPA2 is used for security.
  $ sudo iw dev eth1 scan ssid fta_ssid

  BSS d4:ca:6d:61:dd:8d (on eth1)
  	TSF: 0 usec (0d, 00:00:00)
  	freq: 2412
  	beacon interval: 100
  	capability: ESS Privacy ShortPreamble ShortSlotTime (0x0431)
  	signal: -22.00 dBm
  	last seen: 0 ms ago
  	Information elements from Probe Response frame:
  	SSID: fta_ssid
  	Supported rates: 1.0* 2.0 5.5 11.0
  	DS Parameter set: channel 1
  	RSN:	 * Version: 1
  		 * Group cipher: CCMP
  		 * Pairwise ciphers: CCMP
  		 * Authentication suites: PSK
  		 * Capabilities: (0x0000)
Create a wpa_supplicant.conf file with the key on the AP. Use the wpa_passphrase utility to generate a WPA PSK from an ASCII passphrase for a SSID.
  $ wpa_passphrase fta_ssid
  # reading passphrase from stdin
  mywpakey
  network={
  	ssid="fta_ssid"
  	#psk="mywpakey"
  	psk=f8af67891dd4b156041e1757b68dec57bfbc28035486f3234aacabaae62ad6b6
  }


  $ sudo vi wpa_supplicant.conf

  network={
  	ssid="fta_ssid"
  	#psk="mywpakey"
  	psk=f8af67891dd4b156041e1757b68dec57bfbc28035486f3234aacabaae62ad6b6
  }
To run the wpa_supplicant the following option switches apply.
| option | Description | |
|---|---|---|
| -B | Run daemon in the background | |
| -c | Path to configuration file | |
| -D | Driver to use | |
| -d | Debugging verbosity (-dd even more) | |
| -i | Interface to listen on, i.e. eth1 | |
Here is a selection of drivers that are associated with the -D option switch. Whether to use one of these or another can usually be determined by first trying the generic drivers, and should they fail use dmesg to determine the driver that the system has used for the interface.
| Driver | Description | |
|---|---|---|
| nl80211 | GNU/Linux Netlink nl80211/cfg80211 (generic) | |
| wext | GNU/Linux wireless extensions (generic) | |
| hostap | Host AP driver (Intersil Prism2/2.5/3) | |
| hermes | Agere Systems Inc. driver (Hermes-I/Hermes-II) | |
| madwifi | MADWIFI 802.11 support (Atheros, etc.) | |
| broadcom | Broadcom wl.o driver | |
| wired | wpa_supplicant wired Ethernet driver | |
| roboswitch | wpa_supplicant Broadcom switch driver | |
| bsd | BSD 802.11 support (Atheros, etc.) | |
| ndis | Windows NDIS driver | |
nl80211 is the new 802.11 netlink interface public header. Netlink is a socket family used for the transfer of networking Inter Process Communication (IPC) between the kernel and user space processes. For example iproute2 and iw use netlink to communicate with the kernel. Other older drivers are based on Input/Output ConTroL (ioctl) system calls. Netlink is designed to be more flexible than ioctl. cfg80211 is the GNU/Linux 802.11 configuration API. nl80211 is used to configure a cfg80211 device.
$ sudo wpa_supplicant -B -D nl80211 -c /etc/wpa_supplicant.conf -i eth1
Confirm that the link is connected.
   $ iw dev eth1 link
  Connected to d4:ca:6d:70:90:d7 (on eth1)
  	SSID: fta_ssid
  	freq: 2412
GNU/Linux through the bridge-utils offers the functionality to create an internal Ethernet switch and put selected interfaces into it. Control of the bridge is via the brctl command. This command gives the configuration options expected of a typical Ethernet switch. It supports functionality like Spanning Tree Protocol (STP).
  $ sudo apt-get install bridge-utils

  $ sudo brctl --help
  Usage: brctl [commands]
  commands:
  	addbr     	<bridge>			add bridge
  	delbr     	<bridge>			delete bridge
  	addif     	<bridge> <device>		add interface to bridge
  	delif     	<bridge> <device>		delete interface from bridge
  	hairpin   	<bridge> <port> {on|off}	turn hairpin on/off
  	setageing 	<bridge> <time>			set ageing time
  	setbridgeprio	<bridge> <prio>			set bridge priority
  	setfd     	<bridge> <time>			set bridge forward delay
  	sethello  	<bridge> <time>			set hello time
  	setmaxage 	<bridge> <time>			set max message age
  	setpathcost	<bridge> <port> <cost>		set path cost
  	setportprio	<bridge> <port> <prio>		set port priority
  	show      	[ <bridge> ]			show a list of bridges
  	showmacs  	<bridge>			show a list of mac addrs
  	showstp   	<bridge>			show bridge stp info
  	stp       	<bridge> {on|off}		turn stp on/off
To use the bridge utilities a bridge must be created and then interfaces added to it. It is important to note that once interfaces are added to the bridge, addressing at the Internet Layer (Open Systems Interconnection (OSI) Network Layer) is applied to the bridge interface and not the physical interface (eth0, eth1, ..). In the example below the interfaces eth0 and eth1 are now within the bridge br0. IP addressing at the next stage is applied to br0 (as shown in the right side of the diagram above).
  $ sudo brctl addbr br0
  $ sudo brctl addif br0 eth0 eth1
Now that the bridge is created review it.
  $ sudo brctl show
  bridge name	bridge id		STP enabled	interfaces
  br0		8000.2a7c0a401a31	no		eth0
  							eth1


  $ sudo brctl showmacs br0
  port no	mac addr		is local?	ageing timer
    1	00:04:23:b1:8f:e2	no		   0.02
    1	00:14:22:09:57:0a	no		  23.24
    1	00:60:e0:50:a0:29	no		   9.50
    1	2a:7c:0a:40:1a:31	yes		   0.00
    3	32:e5:4e:7d:ad:de	no		  43.32
    4	36:96:9e:e5:38:fc	yes		   0.00
    4	3a:7f:77:2a:1e:46	no		  69.38
    2	5e:cd:68:17:2e:d1	no		  37.73
    1	b6:7a:b1:d5:03:8c	no		  31.97
    3	c6:33:b1:f0:f1:a4	yes		   0.00
    1	d2:09:f9:15:70:35	no		  27.91
    1	d6:58:a4:c8:f7:d1	no		  24.92
    2	d6:ab:e4:1e:ea:a0	yes		   0.00
To work with the ip commands of iproute package it is important to ensure that there are no manual addresses configured in /etc/network/interfaces file. Remove any entries except those for the loopback interface lo.
  $ cat /etc/network/interfaces
  # interfaces(5) file used by ifup(8) and ifdown(8)
  auto lo
  iface lo inet loopback
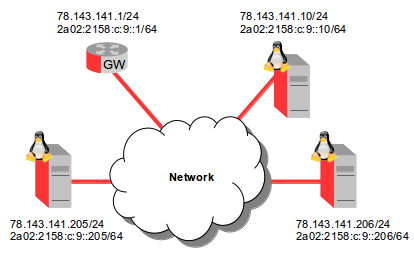
The configurations below are based on the following IPv4 network diagram.
 |
The iproute2 link control command is ip link. Note in the example the state of the interface eth0 is DOWN as network-manager has been disabled.
  $ sudo ip link list
  1: lo: <LOOPBACK,UP,LOWER_UP> mtu 65536 qdisc noqueue state UNKNOWN mode DEFAULT
      link/loopback 00:00:00:00:00:00 brd 00:00:00:00:00:00
  2: eth0: <BROADCAST,MULTICAST> mtu 1500 qdisc mq state DOWN mode DEFAULT qlen 1000
      link/ether 00:12:3f:dc:ab:47 brd ff:ff:ff:ff:ff:ff
  3: eth1: <BROADCAST,MULTICAST> mtu 1500 qdisc pfifo_fast state DOWN mode DEFAULT qlen 1000
      link/ether 00:13:ce:01:66:92 brd ff:ff:ff:ff:ff:ff
Change the state of the eth0 interface from DOWN to UP.
  $ sudo ip link set dev eth0 up

  $ sudo ip link list
  1: lo: <LOOPBACK,UP,LOWER_UP> mtu 65536 qdisc noqueue state UNKNOWN mode DEFAULT
      link/loopback 00:00:00:00:00:00 brd 00:00:00:00:00:00
  2: eth0: <BROADCAST,MULTICAST,UP,LOWER_UP> mtu 1500 qdisc mq state UP mode DEFAULT qlen 1000
      link/ether 00:12:3f:dc:ab:47 brd ff:ff:ff:ff:ff:ff
  3: eth1: <BROADCAST,MULTICAST> mtu 1500 qdisc pfifo_fast state DOWN mode DEFAULT qlen 1000
      link/ether 00:13:ce:01:66:92 brd ff:ff:ff:ff:ff:ff
Add an IPv4 address to the eth0 interface. The -4 option switch is optional for IPv4 as IPv4 is assumed if -6 is not specified.
$ sudo ip -4 addr add 78.143.141.20/24 dev eth0
  $ sudo ip -4 addr list
  1: lo: <LOOPBACK,UP,LOWER_UP> mtu 65536 qdisc noqueue state UNKNOWN
      inet 127.0.0.1/8 scope host lo
         valid_lft forever preferred_lft forever
  2: eth0: <BROADCAST,MULTICAST> mtu 1500 qdisc mq state DOWN qlen 1000
      inet 78.143.141.20/24 scope global eth0
         valid_lft forever preferred_lft forever
Add an IPv4 gateway router to the routes table for all routes not otherwise specified.
$ sudo ip route add default via 78.143.141.1
or
$ sudo ip route add default dev eth0
While the network diagram does not require a static route, I include one here for completeness.
$ sudo ip route add 78.143.152.0/24 via 78.143.141.1
or
$ sudo ip route add 78.143.152.0/24 dev eth0
  $ sudo ip route list
  default via 10.10.10.1 dev eth0
  10.10.10.0/24 dev eth0  proto kernel  scope link  src 10.10.10.10
  192.168.1.0/24 via 10.10.10.1 dev eth0
iproute2 comes with a very neat set of monitoring tools. Here is an example monitoring neighbours captured in the Address Resolution Protocol (ARP) cache.
  $ ip -4 monitor neigh
  78.143.141.1 dev eth0 lladdr 00:0c:42:d1:3c:38 STALE
The configurations below are based on the following IPv6 network diagram.
 |
Like IPv4 the ip link list command will show the interface status, the -6 option switch makes it IPv6 specific.
  $ sudo ip -6 link list

  1: lo: <LOOPBACK,UP,LOWER_UP> mtu 65536 qdisc noqueue state UNKNOWN mode DEFAULT
      link/loopback 00:00:00:00:00:00 brd 00:00:00:00:00:00
  2: eth0: <BROADCAST,MULTICAST,UP,LOWER_UP> mtu 1500 qdisc mq state UP mode DEFAULT qlen 1000
      link/ether 00:12:3f:dc:ab:47 brd ff:ff:ff:ff:ff:ff
Reviewing the IPv6 addresses with the -6 option switch.
  $ sudo ip -6 addr list

  1: lo: <LOOPBACK,UP,LOWER_UP> mtu 65536
      inet6 ::1/128 scope host
         valid_lft forever preferred_lft forever
  2: eth0: <BROADCAST,MULTICAST,UP,LOWER_UP> mtu 1500 qlen 1000
      inet6 2a02:aaaa::1021:3ae0:b092:be7e/64 scope global temporary dynamic
         valid_lft 602791sec preferred_lft 83791sec
      inet6 2a02:aaaa::212:3fff:fedc:ab47/64 scope global dynamic
         valid_lft 2591911sec preferred_lft 604711sec
      inet6 fe80::212:3fff:fedc:ab47/64 scope link
         valid_lft forever preferred_lft forever
To add an IPv6 address to an interface follow the same format as the IPv4 equivalent with the -6 switch.
$ sudo ip -6 addr add 2a02:aaaa::20/64 dev eth0
Add an IPv6 gateway router to the routes table for all routes not otherwise specified.
$ sudo ip route add default via 2a02:aaaa::1
or
$ sudo ip route add default dev eth0
Instead of ping to test connectivity to an IPv6 address, a utility called ping6 must be used.
  $ ping6 2a02:aaaa::1
  PING 2a02:aaaa::1(2a02:aaaa::1) 56 data bytes
  64 bytes from 2a02:aaaa::1: icmp_seq=1 ttl=64 time=0.592 ms
  64 bytes from 2a02:aaaa::1: icmp_seq=2 ttl=64 time=0.266 ms
Instead of ARP as used by IPv4, IPv6 uses the ICMPv6 Neighbour Discovery (ND) messages. To review the IPv6 neighbours cached use the ip -6 neigh list command.
  $ sudo ip -6 neigh list dev eth0
  2a02:aaaa::1 lladdr 00:0c:42:d1:3c:38 router REACHABLE
  fe80::20c:42ff:fed1:3c38 lladdr 00:0c:42:d1:3c:38 router REACHABLE
To print the list of IPv6 routes known by the host connected to the router R1.
  $ ip -6 route list
  2a02:2::/64 dev eth1  proto kernel  metric 256  expires 2591731sec
  2a02:aaaa::/64 dev eth0  proto kernel  metric 256  expires 2591689sec
  fe80::/64 dev eth0  proto kernel  metric 256
  fe80::/64 dev eth1  proto kernel  metric 256
  default via fe80::20c:42ff:fed1:3c38 dev eth0  proto ra  metric 1024  expires 1489sec
  default via fe80::20c:42ff:fe8b:73e8 dev eth1  proto ra  metric 1024  expires 1531sec
  default via fe80::20c:42ff:fe8b:769a dev eth1  proto ra  metric 1024  expires 1395sec
  $ ip -6 monitor address
  3: eth1    inet6 2a02:2::213:ceff:fe01:6692/64 scope global dynamic
         valid_lft 2592000sec preferred_lft 604800sec
  3: eth1    inet6 2a02:2::c1ad:a142:f05a:5539/64 scope global temporary dynamic
         valid_lft 600483sec preferred_lft 81483sec
  2: eth0    inet6 2a02:aaaa::212:3fff:fedc:ab47/64 scope global dynamic
         valid_lft 2592000sec preferred_lft 604800sec
  2: eth0    inet6 2a02:aaaa::1021:3ae0:b092:be7e/64 scope global temporary dynamic
         valid_lft 599887sec preferred_lft 80887sec
  3: eth1    inet6 2a02:2::213:ceff:fe01:6692/64 scope global dynamic
         valid_lft 2592000sec preferred_lft 604800sec
  3: eth1    inet6 2a02:2::c1ad:a142:f05a:5539/64 scope global temporary dynamic
         valid_lft 600364sec preferred_lft 81364sec
  3: eth1    inet6 2a02:2::213:ceff:fe01:6692/64 scope global dynamic
         valid_lft 2592000sec preferred_lft 604800sec
In IPv4 automatic configuration can be achieved using the DHCP. In this case the Internet Systems Consortium (ISC) DHCP Client, dhclient utility will request an address from a DHCP Server. Two option switch's in particular are very useful with this tool, -v enables verbose log messages and -r allows for the release of the current lease. In the example below dhclient grabs an IP address from the network router DHCP Server.
  $ sudo dhclient -v eth0
  Internet Systems Consortium DHCP Client 4.2.4
  Copyright 2004-2012 Internet Systems Consortium.
  All rights reserved.
  For info, please visit https://www.isc.org/software/dhcp/

  Listening on LPF/eth1/1c:3e:84:ed:99:0b
  Sending on   LPF/eth1/1c:3e:84:ed:99:0b
  Sending on   Socket/fallback
  DHCPDISCOVER on eth1 to 255.255.255.255 port 67 interval 3 (xid=0x2eb4b888)
  DHCPREQUEST of 192.168.22.159 on eth1 to 255.255.255.255 port 67 (xid=0x2eb4b888)
  DHCPOFFER of 192.168.22.159 from 192.168.22.1
  DHCPACK of 192.168.22.159 from 192.168.22.1
  bound to 192.168.22.159 -- renewal in 97392 seconds.
SLAAC is an IPv6 process that removes the requirement for the manual configuration of hosts, minimal configuration of routers, and no additional servers. The stateless mechanism enables a host to generate its own Global address. It is based on ICMPv6. The stateless mechanism uses local information as well as non-local information that is advertised by routers to generate the addresses.
Routers advertise prefixes that identify the subnet or subnets that are associated with a link. Hosts generate an interface identifier that uniquely identifies an interface on a subnet. An address is formed by combining the prefix and the interface identifier. In the absence of routers, a host can generate only link-local addresses. However, link-local addresses are only sufficient for allowing communication among nodes that are attached to the same link.
Forming a link-local address
Here are the typical steps performed by an interface during SLAAC. Auto-configuration is performed only on multicast-capable links. SLAAC begins when a multicast-capable interface is enabled, for example, during system startup. Nodes, both hosts and routers, begin the auto-configuration process by generating a link-local address for the interface. A link-local address is formed by appending the interface's identifier to the well-known link-local prefix fe80::.
EUI-48 → EUI-64
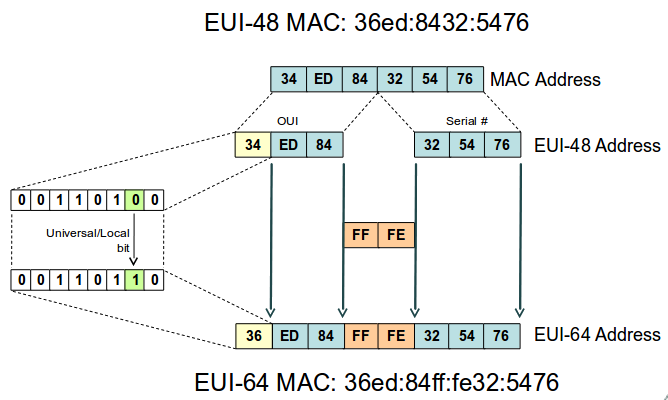 |
Current Medium Access Control (MAC) addresses use the Institute of Electrical and Electronics Engineers (IEEE) 48-Bit Extended Unique Identifier (EUI-48) however it has been predicted that there is a need for larger address sizes so the EUI-64 address was formed. IPv6 uses EUI-64 and not EUI-48 MAC addresses. But current interfaces are identified using EUI-48 bit MAC addresses. To solve the problem a conversion mechanism where FFFE (11111111 11111111 11111111 11111110) is inserted in the centre of the EUI-48 bit MAC address. Additionally the 7th bit in the first byte is changed from 0 to 1 indicating the original address was EUI-48. By adding this EUI-64 address to FE80 a link-local address is formed:
EUI-48 (36ed:8432:5476) → EUI-64 (36ed:84ff:fe32:5476) → IPv6 (fe80::36ed:84ff:fe32:5476)
Duplicate Address Detection (DAD)
The next step is called DAD where the host, once its link-local address is created will send an ICMPv6 Neighbour Solicitation (135) informational message to the newly created link-local address to see if an ICMPv6 Neighbour Advertisement (136) informational message will be received. If an advertisement is received then it determines that the address is a duplicate and the SLAAC process stops. If none is received SLAAC proceeds to the next step.
Obtaining a Global scope prefix
After confirming that the link-local address is unique the host sends a ICMPv6 Router Solicitation (133) informational message to the well-known all-routers multicast group ff02::2. If an ICMPv6 Router Advertisement (134) informational message is received from a router the host creates a new IPv6 address with Global scope by taking the advertised prefix and pre-pending it to the EUI-64 address created on bootup. Router Advertisement (134) informational messages contain two flags that indicate what type of stateful Auto-configuration should be performed. A Managed address configuration flag (M-Flag) indicates whether hosts should use SLAAC to obtain global scope IPv6 addresses. The other stateful configuration flag (O-Flag) if set (1) indicates that hosts should use SLAAC to obtain additional information, excluding addresses, from a stateless DHCPv6 Server.
  Internet Protocol Version 6
      0110 .... = Version: 6
      Payload length: 64
      Next header: ICMPv6 (0x3a)
      Hop limit: 255
      Source: fe80::223:5eff:fe0e:6816
      Destination: ff02::1 (all-hosts link-local)
  Internet Control Message Protocol v6
      Type: 134 (Router advertisement)
      Code: 0
      Checksum: 0x9246 [correct]
      Cur hop limit: 64
      Flags: 0x40
          0... .... = Not managed  (M-Flag)
          .1.. .... = Other Configuration (O-Flag)
          ..0. .... = Not Home Agent
          ...0 0... = Router preference: Medium
      Router lifetime: 1800
      Reachable time: 5000
      Retrans timer: 0
      ICMPv6 Option (Source link-layer address)
          Type: Source link-layer address (1)
          Length: 8
          Link-layer address: 00:23:5e:0e:68:16
      ICMPv6 Option (MTU)
          Type: MTU (5)
          Length: 8
          MTU: 1500
      ICMPv6 Option (Prefix information)
          Type: Prefix information (3)
          Length: 32
          Prefix length: 64
          Flags: 0xc0
              1... .... = Onlink
              .1.. .... = Auto
              ..0. .... = Not router address
              ...0 .... = Not site prefix
          Valid lifetime: 86400
          Preferred lifetime: 86400
          Prefix: 2a02:aaaa:2::
Although IPv6's SLAAC removes the primary motivation for DHCP in IPv4, DHCPv6 can still be used to statefully assign addresses if the network administrator desires more control over addressing. It can also be used to distribute information which is not otherwise discoverable; the most important case of this is the DNS nameserver information.
A major difference with DHCPv4 Servers is that hosts send broadcasts to find DHCP Servers whereas with DHCPv6 Servers IPv6 hosts send IPv6 multicast. The reserved address for hosts to send packets to an unknown DHCPv6 Server is FF02::1:2.
Upon reboot particularly for servers it is essential that the IP address configuration remains permanent. This can be done by creating a script of the iproute2 commands in the /etc/rc.local directory. There is however another means that is more typical. The /etc/network/interfaces file holds the network configuration to be acted upon by the commands:
The word auto at the beginning of a line indicates the interfaces to be brought up when the ifup command is run with the -a option switch. This option is typically the preserve of system boot scripts.
  auto lo
  iface lo inet loopback

  auto eth0
  iface eth0 inet static
     address 78.143.141.78
     netmask 255.255.255.0
     gateway 78.141.143.1

  iface eth0 inet6 static
     pre-up modprobe ipv6
     address 2a02:aaaa::20
     netmask 64
     gateway 2a02:aaaa::1
To setup DHCP for an interface on the execution of the ifup command is as follows.
The setup for IPv4 DHCP and IPv6 SLAAC configuration is shown below.
  auto lo
  iface lo inet loopback

  auto eth0
  iface eth0 inet dhcp
  iface eth0 inet6 auto
It is also possible to add logic to the decision making in the /etc/network/interfaces file. This is achieved in the form of pre-up and post-down commands. These commands can perform a test, like does a file exist, or run a script. If the exit status of the pre-up command is 1 then the interface is not configured.
Take for example the following snippet. If a test is performed for the existence of the file /etc/network/local-net-ok it returns an exit status of 1. If then I create the file and rerun the test the exit status is now 0.
  $ [ -f /etc/network/local-net-ok ]; echo $?
  1

  $ touch /etc/network/local-net-ok

  $ [ -f /etc/network/local-net-ok ]; echo $?
  0
Applying this logic to the /etc/network/interfaces file, the pre-up command will only bring the eth0 interface up if the /etc/network/local-net-ok file exists.
  auto eth0
  iface eth0 inet dhcp
     pre-up [ -f /etc/network/local-network-ok ]
  iface eth0 inet6 auto
     pre-up [ -f /etc/network/local-network-ok ]
Name resolution is the process of resolving hostnames and hostname/domain to actual IP addresses. Typically this is achieved using the /etc/hosts file and the name resolver indicated by the /etc/resolv.conf file. The /etc/nsswitch.conf file determines the order that name resolution is performed. The example file below indicates hosts should be resolved by first consulting files i.e. the entries in /etc/hosts and if that fails dns to the /etc/resolv.conf file should be consulted to determine the IP of the DNS Server and a DNS request to that server tried to determine the IP address required.
  $ cat /etc/nsswitch.conf
  # /etc/nsswitch.conf

  passwd:         compat
  group:          compat
  shadow:         compat

  hosts:          files dns
  networks:       files

  protocols:      db files
  services:       db files
  ethers:         db files
  rpc:            db files


  netgroup:       nis
The /etc/hosts file is a static table lookup for hostnames. If resolutions for hostnames to IP addresses cannot be found in this file then the DNS Servers indicated in the /etc/resolv.conf file are consulted.
  $ cat /etc/hosts
  127.0.0.1	localhost
  127.0.1.1	training
  78.141.143.67   training.ftacademy.org

  # The following lines are desirable for IPv6 capable hosts
  ::1     ip6-localhost ip6-loopback
  fe00::0 ip6-localnet
  ff00::0 ip6-mcastprefix
  ff02::1 ip6-allnodes
  ff02::2 ip6-allrouters
If the /etc/hosts file fails to produce an IP address for the required name then the host uses DNS to request an IP address for the name from the listed DNS Servers.
  $ cat /etc/resolv.conf

  domain ftacademy.org
  search ftacademy.org freeknowledge.eu
  nameserver 2a02:2e69:d001:234a::10
  nameserver 78.143.141.10
  nameserver 78.143.141.11
The ss utility can dump socket statistics like Transmission Control Protocol (TCP) and other state information.
  $ ss --all

  State      Recv-Q Send-Q      Local Address:Port          Peer Address:Port
  LISTEN     0      128                    :::55727                   :::*
  LISTEN     0      128                    :::sunrpc                  :::*
  LISTEN     0      128                     *:sunrpc                   *:*
  LISTEN     0      128                    :::ssh                     :::*
  LISTEN     0      128                     *:ssh                      *:*
  LISTEN     0      20                    ::1:smtp                    :::*
  LISTEN     0      20              127.0.0.1:smtp                     *:*
  LISTEN     0      128                     *:36263                    *:*
  LISTEN     0      50              127.0.0.1:mysql                    *:*
  LISTEN     0      128             127.0.0.1:11211                    *:*
  ESTAB      0      208        78.143.141.20:ssh         109.78.211.123:51802


  $ ss --info

  State      Recv-Q Send-Q      Local Address:Port          Peer Address:Port
  ESTAB      0      0      2a02:2158:c:9::206:ssh     2a02:2158:c:9::205:58075
  	 cubic wscale:4,3 rto:212 rtt:14/15 ato:40 cwnd:10 send 8.2Mbps rcv_rtt:4 rcv_space:14280
  ESTAB      0      208        78.143.141.206:ssh         109.78.211.123:51802
  	 cubic wscale:7,3 rto:224 rtt:27.5/3 ato:40 cwnd:10 send 4.1Mbps rcv_rtt:36 rcv_space:14480

  $ ss --summary

  Total: 67 (kernel 0)
  TCP:   12 (estab 2, closed 0, orphaned 0, synrecv 0, timewait 0/0), ports 0

  Transport Total     IP        IPv6
  *	  0         -         -
  RAW	  0         0         0
  UDP	  8         5         3
  TCP	  12        7         5
  INET	  20        12        8
  FRAG	  0         0         0

  $ ss --options state established '( dport = :ssh or sport = :ssh )'

  Recv-Q Send-Q           Local Address:Port               Peer Address:Port
  0      0           2a02:2158:c:9::206:ssh          2a02:2158:c:9::205:58075    timer:(keepalive,115min,0)
  0      256             78.143.141.206:ssh              109.78.211.123:51802    timer:(on,224ms,0)
Droms, R. (1997). Dynamic Host Configuration Protocol.
Giraud, J.P. (2012). WPA support in Debian. (Accessed: 24/5/2014)
Linux Wireless. nl80211. (Accessed: 24/5/2014)
Malinen, J. (2013). Linux WPA/WPA2/IEEE 802.1X Supplicant. (Accessed: 24/5/2014)
Mockapetris, P. (1987). Domain names - Concepts and facilities.
Mockapetris, P. (1987). Domain names - Implementation and specification.
Simmons, G. (2013). Bridging Network Connections. (Accessed: 24/5/2014)
Smith, A. (2010). iproute2: Life after ifconfig. (Accessed: 24/-5/2014)
Thompson, S., Huitema, C., Ksinant, V., Souissi, M. (2003). DNS Extensions to Support IP Version 6.
Thompson, S., Narten, T., Jinmei, T. (2007). IPv6 Stateless Address Autoconfiguration.
Describe how to configure a firewall on a Linux system in order to allow ONLY the following connections:
 |
It is important to limit access to a host to only those services it is offering. GNU/Linux comes with set of hooks inside the kernel that allow kernel modules to register callback functions with the network stack. A registered callback function is then called back for every packet that traverses the respective hook within the network stack. This filter system is called Netfilter and it is accessed using tools called iptables and ip6tables.
The conntrack feature within iptables means that Netfilter can be stateful and packets can be related to tracked connections in four different so called states.
These are accessed with the --state option switch.
The conntrack-tools package is a set tools to allow interaction with the stateful packet inspection for iptables and ip6tables. The conntrack-tools are the userspace daemon conntrackd and the command line interface conntrack.
Check the iptables for firewall rules.
  $ sudo iptables -L

  Chain INPUT (policy ACCEPT)
  target     prot opt source               destination

  Chain FORWARD (policy ACCEPT)
  target     prot opt source               destination

  Chain OUTPUT (policy ACCEPT)
  target     prot opt source               destination
iptables rules should be stored in two files.
$ sudo mkdir /etc/iptables
iptables rules.v4
Edit the iptables firewall rules files to add IPv4 rules.
  $ sudo vi /etc/iptables/rules.v4

  *filter

  ## Filter to allow ssh (3000), smtp (25), Secure IMAP (143), email relaying from auth users (587), while all else is blocked. ##

  #  Flush tables

  -F

  #  Allow all loopback (lo0) traffic and drop all traffic to 127/8 that doesn't use lo0

  -A INPUT -i lo -j ACCEPT
  -A INPUT -d 127.0.0.0/8 -j REJECT

  # Allow Incoming SSH on port 3000

  -A INPUT -i eth0 -p tcp --dport 3000 -m state --state NEW,ESTABLISHED -j ACCEPT
  -A OUTPUT -o eth0 -p tcp --sport 3000 -m state --state ESTABLISHED -j ACCEPT

  # Incoming email from other internet domains, addressed to system users, on port 25

  -A INPUT -i eth0 -p tcp --dport 25 -m state --state NEW,ESTABLISHED -j ACCEPT
  -A OUTPUT -o eth0 -p tcp --sport 25 -m state --state ESTABLISHED -j ACCEPT

  # Allow email relaying on port 587

  -A OUTPUT -p tcp -d 78.143.141.10 --dport 25 -m state --state NEW -j ACCEPT
  -A OUTPUT -p tcp --dport 25 -m state --state NEW -j DROP

  # Allow Secure IMAP on port 143

  -A INPUT -i eth0 -p tcp --dport 143 -m state --state NEW,ESTABLISHED -j ACCEPT
  -A OUTPUT -o eth0 -p tcp --sport 143 -m state --state ESTABLISHED -j ACCEPT

  #  Log iptables denied calls
  -A INPUT -m limit --limit 5/min -j LOG --log-prefix "iptables denied: " --log-level 7

  #  Drop all other inbound - default deny unless explicitly allowed policy
  -A INPUT -j DROP
  -A FORWARD -j DROP

  COMMIT
ip6tables rules.v6
Edit the ip6tables firewall rules files to add IPv6 rules.
  $ sudo vi /etc/iptables/rules.v6

  *filter

  ## Filter to allow ssh (3000), smtp (25), Secure IMAP (143), email relaying from auth users (587), while all else is blocked. ##

  #  Flush tables

  -F

  #  Allow all loopback (lo0) traffic

  -A INPUT -i lo -j ACCEPT
  -A INPUT -d ::1/128 -j REJECT

  # Allow Incoming SSH on port 3000

  -A INPUT -i eth0 -p tcp --dport 3000 -m state --state NEW,ESTABLISHED -j ACCEPT
  -A OUTPUT -o eth0 -p tcp --sport 3000 -m state --state ESTABLISHED -j ACCEPT

  # Incoming email from other internet domains, addressed to system users, on port 25

  -A INPUT -i eth0 -p tcp --dport 25 -m state --state NEW,ESTABLISHED -j ACCEPT
  -A OUTPUT -o eth0 -p tcp --sport 25 -m state --state ESTABLISHED -j ACCEPT

  # Allow email relaying on port 587

  -A OUTPUT -p tcp -d 2a02:2158:c:9::10 --dport 25 -m state --state NEW -j ACCEPT
  -A OUTPUT -p tcp --dport 25 -m state --state NEW -j DROP

  # Allow Secure IMAP on port 143

  -A INPUT -i eth0 -p tcp --dport 143 -m state --state NEW,ESTABLISHED -j ACCEPT
  -A OUTPUT -o eth0 -p tcp --sport 143 -m state --state ESTABLISHED -j ACCEPT

  #  Allow ICMP (ping) - it is not a good idea to block ICMPv6 traffic, IPv6 dependent on it
  -A INPUT -p ipv6-icmp -j ACCEPT

  #  Log iptables denied calls
  -A INPUT -m limit --limit 5/min -j LOG --log-prefix "ip6tables denied: " --log-level 7

  #  Drop all other inbound - default deny unless explicitly allowed policy
  #  'Connection refused' message at the other end, masking the firewall's presence
  -A INPUT -j REJECT --reject-with icmp6-port-unreachable
  -A FORWARD -j REJECT --reject-with icmp6-port-unreachable

  COMMIT
Rerun the iptables and ip6tables but this time redirecting the new rules in.
  $ sudo iptables-restore < /etc/iptables/rules.v4
  $ sudo ip6tables-restore < /etc/iptables/rules.v6
Check the running iptables and ip6tables firewall rules to see changes.
  $ sudo iptables -L

  Chain INPUT (policy ACCEPT)
  target     prot opt source               destination
  ACCEPT     all  --  anywhere             anywhere
  REJECT     all  --  anywhere             127.0.0.0/8          reject-with icmp-port-unreachable
  ACCEPT     all  --  anywhere             anywhere             state RELATED,ESTABLISHED
  ACCEPT     tcp  --  anywhere             anywhere             tcp dpt:http
  ACCEPT     tcp  --  anywhere             anywhere             tcp dpt:https
  ACCEPT     tcp  --  anywhere             anywhere             state NEW tcp dpt:ssh
  ACCEPT     icmp --  anywhere             anywhere
  LOG        all  --  anywhere             anywhere             limit: avg 5/min burst 5 LOG level debug prefix "iptables denied: "
  DROP       all  --  anywhere             anywhere

  Chain FORWARD (policy ACCEPT)
  target     prot opt source               destination
  DROP       all  --  anywhere             anywhere

  Chain OUTPUT (policy ACCEPT)
  target     prot opt source               destination
  ACCEPT     all  --  anywhere             anywhere


  $ sudo ip6tables -L

  Chain INPUT (policy ACCEPT)
  target     prot opt     source           destination
  ACCEPT     all          anywhere         anywhere
  ACCEPT     all          anywhere         anywhere             state RELATED,ESTABLISHED
  ACCEPT     all          anywhere         anywhere             state RELATED,ESTABLISHED
  ACCEPT     tcp          anywhere         anywhere             state NEW tcp dpt:http
  ACCEPT     tcp          anywhere         anywhere             state NEW tcp dpt:https
  ACCEPT     tcp          anywhere         anywhere             state NEW tcp dpt:ssh
  ACCEPT     ipv6-icmp    anywhere         anywhere
  LOG        all          anywhere         anywhere             limit: avg 5/min burst 5 LOG level debug prefix "ip6tables denied: "
  REJECT     all          anywhere         anywhere             reject-with icmp6-port-unreachable

  Chain FORWARD (policy ACCEPT)
  target     prot opt     source           destination
  REJECT     all          anywhere         anywhere             reject-with icmp6-port-unreachable

  Chain OUTPUT (policy ACCEPT)
  target     prot opt     source           destination
To ensure the firewall rules become active at each time the interface comes up add a pre-up rule to /etc/network/interfaces.
  $ cat /etc/network/interfaces

  auto lo
  iface lo inet loopback

  auto eth0
  iface eth0 inet static
     address 78.143.141.78
     netmask 255.255.255.0
     gateway 78.141.143.1
     pre-up iptables-restore < /etc/iptables/rules.v4

  iface eth0 inet6 static
     pre-up modprobe ipv6
     address 2a02:aaaa::20
     netmask 64
     gateway 2a02:aaaa::1
     pre-up ip6tables-restore < /etc/iptables/rules.v6
Test the firewalls on 78.143.141.206 and 2a02:2158:c:9::206.
  $ nmap -p 0-65535 -PN 78.143.141.206

  Starting Nmap 6.00 ( http://nmap.org ) at 2014-05-26 06:55 IST
  Nmap scan report for 78.143.141.206
  Host is up (0.0026s latency).
  Not shown: 65533 filtered ports
  PORT     STATE  SERVICE
  25/tcp   closed smtp
  143/tcp  closed imap
  3000/tcp closed ppp
  MAC Address: EA:A3:2F:28:CD:9D (Unknown)

  Nmap done: 1 IP address (1 host up) scanned in 104.45 seconds


  $ nmap -6 -p 0-65535 -PN 2a02:2158:c:9::206

  Starting Nmap 6.00 ( http://nmap.org ) at 2014-05-26 07:03 IST
  Nmap scan report for 2a02:2158:c:9::206
  Host is up (0.0015s latency).
  Not shown: 65533 filtered ports
  PORT     STATE  SERVICE
  25/tcp   closed smtp
  143/tcp  closed imap
  3000/tcp closed ppp
  MAC Address: EA:A3:2F:28:CD:9D (Unknown)

  Nmap done: 1 IP address (1 host up) scanned in 145.21 seconds
Andreasson, O. (2006). Iptables Tutorial 1.2.2. (Accessed: 25/5/2014)
Bieringer, P. (2006). Linux IPv6 HOWTO. (Accessed: 25/5/2014)
Netfilter documentation website
Newman, C. (1999). RFC 2595. Using TLS with IMAP, POP3 and ACAP. IETF.
Russell, R. (2002). Linux 2.4 Packet Filtering HOWTO. (Accessed: 24/5/2014)
 |
Security Enhancement Linux (SELinux) is a security module addition to GNU/Linux that adds Mandatory Access Controls (MAC). SELinux is implemented on Red Hat Enterprise Linux (RHEL), Fedora, and CentOS, it is available for other distributions but not installed by default. The initial implementations of SELinux incorporated static packet filtering and therefore from a network security perspective it was a matter of iptables/ip6tables being redundant. It does not make sense to forgo the excellent Netfilter feature. The addition of the security marks SECMARK and CONNSECMARK to the socket buffer structure in the GNU/Linux kernel (sk_buff) allow the use of both together. SECMARK and CONNSECMARK are security extensions that allow security contexts to be added to either packets (SECMARK) or to sessions (CONNSECMARK).
Netfilter can mark traffic with the SECMARK or CONNSECMARK, then it uses the packet matching table mangle to alter the marked packets with a SELinux security context label. The context is used by SELinux to enforce policy rules. For example SSH traffic on port 22 is labelled as:
system_u:object_r:httpd_packet_t:s0
The following iptables rules demonstrate how Netfilter labels SSH and HTTP packets.
  iptables -t mangle -A INPUT -p tcp --dport 22 -j SECMARK --selctx system_u:object_r:ssh_packet_t:s0
  iptables -t mangle -A INPUT -p tcp --dport 80 -j SECMARK --selctx system_u:object_r:httpd_packet_t:s0
SELinux requires policies for each SELinux type. Here is examples of two policies for the SSH and HTTP traffic marked by Netfilter.
$ sudo -s
SSH Daemon Policy Module
  # vi sshd.te

  policy_module(sshd, 1.0.0)

  gen_require(`
    type sshd_t;
    type sshd_packet_t;
  ')

  allow sshd_t sshd_packet_t:packet { recv send };
HTTP Daemon Policy Module
  # vi httpd.te

  policy_module(httpd, 1.0.0)

  gen_require(`
    type httpd_t;
    type httpd_packet_t;
  ')

  allow httpd_t httpd_packet_t:packet { recv send };
These .te extension files are built into a Policy Package (.pp) with the SELinux MakeFile and are then installed as non-base policy packages with the semodule utility. Once these are loaded they remain even after a reboot.
  # make -f /usr/share/selinux/devel/Makefile sshd.pp
  # make -f /usr/share/selinux/devel/Makefile httpd.pp

  # semodule -i sshd.pp
  # semodule -i httpd.pp

  # semodule -l
  abrt		1.2.0
  accountsd	1.0.0
  ...
  howl		1.8.1
  httpd		1.0.0
  icecast		1.0.0
  ...
  squid		1.9.0
  sshd		1.0.0
  sssd		1.0.2
  ...
  zebra		1.10.1
  zosremote	1.1.0

  # exit

  $
These examples demonstrate how Netfilter first marks, then labels packets. SELinux then applies the security policies based on the labels.
CentOS - Security and SELinux. (Accessed: 26/5/2014)
Dan Walsh's Blog. (Accessed: 26/5/2014)
Fedora SELinux Project. (Accessed: 26/5/2014)
RHEL 7.0 - SELinux Users and Administrators Guide. (Accessed: 26/5/2014)
| << Back | HOME | Next >> |