
Last updated: 18-06-2014 22:17
| << Back | HOME |
ftp://ftp.isc.org/isc/bind9/cur/9.10/doc/arm/Bv9ARM.ch01.html
The interconnection of machines and high-speed communications has meant that the resources that are used can be at a different geographical locations to that of the user. UNIX (and of course GNU/Linux) is probably the best example of this philosophy, because from its beginning, the focus has always been on the sharing of resources and the independence of the devices. This philosophy has been realised in the creation services. A service is a resource that provides; data storage, databases, data retrieval, data transmission or data manipulation, under certain conditions. The objective is to analyse the services that make it possible for a network. Generally, for a network, there will be server(s) either locally or in the cloud that will make it possible to exchange information with all the other elements. These servers contain a set of programs that centralise the information and make it easily accessible, they help to reduce costs and increase the availability of information, but it should be remembered that a centralised service also involves some disadvantages, as it can come offline and leave the users without the service. To mitigate against this servers should be designed so that they are mirrored if possible.
The services can be classified into two categories:
In the first category, there are the naming services, such as the Domain Name System (DNS), the Network Information Service/NIS+/Yellow Pages (NIS/NIS+/YP), the Lightweight Directory Access Protocol (LDAP) information directory or the services for storing in proxies. In the second category, we have interactive connection and remote execution services (Secure Shell (SSH), TELecommunications NETwork (telnet)), File Transfer Protocol (FTP), user-level information exchange such as email (Mail Transfer Agent (MTA), Internet Message Access Protocol (IMAP), Post Office Protocol (POP)), news, World Wide Web, Wiki and Network File System (NFS). This section will describe each of these services with a minimal and operative configuration, but without leaving out the aspects related to security and stability.
The function of the DNS service is to translate machine names into IP addresses or vice-versa. Using the host command with the hostname of the www.ftacademy.org server, the DNS Server returns the IP address. For more information from the DNS Server the nslookup or dig command can be used.
  $ host www.ftacademy.org

  www.ftacademy.org has address 91.250.103.168


  $ nslookup www.ftacademy.org

  Server:		127.0.1.1
  Address:	127.0.1.1#53

  Non-authoritative answer:
  Name:	www.ftacademy.org
  Address: 91.250.103.168


  $ dig @dns1.nominalia.com +short www.ftacademy.org

  91.250.103.168


  $ dig www.ftacademy.org

  ; <<>> DiG 9.9.3-rpz2+rl.13214.22-P2-Ubuntu-1:9.9.3.dfsg.P2-4ubuntu1 <<>> www.ftacademy.org
  ;; global options: +cmd
  ;; Got answer:
  ;; ->>HEADER<<- opcode: QUERY, status: NOERROR, id: 21843
  ;; flags: qr rd ra; QUERY: 1, ANSWER: 1, AUTHORITY: 0, ADDITIONAL: 1

  ;; OPT PSEUDOSECTION:
  ; EDNS: version: 0, flags:; udp: 512
  ;; QUESTION SECTION:
  ;www.ftacademy.org.		IN	A

  ;; ANSWER SECTION:
  www.ftacademy.org.	639	IN	A	91.250.103.168

  ;; Query time: 70 msec
  ;; SERVER: 127.0.1.1#53(127.0.1.1)
  ;; WHEN: Thu May 15 06:42:06 IST 2014
  ;; MSG SIZE  rcvd: 62


  $ dig @ns1.ripplecom.net www.ftacademy.org

  ; <<>> DiG 9.9.3-rpz2+rl.13214.22-P2-Ubuntu-1:9.9.3.dfsg.P2-4ubuntu1 <<>> @ns1.ripplecom.net www.ftacademy.org
  ; (1 server found)
  ;; global options: +cmd
  ;; Got answer:
  ;; ->>HEADER<<- opcode: QUERY, status: NOERROR, id: 26635
  ;; flags: qr rd ra; QUERY: 1, ANSWER: 1, AUTHORITY: 2, ADDITIONAL: 3

  ;; OPT PSEUDOSECTION:
  ; EDNS: version: 0, flags:; udp: 4096
  ;; QUESTION SECTION:
  ;www.ftacademy.org.		IN	A

  ;; ANSWER SECTION:
  www.ftacademy.org.	900	IN	A	91.250.103.168

  ;; AUTHORITY SECTION:
  ftacademy.org.		9703	IN	NS	dns2.nominalia.com.
  ftacademy.org.		9703	IN	NS	dns1.nominalia.com.

  ;; ADDITIONAL SECTION:
  dns1.nominalia.com.	54432	IN	A	81.88.57.102
  dns2.nominalia.com.	141598	IN	A	62.193.205.63

  ;; Query time: 60 msec
  ;; SERVER: 109.106.96.2#53(109.106.96.2)
  ;; WHEN: Thu May 15 07:14:12 IST 2014
  ;; MSG SIZE  rcvd: 145
DNS is a tree architecture that avoids duplication of information and makes any searches easier. For this reason, a single DNS makes no sense unless it is part of the architecture. The mose common GNU/Linux implementation is the Berkeley Internet Name Domain (BIND) and the current version is 9 (BIND9). It is maintained by the Internet Software Consortium (ISC). It has three parts:
$ sudo apt-get install bind9
After installation go to the /etc/bind directory and look at the files within:
  $ ls /etc/bind
  bind.keys  db.127  db.empty  db.root     named.conf.default-zones  named.conf.options  zones.rfc1918
  db.0       db.255  db.local  named.conf  named.conf.local          rndc.key
The DNS Server is concerned with Domain Names which are organised into a tree of labels. A node is a concentration of labels ordered from right to left from a Top Level Domain (TLD) or a Country Level Domain (CLD) back to the hostname of the server itself. Take for example www.ftacademy.org, .org is the TLD, .ftacademy the organisation, which is a sub-domain of .org and www is the hostname of the node itself.
BIND partitions the name space into areas called zones. Each zone. Imagine a domain ftacademy.net domain with a webserver www, an FTP server ftp and a fileserver storage contained in a sub-domain called admin and a moodle server edu contained in a sub-domain called ops.
The ftacademy.org zone has delegations for admin and ops zones. A zone can map exactly to a single domain, but could also include only part of a domain, the rest of which could be delegated to other DNS Servers. Every name in the DNS tree is a domain, for example; ftacademy.net, admin.ftacademy.net and even www.admin.ftacademy.net. BIND has master and slave declarations in the /etc/bind/named.conf file to specify zones, not domains. Each zone is served by at least one authoritative DNS Server, which contains the complete data for the zone. For redundancy purposes zones will typically have two or more authoritative servers, on different networks. Responses from authoritative servers have the Authoritative Answer (AA) bit set in the response packets.
The data associated with each domain name is stored in the form of Resource Records (RR).
The authoritative server maintains the the master copy of the zone data and is termed a primary master DNS Server (primary).
Additional authoritative (secondary) servers load the zone contents from either the primary DNS Server or another secondary DNS Server using a zone transfer process. Typically the data are transferred directly from the primary master, but it is also possible to transfer it from another slave.
A stealth server is an authoritative DNS Server for a zone but is not listed in the zone's NS records. Stealth servers if used keep a local copy of a zone to speed up access locally or as a local backup in the event of failure of the primary or other secondary authoritative DNS Servers.
The resolver libraries provided by most operating systems are stub resolvers, meaning that they are not capable of performing the full DNS resolution process by themselves by talking directly to the authoritative servers. Instead, they rely on a local name server to perform the resolution on their behalf. Such a server is called a recursive name server; it performs recursive lookups for local clients.
To improve performance, a local recursive DNS server can be used to perform recursive lookups for local clients. These servers cache the results of any lookups they perform. Each of these cached records have a Time To Live (TTL) which when exceeded causes the entry to be discarded.
Configuration of the DNS Server requirements in the example is shown in the following diagram.
|
The /etc/bind directory contains a number of files that must be configured.
search ftacademy.net entry
Some file terms:
This is the primary configuration file for the DNS server. Do not edit it, it **includes other files.
  $ cat named.conf

  include "/etc/bind/named.conf.options";
  include "/etc/bind/named.conf.local";
  include "/etc/bind/named.conf.default-zones";
This file defines:
  $ sudo cp /etc/bind/named.conf.options /etc/bind/named.conf.options.orig
  $ sudo vi /etc/bind/named.conf.options

  ...
  options {
       directory "/etc/bind";
       allow-query-cache { none; };
       allow-query { any; };
       recursion no;
       forwarders { 78.45.54.6; 109.106.96.3; };
       dnssec-validation auto;
       dnssec-lookaside auto;
       auth-nxdomain no;
       listen-on-v6 { 2a02:b5c::/122; };
  };
  ...
Add in the RFC 1918 Address Allocation for Private Internets ranges. The include calls zones.rfc1918 which creates a master zone for each of the private subnets and associates each with the db.empty reverse data file. The zone for ftacademy.net is included here. It calles the db.ftacademy.net file which will have to be created.
zone "10.in-addr.arpa" { type master; file "/etc/bind/db.empty"; };
  $ sudo cp /etc/bind/named.conf.local /etc/bind/named.conf.local.orig
  $ sudo vi /etc/bind/named.conf.local

  include "/etc/bind/zones.rfc1918";

  zone "ftacademy.net" {
       type master;
       file "/etc/bind/db.ftacademy.net";
  };
The special zone . is for the root servers root name servers needed to initialise the cache of Internet domain name servers as defined in InterNIC . This file also details the requirementd to make the server authoritative for the localhost forward and reverse zones, and for broadcast zones as per RFC 1912 Common DNS Operational and Configuration Errors
  $ sudo cp /etc/bind/named.conf.default-zones /etc/bind/named.conf.default-zones.orig
  $ sudo vi /etc/bind/named.conf.default-zones

  // prime the server with knowledge of the root servers

  zone "." {
          //
  	type hint;
  	file "/etc/bind/db.root";
  };

  // be authoritative for the localhost forward and reverse zones, and for broadcast zones as per RFC 1912

  zone "localhost" {
  	type master;
  	file "/etc/bind/db.local";
  };

  zone "127.in-addr.arpa" {
  	type master;
  	file "/etc/bind/db.127";
  };

  zone "0.in-addr.arpa" {
  	type master;
  	file "/etc/bind/db.0";
  };

  zone "255.in-addr.arpa" {
  	type master;
  	file "/etc/bind/db.255";
  };
Using the db.local as a template build the db.ftacademy.net file. It is essential that the serial number is incremented every time a change is made to the zone file. If multiple changes are made, simply increment the serial once. Typically the serial is set to the date of the change and a version if multiple changes are made the same day. i.e. YYYYMMDDVV where YYYY is year, MM - Month, DD - Day and VV is version.
  $ sudo cp /etc/bind/db.local /etc/bind/db.ftacademy.net
  $ sudo vi /etc/bind/db.ftacademy.net

  ;
  ; BIND data file for the ftacademy.net domain
  ;
  $TTL    604800
  @       IN      SOA     ns.ftacademy.net. root.ftacademy.net. (
                          2014051701         ; Serial
                              604800         ; Refresh
                               86400         ; Retry
                             2419200         ; Expire
                              604800 )       ; Negative Cache TTL
  ;
  @       IN      NS      ns.ftacademy.net.
  ns      IN      A       78.143.141.249
  ns      IN      AAAA    2a02:b5c::249

  ; Other computers

  www     IN      A       78.143.141.11
  www     IN      AAAA    2a02:b5c::11
  ftp     IN      A       78.143.141.12
  ftp     IN      AAAA    2a02:b5c::12
Now that the zone file is setup and resolving names to IP Adresses a Reverse zone is also required. A Reverse zone allows DNS to convert from an address to a name.
Edit /etc/bind/named.conf.local and add the following:
  $ sudo vi /etc/bind/named.conf.local

  ...
  zone "141.143.78.in-addr.arpa" {
          type master;
          notify no;
          file "/etc/bind/db.ipv4.78.zone";
  };
Create the associated zone file.
  $ sudo vi /etc/bind/db.ipv4.78.zone

  ;
  ; BIND reverse data file for the 78.143.141.0/24
  ;
  $TTL 604800		; Default TTL
  ;
  @	IN	SOA	ns.ftacademy.net.	admin.ftacademy.net. (
  	2014051701	; serial
  	604800		; slave refresh interval
  	86400		; slave retry interval
  	2419200		; slave copy expire time
  	604800		; NXDOMAIN cache time
  	)
  ;
  ; DNS servers
  ;
  @	IN	NS	ns.ftacademy.net.


  ; IPv4 PTR entries
  249.141.143.78.in-addr.arpa.    IN    PTR    ns.ftacademy.net.
  11.141.143.78.in-addr.arpa.    IN    PTR    www.ftacademy.net.
  12.141.143.78.in-addr.arpa.    IN    PTR    ftp.ftacademy.net.
The process must be repeated for IPv6. Edit /etc/bind/named.conf.local and add the following:
  $ sudo vi /etc/bind/named.conf.local

  ...
  zone "0.0.0.0.c.5.b.0.2.0.a.2.ip6.arpa." {
          type master;
          notify no;
          file "/etc/bind/db.ipv6.2a02.zone";
  };


  $ sudo vi /etc/bind/db.ipv6.2a02.zone

  ;
  ; BIND reverse data file for the 2a02:b5c::/48
  ;
  $TTL 604800		; Default TTL
  ;
  @	IN	SOA	ns.ftacademy.net.	admin.ftacademy.net. (
  	2014051701	; serial
  	604800		; slave refresh interval
  	86400		; slave retry interval
  	2419200		; slave copy expire time
  	604800		; NXDOMAIN cache time
  	)

  ;
  ; DNS servers
  ;
  @	IN	NS	ns.ftacademy.net.


  ; IPv6 PTR entries
  9.4.2.0.0.0.0.0.0.0.0.0.0.0.0.0.0.0.0.0.0.0.0.0.c.5.b.0.2.0.a.2.ip6.arpa.    IN    PTR    ns.ftacademy.net.
  1.1.0.0.0.0.0.0.0.0.0.0.0.0.0.0.0.0.0.0.0.0.0.0.c.5.b.0.2.0.a.2.ip6.arpa.    IN    PTR    www.ftacademy.net.
  2.1.0.0.0.0.0.0.0.0.0.0.0.0.0.0.0.0.0.0.0.0.0.0.c.5.b.0.2.0.a.2.ip6.arpa.    IN    PTR    ftp.ftacademy.net.
After all the changes the /etc/bind/named.conf.local file should look like this.
  $ cat /etc/bind/named.conf.local

  ;
  ; named.conf.local
  ;

  zone "ftacademy.net" IN {
       type master;
       file "/etc/bind/db.ftacademy.net";
  };

  zone "141.143.78.in-addr.arpa" IN {
          type master;
          notify no;
          file "/etc/bind/db.ipv4.78.zone";
  };

  zone "0.0.0.0.c.5.b.0.2.0.a.2.ip6.arpa." IN {
          type master;
          notify no;
          file "/etc/bind/db.ipv6.2a02.zone";
  };
The named-checkconf is a named configuration file syntax checking tool. Run as shown and if there is no output, the configuration is considered correct and you can safely restart or reload bind configuration file. In the example I created an error in the file so the output can be seen. Fix the error and the next time the command is run, no error should be seen.
  $ sudo named-checkconf /etc/bind/named.conf
  /etc/bind/named.conf.local:1: syntax error near ';'

  $ vi named.conf.local
  (make corrections)

  $ sudo named-checkconf /etc/bind/named.conf
Use the named-checkzone utility to check the db.ftacademy.net zone file.
  $ sudo named-checkzone ftacademy.net /etc/bind/db.ftacademy.net
  zone ftacademy.net/IN: loaded serial 2014051701
  OK
  $ sudo service bind9 restart

  [....] Stopping domain name service...: bind9 waiting for pid 11896 to die
  . ok
  [ ok ] Starting domain name service...: bind9.
  $ dig @127.0.0.1 www.ftacademy.net

  ; <<>> DiG 9.8.4-rpz2+rl005.12-P1 <<>> @127.0.0.1 www.ftacademy.net
  ; (1 server found)
  ;; global options: +cmd
  ;; Got answer:
  ;; ->>HEADER<<- opcode: QUERY, status: NOERROR, id: 62773
  ;; flags: qr aa rd ra; QUERY: 1, ANSWER: 1, AUTHORITY: 1, ADDITIONAL: 2

  ;; QUESTION SECTION:
  ;www.ftacademy.net.		IN	A

  ;; ANSWER SECTION:
  www.ftacademy.net.	604800	IN	A	78.143.141.11

  ;; AUTHORITY SECTION:
  ftacademy.net.		604800	IN	NS	ns.ftacademy.net.

  ;; ADDITIONAL SECTION:
  ns.ftacademy.net.	604800	IN	A	78.143.141.249
  ns.ftacademy.net.	604800	IN	AAAA	2a02:b5c::249

  ;; Query time: 1 msec
  ;; SERVER: 127.0.0.1#53(127.0.0.1)
  ;; WHEN: Sat May 17 12:39:17 2014
  ;; MSG SIZE  rcvd: 112


  $ host 78.143.141.11

  11.141.143.78.in-addr.arpa domain name pointer www.ftacademy.net.

  $ host 2a02:b5c::12

  2.1.0.0.0.0.0.0.0.0.0.0.0.0.0.0.0.0.0.0.0.0.0.0.c.5.b.0.2.0.a.2.ip6.arpa domain name pointer ftp.ftacademy.net.
If configuration changes are made to zone files, the Serial MUST be advanced and typically follows the date and version format YYYYMMDDVV. Serial numbers are used by slave nameservers to determine when a zone transfer is necessary from the master with a higher value serial that the last recorded by the slave indicating that a more recent copy of the zone exists and the slave requests a transfer.
 |
In order to facilitate the administration and make the system more user-friendly, in networks of different sizes that execute GNU/Linux, there are Network Information Services, NIS (or Yellow Pages(YP), Sun Microsystems original name). GNU/Linux can provide support as an NIS client/server and can act as a client of NIS+, which is a safer and more optimised version of NIS. The information that can be distributed in NIS is:
which has the advantage that, from any client machine or from the server itself, the user may connect with the same account and password and to the same directory although the directory must have been previously mounted on all the machines with NFS or using the automount service).
The NIS architecture is of the client-server type, in other words, there is a server that will have all the databases and some clients that will consult these data in a transparent manner for the user. For this reason, we must consider configuring the 'reinforcement' servers (called secondary servers) so that users will not be blocked because the primary server is unavailable. This architecture is called multiple server architecture (master+mirrors-clients).
Add NIS IP address to the /etc/hosts file.
  $ sudo -s
  # echo -e "\n# add own IP address for NIS database\n109.106.96.158\tnis.ftacademy.net\tnis" >> /etc/hosts
  # exit
Install the rpcbind and nis packages. The rpcbind utility is a server that converts RPC program numbers into universal addresses. It must be running on the host to be able to make RPC calls on a server on that machine.
  $ sudo apt-get install rpcbind nis

  NIS Domain : ftacademy.net

  [ ok ] Starting rpcbind daemon....
  Setting up nis (3.17-32) ...
  [ ok ] Stopping NIS services: ypbind ypserv ypppasswdd ypxfrd.
  [info] Setting NIS domainname to: ftaacademy.net.
  [FAIL] Starting NIS services: ypbind[....] binding to YP server...........................................failed (backgrounded).
  . ok
The NIS Domain is stored in the file /etc/defaultdomain. to change it in the future do the following.
  $ vi cat /etc/defaultdomain
  $ domainname `cat /etc/defaultdomain`
  $ sudo service nis restart
The rpcbind shows the NIS Service (Yellow Pages bind (ypbind)) bound to the ports 716 and 717 UDP and TCP.
  $ rpcinfo -p
     program vers proto   port
      100000    4   tcp    111  portmapper
      100000    3   tcp    111  portmapper
      100000    2   tcp    111  portmapper
      100000    4   udp    111  portmapper
      100000    3   udp    111  portmapper
      100000    2   udp    111  portmapper
      100007    2   udp    716  ypbind
      100007    1   udp    716  ypbind
      100007    2   tcp    717  ypbind
      100007    1   tcp    717  ypbind
Enable the NIS as a Master server.
$ sudo sed -i.orig -e 's/NISSERVER=false/NISSERVER=master/' /etc/default/nis
Hash out the line that gives all addresses access and replace with the allowed address range.
  $ sudo cp /etc/ypserv.securenets  /etc/ypserv.securenets.orig

  $ sudo vi /etc/ypserv.securenets

  ...

  #0.0.0.0                0.0.0.0
  255.255.255.0           78.143.141.0

  ...
Add shadow to the /var/yp/Makefile, ALL line.
  $ sudo vi /var/yp/Makefile

  ...

  #ALL =   passwd group hosts rpc services netid protocols netgrp
  ALL =   passwd shadow group hosts rpc services netid protocols netgrp

  ...
Initialise the NIS (YP) Database.
  $ sudo /usr/lib/yp/ypinit -m

  At this point, we have to construct a list of the hosts which will run NIS
  servers.  fta.obriain.com is in the list of NIS server hosts.  Please continue to add
  the names for the other hosts, one per line.  When you are done with the
  list, type a <control D>.
  	next host to add:  fta.obriain.com
  	next host to add:  <CTRL-D>
  The current list of NIS servers looks like this:

  nis.ftacademy.net


  Is this correct?  [y/n: y]  y
  We need a few minutes to build the databases...
  Building /var/yp/ftacademy.net/ypservers...
  Running /var/yp/Makefile...
  make[1]: Entering directory `/var/yp/ftacademy.net'
  Updating passwd.byname...
  failed to send 'clear' to local ypserv: RPC: Program not registeredUpdating passwd.byuid...
  failed to send 'clear' to local ypserv: RPC: Program not registeredUpdating group.byname...
  failed to send 'clear' to local ypserv: RPC: Program not registeredUpdating group.bygid...
  failed to send 'clear' to local ypserv: RPC: Program not registeredUpdating hosts.byname...
  failed to send 'clear' to local ypserv: RPC: Program not registeredUpdating hosts.byaddr...
  failed to send 'clear' to local ypserv: RPC: Program not registeredUpdating rpc.byname...
  failed to send 'clear' to local ypserv: RPC: Program not registeredUpdating rpc.bynumber...
  failed to send 'clear' to local ypserv: RPC: Program not registeredUpdating services.byname...
  failed to send 'clear' to local ypserv: RPC: Program not registeredUpdating services.byservicename...
  failed to send 'clear' to local ypserv: RPC: Program not registeredUpdating netid.byname...
  failed to send 'clear' to local ypserv: RPC: Program not registeredUpdating protocols.bynumber...
  failed to send 'clear' to local ypserv: RPC: Program not registeredUpdating protocols.byname...
  failed to send 'clear' to local ypserv: RPC: Program not registeredUpdating netgroup...
  failed to send 'clear' to local ypserv: RPC: Program not registeredUpdating netgroup.byhost...
  failed to send 'clear' to local ypserv: RPC: Program not registeredUpdating netgroup.byuser...
  failed to send 'clear' to local ypserv: RPC: Program not registeredUpdating shadow.byname...
  failed to send 'clear' to local ypserv: RPC: Program not registeredmake[1]: Leaving directory `/var/yp/ftacademy.net'

  nis.ftacademy.net has been set up as a NIS master server.
  $ sudo service nis start
  [ ok ] Starting NIS services: ypserv yppasswdd ypxfrd ypbind.
  $ ypwhich
  nis.ftacademy.net
The process is identical to that of adding a user to the GNU/Linux with the added step of the NIS data.
  $ sudo useradd -m nistestuser
  $ sudo passwd nispass

  $ cd /var/yp
  $ sudo make
  make[1]: Entering directory `/var/yp/ftacademy.net'
  Updating netid.byname...
  make[1]: Leaving directory `/var/yp/ftacademy.net'
Add NIS IP address to the /etc/hosts file.
  $ sudo -s
  # echo -e "\n# add own IP address for NIS database\n109.106.96.158\tnis.ftacademy.net\tnis" >> /etc/hosts
  # exit
Install rpcbind and nis as per the server above.
  $ sudo apt-get install rpcbind nis

  NIS Domain : ftacademy.net

  [ ok ] Starting rpcbind daemon....
  Setting up nis (3.17-32) ...
  [ ok ] Stopping NIS services: ypbind ypserv ypppasswdd ypxfrd.
  [info] Setting NIS domainname to: ftaacademy.net.
  [FAIL] Starting NIS services: ypbind[....] binding to YP server...........................................failed (backgrounded).
  . ok
Define the NIS Server to be used.
  $ sudo cp /etc/yp.conf  /etc/yp.conf.orig
  $ sudo -s
  # echo -e "\n# NIS Servers\n\ndomain ftacademy.net server nis.ftacademy.net" >> /etc/yp.conf
  # exit
Make NIS an authentication method for passwd, group, shadow and hosts. Change only the lines indicated, leave the rest as they are.
  $ sudo cp /etc/nsswitch.conf  /etc/nsswitch.conf.orig
  $ sudo vi /etc/nsswitch.conf

  ...
  passwd:         compat nis
  group:          compat nis
  shadow:         compat nis

  hosts:          files mdns4_minimal [NOTFOUND=return] dns mdns4 nis
  ...
In the Pluggable Authentication Module (PAM) common-session file, set a session rule to create home directory automatically at the first login of the user because the user will be configured on the server and will not have local home directory. The /etc/skel creates standard files for the new user.
  $ sudo cp /etc/pam.d/common-session /etc/pam.d/common-session.orig
  $ sudo -s
  # echo -e "\n# NIS create home directory automatically at the first login\nsession optional\tpam_mkhomedir.so skel=/etc/skel umask=077" >> /etc/pam.d/common-session
  # exit
Reboot the client and login as a user configured on the server.
  $ sudo reboot

  Username: nistestuser
  Password: nispass

  $ whoami
  nistestuser
NIS first introduced by Sun Microsystems has a long history, it was even replaced by NIS+ in 1992 by Sun to add functionality for hierarchical domains, namespace security, and other features that NIS does not provide. However this was ultimately unsuccessful and Sun removed NIS+ from Solaris in 2002. NIS and NIS+ are largely superceeded by Lightweight Directory Access Protocol (LDAP) which has cross platform support.
Telecommunications Network (Telnet) is a (client) command used to communicate interactively with another host that executes the telnetd daemon. Essentially telnet is an Transmission Control Protocol (TCP) Input/Output (I/O) socket stream, a server daemon listens for connections on the TCP socket and responds.
When the telnet client is run it offers the telnet> prompt, and the open command allows a connection to the remote telnetd, typically a Username/Password prompt set are presented and once the telnet connection is authenticated it responds with a shell prompt from the device being connected to.
  $ telnet

  telnet> ?
  Commands may be abbreviated.  Commands are:

  close   	close current connection
  logout  	forcibly logout remote user and close the connection
  display 	display operating parameters
  mode    	try to enter line or character mode ('mode ?' for more)
  open    	connect to a site
  quit    	exit telnet
  send    	transmit special characters ('send ?' for more)
  set     	set operating parameters ('set ?' for more)
  unset   	unset operating parameters ('unset ?' for more)
  status  	print status information
  toggle  	toggle operating parameters ('toggle ?' for more)
  slc     	set treatment of special characters

  z       	suspend telnet
  environ 	change environment variables ('environ ?' for more)

  telnet> open myTelnet.ftacademy.net
  Username: myTelnetuser
  Password: myTelnetpass

  myTelnetuser@myTelnet ~ $ whoami
  myTelnetuser

  myTelnetuser@myTelnet ~ $ exit
  telnet> quit
  $
The Telnet & Dial-Up BBS Guide is the largest regularly maintained Bulletin Board System (BBS) guide that lists both Telnet (Internet based) and Dial-Up (modem based) BBS systems.
Telnet is also used for access to Bulletin Board Systems (BBS). Before the Internet a user could dial into a BBS system using an analogue dial-up Modulator/Demodulator (modem), this was typical from 1969. telnet was a means of connecting using Network Control Program (NCP) over the original Advanced Research Projects Agency Network (ARPANET), before the Internet. Its functionality was ported to TCP port 23 over IP and defined in 1973. At the Internet evolved BBS systems transitioned to using Telnet to access BBS systems. Here is an example connecting to the csbbs.omega-networks.net. A listing of BBS can be optained at www.telnetbbsguide.com/.
  $ telnet csbbs.omega-networks.net

  Trying 54.200.66.111...
  Connected to csbbs.omega-networks.net.
  Escape character is '^]'.
  Auto-sensing...
  [!

              WELCOME!

           Cyberspace BBS

  Running Worldgroup
  ONLINE 100Mbps AT 22:37 19-MAY-14

  If you already have a User-ID on this
  system, type it in and press ENTER.
  Otherwise type "new":
telned is generally started by the inetd or xinetd daemons upon an access attempt and it is recommended that a tcpd wrapper be included in the telnetd call within the /etc/inetd.conf, including a line such as shown below. The tcpd wrapper uses the access rules in /etc/host.allow and /etc/host.deny to offer some level of security.
telnet stream tcp nowait telnetd.telenetd /usr/sbin/tcpd /usr/bin/in.telnetd
or in the /etc/xinetd.conf file
  service telnet
  {
    disable = no
    flags = REUSE
    socket_type = stream
    wait = nouser = root
    server = /usr/sbin/in.telnetd
    log_on_failure += USERID
  }
Telnet and telnetd are insecure protocols, passing data in clear on the network and have been largely replaced by Secure SHell (ssh). Here is the raw output of the TCP stream captured in Wireshark of the BBS connection.
  ........... ..!.."..'.....#.....................Auto-sensing...
      .[6n....
      .[!...
  ........... ..!.."..'.....#.[24;5R.[0m

              .[1;5;35mWELCOME!

           .[0;1;32mCyberspace BBS

  Running Worldgroup
  ONLINE 100Mbps AT 22:57 19-MAY-14
  .[0;1;32m
  If you already have a User-ID on this
  system, type it in and press ENTER.
  Otherwise type ".[36mnew.[32m":
Remote LOGIN (rlogin) defined in RFC 1282 is another utility that allows users to log in on another host via a network, communicating via TCP port 513. In the example access is granted to the remote server linux.ftacademy.net to user myRemoteUser.
  rlogin -l myRemoteUser linux.ftacademy.net
  Password: myRemotePassword
  $
Remote SHell (rsh), allows commands to be run on a remote machine without the user logging into it. It communicates via TCP port 514. An example of an rsh connection is below shows myRemoteUser execute mkdir myRemoteDirectory on the server linux.ftacademy.net to create the directory myRemoteDirectory within the users home directory.
$ rsh -l myRemoteUser linux.ftacademy.net "mkdir myRemoteDirectory"
Like telnet both of these protocols are insecure, passing traffic, including passwords unencrypted over the network. The have been superceeded by ssh.
FTP is a client/server protocol (under TCP) which allows files to be transferred to and from a remote system. An FTP server is a computer that runs the ftpd daemon. FTP like telnet is not secure with all traffic transmitted in clear text over the network. Despit this FTP continues to be used with some software repositories, typically with the anonymous user with no password. For secure file transfer Secure FTP (SFTP) should be used instead as it uses public-key cryptography to authenticate the remote host and allow it to authenticate the user.
  $ ftp
  ftp> open ftp.heanet.ie
  Connected to ftp.heanet.ie.
  220-
  220-Welcome to the HEAnet mirror site, ftp.heanet.ie
  220 FTP server on ftp.heanet.ie
  Name (ftp.heanet.ie:dobriain): anonymous
  331 Anonymous login ok, send your complete email address as your password
  Password: diarmuid@ftacademy.net
  230 Anonymous access granted, restrictions apply
  Remote system type is UNIX.
  Using ASCII mode to transfer files.
  ftp> bin
  200 Type set to I
  ftp> hash

  ftp> ls
  200 PORT command successful

  150 Opening ASCII mode data connection for file list
  lrwxrwxrwx   1 ftp      ftp            29 Jun 13  2011 debian -> mirrors/ftp.debian.org/debian
  lrwxrwxrwx   1 ftp      ftp            39 Jun 13  2011 debian-backports -> mirrors/ftp.debian.org/debian-backports
  lrwxrwxrwx   1 ftp      ftp            32 Jun 13  2011 debian-cd -> mirrors/ftp.debian.org/debian-cd
  drwxr-xr-x 160 ftp      ftp          6156 May  1 16:25 disk1
  drwxr-xr-x 160 ftp      ftp          6156 May  1 16:25 mirrors
  drwxr-xr-x 160 ftp      ftp          6156 May  1 16:25 pub

  ftp> cd debian-cd
  250 CWD command successful

  ftp> ls
  200 PORT command successful

  150 Opening ASCII mode data connection for file list
  drwxr-xr-x  18 ftp      ftp           390 Apr 29 02:32 7.5.0
  drwxr-xr-x   5 ftp      ftp            69 May  6 23:26 7.5.0-live
  lrwxrwxrwx   1 ftp      ftp             5 Apr 29 02:35 current -> 7.5.0
  lrwxrwxrwx   1 ftp      ftp            10 May  6 23:30 current-live -> 7.5.0-live
  -rw-r--r--   1 ftp      ftp         38196 May 20 18:12 ls-lR.gz
  drwxr-xr-x   4 ftp      ftp            46 May 23  2005 project

  226 Transfer complete

  ftp> get ls-lR.gz
  local: ls-lR.gz remote: ls-lR.gz

  200 PORT command successful
  150 Opening BINARY mode data connection for ls-lR.gz (38196 bytes)
  #####################################
  226 Transfer complete
  38196 bytes received in 0.32 secs (116.5 kB/s)
  ftp>

  ftp> quit
  221 Goodbye.
The protocol allows the transfer in ASCII (ascii) or binary (bin) modes. It is important to decide what type of file has to be transferred because transferring a binary in ASCII mode will destroy the file. Another useful command is hash which prints a hash symbol to represent every 1024 bytes transferred.
  ftp> ?
  Commands may be abbreviated.  Commands are:

  !		dir		mdelete		qc		site
  $		disconnect	mdir		sendport	size
  account		exit		mget		put		status
  append		form		mkdir		pwd		struct
  ascii		get		mls		quit		system
  bell		glob		mode		quote		sunique
  binary		hash		modtime		recv		tenex
  bye		help		mput		reget		tick
  case		idle		newer		rstatus		trace
  cd		image		nmap		rhelp		type
  cdup		ipany		nlist		rename		user
  chmod		ipv4		ntrans		reset		umask
  close		ipv6		open		restart		verbose
  cr		lcd		prompt		rmdir		?
  delete		ls		passive		runique
  debug		macdef		proxy		send
Useful commands of the FTP client are
The traditional UNIX server is run through port 21 and is booted by the inetd or xinetd daemon. In inetd.conf it is advisable to include the tcpd wrapper with the access rules in host.allow and host.deny in the call to ftpd by inetd to increase the system's security. The ftpd daemon supports the following files for its configuration:
SSH Daemon (sshd) and SSH client (ssh) are a utility pair for logging into a remote machine and for executing commands on a remote machine. They communicates via TCP port 22 and have largely replaced rlogin, rsh, and telnet. SSH provides secure encrypted communications between two hosts over an insecure network by using public-key cryptography to authenticate the remote host and allow it to authenticate the user. SHH also allows for X Window System (X11) connections and the forwarding of arbitrary TCP ports over the secure channel.
A number of other protocols have evolved based on the SSH protocol.
On GNU/Linux SSH and SFTP functionality is provided using OpenSSH. This is an SSH version 2 (SSHv2). SSHv2 was adopted in 2006 to overcome vunerabilities in the original protocol with the addition of Diffie–Hellman key exchange (D-H) and strong integrity checking via Message Authentication Codes (MAC).
Here are two examples of ssh connections to a remote server. In the first example the current user username myRemoteUser will be assumed as no user is defined in the command. In the second the option switch -l is used to define a different username. In the third the username is seperated from the hostname with the @ symbol.
  $ ssh linux.ftacademy.net
  myRemoteUser@linux.ftacademy.net's password: myRemotePassword

  myRemoteUser@linux:~#

  $ ssh -l myRemoteUser linux.ftacademy.net
  myRemoteUser@linux.ftacademy.net's password: myRemotePassword

  myRemoteUser@linux:~# exit


  $ ssh myRemoteUser@linux.ftacademy.net
  myRemoteUser@linux.ftacademy.net's password: myRemotePassword

  myRemoteUser@linux:~#
It is also possible to implement an SSH passwordless login by pre sharing a public/private Ron Rivest, Adi Shamir and Leonard Adleman (RSA) key pair. To implement this:
  $ ssh-keygen -t rsa

  Generating public/private rsa key pair.
  Enter file in which to save the key (/home/myRemoteUser/.ssh/id_rsa): <Enter>
  Enter passphrase (empty for no passphrase): <Enter>
  Enter same passphrase again: <Enter>
  Your identification has been saved in /home/myRemoteUser/.ssh/id_rsa.
  Your public key has been saved in /home/myRemoteUser/.ssh/id_rsa.pub.
  The key fingerprint is:
  0d:37:b8:a9:f4:89:27:4d:3e:83:a2:56:6e:dd:9a:2b myRemoteUser@linux
  The key's randomart image is:
  +--[ RSA 2048]----+
  |                 |
  |         .       |
  |        o o      |
  |         * .     |
  |      . S .      |
  |    .. O .       |
  |   o..=.O        |
  |  ..E..+.o       |
  | ... .+o         |
  +-----------------+
  $ ssh myRemoteUser@linux.ftacademy.net mkdir -p .ssh

  myRemoteUser@linux.ftacademy.net's password: myRemotePassword
  $ cat .ssh/id_rsa.pub | ssh myRemoteUser@linux.ftacademy.net 'cat >> .ssh/authorized_keys'

  myRemoteUser@linux.ftacademy.net's password: myRemotePassword
$ ssh myRemoteUser@linux.ftacademy.net "chmod 700 .ssh; chmod 640 .ssh/authorized_keys"
  $ ssh myRemoteUser@linux.ftacademy.net

  Linux DOB-Debian 3.2.0-4-amd64 #1 SMP Debian 3.2.54-2 x86_64

  The programs included with the Debian GNU/Linux system are free software;
  the exact distribution terms for each program are described in the
  individual files in /usr/share/doc/*/copyright.

  Debian GNU/Linux comes with ABSOLUTELY NO WARRANTY, to the extent
  permitted by applicable law.
  You have new mail.
  Last login: Sun Mar  2 21:46:11 2014 from 78.143.163.178

  myRemoteUser@linux:~$
Typically secure access is available to a GNU/Linux server via SSH access. But what of insecure non-encrypted traffic like Post Office Protocol version 3 (POP3) or C11 windows server. Well SSH can be used to tunnel these protocols in a secure manner. It is possible to establish an encrypted tunnel between the client machine and the server with sshd. The -L option switch port(A):host:hostport(B) which specifies that the given port (A) on the local (client) host is to be forwarded to the given host and port (B) on the remote side. So taking a few examples:
 |
In this case an SSH tunnel is established and all local traffic on port 1100 is forwarded to the server linux.ftacademy.net to appear as traffic from the localhost on that machine from port 110 which is where the POP3 service listens.
| Option | Description | |
|---|---|---|
| -C | Enables compression of data between client and server | |
| -L 1100:localhost:110 | Accepts connections from the localhost on port 1100 and tunnels it to the SSH client side such that it is available locally on the client machine on its port 110 | |
| -v | Use when establishing the first time as it gives verbose information on connection | |
$ ssh -C -L 1100:localhost:110 myRemoteUser@linux.ftacademy.net
Another example; In this example the local machine does not have access directly to a remote proxy server. However the remote proxy server can be accessed from a remote gateway machine. Consider that a login on a gateway machine exists that can access the proxy machine running the Squid proxy server over port 3128. Running the following on the client machine:
$ ssh -C -L 8080:squid.ftacademy.net:3128 myGwUser@gw.ftacademy.net
This redirects traffic from squid.ftacademy.net port 3128 to the local port 8080. To access the squid.ftacademy.net server securely simply http://localhost:8080 on the local machine.
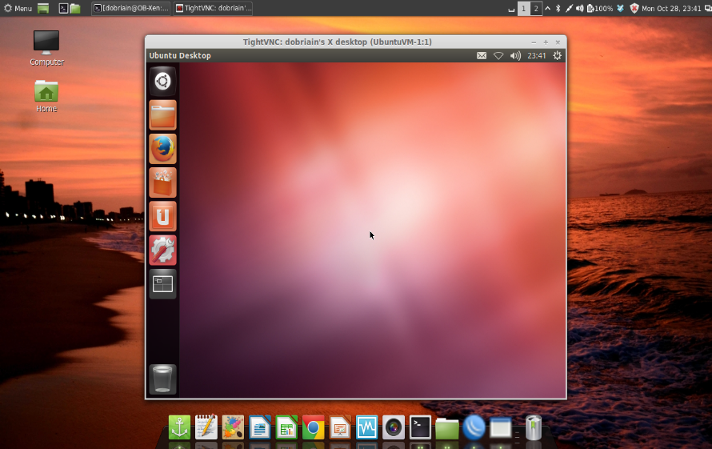
In the final example -L 5901:localhost:5901 means that the remote machine accepts connections from the localhost on port 5901 (this equates to the local display :1) and tunnels it to the SSH client side such that it is available locally on the client machine on its port 5901.
$ ssh -C -L 5901:localhost:5901 myRemoteUser@linux.ftacademy.net
On the client run TightVNC viewer to access the local VNC Server on port 5901 (This is in fact the tunnelled display).
$ xtightvncviewer -encodings "copyrect hextile" localhost:5901
VNC uses 'raw' pixel encoding by default as it gives better performance for local access. However in this case it is not really a local connection but a local connection redirected across an SSH tunnel.
 |
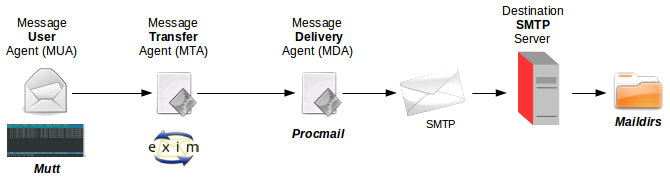
There are three main functions that make up an e-mail system. First there is the Mail User Agent (MUA) which is the program a user actually uses to compose and read mails. Then there is the Mail Transfer Agent (MTA) that takes care of transferring messages from one computer to another. And last there is the Mail Delivery Agent (MDA) that takes care of delivering incoming mail to the user's inbox.
 |
There are many MUAs available, on GNU/Linux any of these can be used:
Mutt is a small but very powerful text based program for reading and sending e-mail under UNIX and GNU/Linux operating systems. It includes support for colour terminals, Multipurpose Internet Mail Extensions (MIME), Open Pretty Good Privacy (OpenPGP), and a threaded sorting mode.
  $ mutt

  /home/dobriain/Mail does not exist. Create it? ([yes]/no): yes
 |
An mail transport agent (MTA) is responsible for sending/receiving mails from an e-mail server to/from Internet, implementing the Simple Mail Transfer Protocol (SMTP). By default, Debian uses exim4, it is easier to configure than other MTA packages, such as smail or sendmail. exim4 offers advanced features such as rejecting known SPAM site connections, it has defences against junk mail or mail bombing and is extremely efficient at processing large amounts of mail. It is run through inetd or xinetd.
inetd smtp entry
  $ cat /etc/inetd.conf | grep smtp

  smtp stream   tcp     nowait  Debian-exim     /usr/sbin/exim4 exim4 -bs
xinetd exim4 file.
  $ cat /etc/xinetd.d/exim4

  service smtp
  {
      disable     = no
      flags       = NAMEINARGS
      socket_type = stream
      protocol    = tcp
      wait        = no
      user        = Debian-exim
      group       = Debian-exim
      server      = /usr/sbin/exim4
      server_args = exim4 -bs
  }
exim4 uses a configuration file in /etc/exim4/exim.conf, which can be modified manually, but it is advisable to do so using a shell script called eximconfig, in order to be able to configure exim interactively. The configuration values will depend on the machine's situation; however, its connection is extremely easy, since the script itself suggests the default values. Nonetheless, in /usr/share/doc/exim4 we can find examples of typical configurations.
$ sudo dpkg-reconfigure exim4-config
Test whether the configuration is valid with exim4 -bV and, if there are errors in the configuration file, the program will show them on screen or, if everything is correct, it will simply indicate the version and date.
  $ sudo exim4 -bV
  Exim version 4.80 #3 built 02-Jan-2013 18:59:25
  Copyright (c) University of Cambridge, 1995 - 2012
  (c) The Exim Maintainers and contributors in ACKNOWLEDGMENTS file, 2007 - 2012
  Berkeley DB: Berkeley DB 5.1.29: (October 25, 2011)
  Support for: crypteq iconv() IPv6 GnuTLS move_frozen_messages DKIM
  Lookups (built-in): lsearch wildlsearch nwildlsearch iplsearch cdb dbm dbmjz dbmnz dnsdb dsearch nis nis0 passwd
  Authenticators: cram_md5 plaintext
  Routers: accept dnslookup ipliteral manualroute queryprogram redirect
  Transports: appendfile/maildir/mailstore autoreply lmtp pipe smtp
  Fixed never_users: 0
  Size of off_t: 8
  Configuration file is /var/lib/exim4/config.autogenerated
To test if it can recognise a local mailbox, use:
  $ sudo exim4 -v -bt dobriain
  R: system_aliases for dobriain@mail.ftacademy.net
  R: userforward for dobriain@mail.ftacademy.net
  R: procmail for dobriain@mail.ftacademy.net
  R: maildrop for dobriain@mail.ftacademy.net
  R: lowuid_aliases for dobriain@mail.ftacademy.net (UID 1001)
  R: local_user for dobriain@mail.ftacademy.net
  dobriain@mail.ftacademy.net
    router = local_user, transport = mail_spool
Which will show the layers of transport used and the user's local address. We can also do the following test with a remote user by replacing local user with a remote address to see how it behaves.
  $ sudo exim4 -v -bt diarmuid@obriain.com
  R: dnslookup for diarmuid@obriain.com
  diarmuid@obriain.com
    router = dnslookup, transport = remote_smtp
    host mx.obriain.com [66.96.142.52] MX=30
    host mx.obriain.com [66.96.142.51] MX=30
    host mx.obriain.com [66.96.142.50] MX=30
x` Then try sending a local mail message and remotely, passing the messages directly to exim (without using an agent, for example, mailx), by keying in the example (all together). Note that this would normally be how the MUA would create the message prior to passing it to the MTA:
  $ sudo exim4 diarmuid@obriain.com
  From: dobriain@ftacademy.net
  To: diarmuid@obriain.com
  Subject: Test exim4
  This is a test email.
  <CRTL-D>
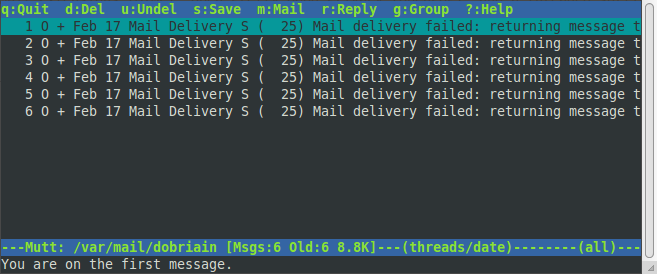
Review the exim4 logs. Analyse the mainlog track file in /var/log/exim4/ to see its behaviour and see what error messages have been generated. Another opton is to run exim4 in debug mode using -d<#> as a parameter, where <#> is the debug level (1-9)
  $ sudo ls /var/log/exim4/
  mainlog  mainlog.1  mainlog.10.gz  mainlog.2.gz  mainlog.3.gz  mainlog.4.gz  mainlog.5.gz  mainlog.6.gz  mainlog.7.gz  mainlog.8.gz  mainlog.9.gz

  $ sudo cat /var/log/exim4/mainlog

  2014-05-21 07:23:21 exim 4.80 daemon started: pid=6345, -q30m, listening for SMTP on [78.143.141.205]:25
  2014-05-21 07:23:21 Start queue run: pid=6351
  2014-05-21 07:32:19 1Wn03U-0001jq-0X <= root@mail.ftacademy.net U=root P=local S=354
  2014-05-21 07:32:20 1Wn03U-0001jq-0X ** diarmuid@obriain.com R=dnslookup T=remote_smtp: SMTP error from remote mail server after MAIL FROM:<root@mail.ftacademy.net> SIZE=1388: host mx.obriain.com [66.96.142.51]: 550 5.1.0 error: R4.1: 78.143.141.205
  2014-05-21 07:32:20 1Wn04a-0001kP-4R <= <> R=1Wn03U-0001jq-0X U=Debian-exim P=local S=1319
  2014-05-21 07:32:20 1Wn03U-0001jq-0X Completed
The final step in the chain is the Delivery of the mail to the destination Post Office Protocol version 3 (POP3) or Internet message access protocol (IMAP) server. This is carried out by the MDA. A popular MDA on GNU/Linux is procmail, though exim is capable of carrying out this function also as shown above. procmail is considered an autonomous mail processor. THE MDA delivers the mail to the destination Mail server using Simple Mail Transfer Protocol (SMTP). The destination mail server is determined by the domain name portion of the destination email address and the associated DNS Server is polled for its Mail eXchange (MX) record, the IP address of the mail server. The mail is delivered to it using SMTP on port 25.
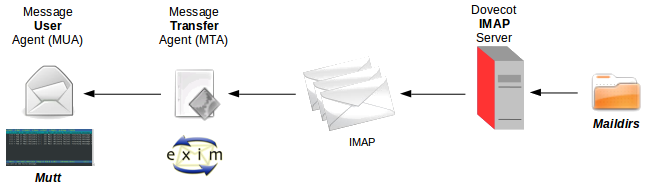 |
A mail Server receive mails via SMTP on port 25, it stores the mails until the owner takes the mails using a protocol like Post Office Protocol version 3 (POP3) or Internet message access protocol (IMAP).
POP3 allows an email client to download stored emails from an email server. The POP3 protocol is a simple download protocol that assumes the email client downloads all available emails from the server, deletes them from the server and then disconnects. POP3 uses port 110. Essentially POP3 downloads emails to the client to store locally. IMAP – Mail is stored on the mail server
IMAP is a similar protocol to POP3 and can be used to download email from an email server. IMAP includes many more features than POP3, for example IMAP can allow users keep their email on the server even after they have downloaded them. For this reason IMAP requires more disk space on the server and more CPU resources than POP3, as all emails are stored on the server. IMAP uses port 143. Essentially IMAP stores the mail on the server even after the client has downloaded locally.
Mail on GNU/Linux is stored in one of three formats:
This is the traditional method to store mail in UNIX/Linix. Individual messages are simply concatenated together, and saved within a single mail-file. Mails are seperated by a special marker. The mail file has a locking mechanism that prevents multiple access thereby allowing only one process access the file. It suffers the disadvantage that if anyone needs to update the mbox mail-file, other users are required to wait until the update is completed.
A slightly modified version of mbox is the mbx mail storage format. This version still require locking. It differs from the mbox format in that instead of a message seperator each message is preceeded with a message specific metadata header record in the file is preceded by a record that carries some message-specific metadata. This allows processes that in mbox required the full mail-file to be re-written can now targer the specific message(s) via their header record.
Maildirs was developed to overcome the perceived inadequacies of mbox. With Maildirs individual messages are stored in their own file and each file is named by a nomenclature. As each message is a seperate file their is no locking required and the Maildirs can be accessed by multiple processes at the same time.
So what is involved in the creation of a mail-server. Well Debian GNU/Linux has a Mail Server as one of its installation task options.
  $ tasksel --list-tasks

  i desktop		Debian desktop environment
  u web-server		Web server
  u print-server		Print server
  u database-server	SQL database
  u dns-server		DNS Server
  u file-server		File server
  u mail-server		Mail server
  i ssh-server		SSH server
  i laptop		Laptop

  $ apt-cache show task-mail-server

  Package: task-mail-server
  Source: tasksel
  Version: 3.14.1
  Installed-Size: 21
  Maintainer: Debian Install System Team <debian-boot@lists.debian.org>
  Architecture: all
  Depends: tasksel, exim4
  Recommends: dovecot-imapd, dovecot-pop3d, mailx, mutt, exim4-daemon-light, exim4-config, procmail, mailagent, spamassassin, sa-exim
  Description-en: Mail server
   This task selects a variety of packages useful for a general purpose mail
   server system.
  Description-md5: 90fb7c11a5b4626cfaeb11f0411caf7a
  Tag: role::program
  Section: tasks
  Priority: optional
  Filename: pool/main/t/tasksel/task-mail-server_3.14.1_all.deb
  Size: 820
  MD5sum: 4a1f686927b4f9e7c4277595f9673d82
  SHA1: ef922f6c4c0f8bdded527f46246c9240fe760807
  SHA256: 1ab9e05ff2473d022cf4008eacbd736808769de4369eafa396b7d23301b19902
As shown Debian GNU/Linux installs the following packages for the Mail Server. exim4, dovecot-imapd, dovecot-pop3d, mailx, mutt, exim4-daemon-light, exim4-config, procmail, mailagent, spamassassin and sa-exim. Install the task. Additionally install a Network Time Protocol (ntp) daemon so that timestamps in emails are accurate.
  $ sudo tasksel install mail-server
  $ sudo apt-get install ntp
Confirm exim4 is installed and re-configure.
  $ sudo aptitude search exim4 | grep ^i
  i   exim4                           - metapackage to ease Exim MTA (v4) installa
  i   exim4-base                      - support files for all Exim MTA (v4) packag
  i   exim4-config                    - configuration for the Exim MTA (v4)
  i   exim4-daemon-light              - lightweight Exim MTA (v4) daemon

  $ sudo dpkg-reconfigure exim4-config
Test the SMTP Server
Test the SMTP Server is operational. With the telnet to port 25 look for a 250 response.
  $ sudo exim4 -v -bt dobriain
  R: system_aliases for dobriain@mail.ftacademy.net
  R: userforward for dobriain@mail.ftacademy.net
  R: procmail for dobriain@mail.ftacademy.net
  R: maildrop for dobriain@mail.ftacademy.net
  R: lowuid_aliases for dobriain@mail.ftacademy.net (UID 1000)
  R: local_user for dobriain@mail.ftacademy.net
  dobriain@mail.ftacademy.net
    router = local_user, transport = maildir_home

  $ telnet 127.0.0.1 25
  Trying 127.0.0.1...
  Connected to 127.0.0.1.
  Escape character is '^]'.
  220 mail.ftacademy.net ESMTP Exim 4.80 Tue, 03 Jun 2014 09:00:52 +0100
  ehlo xxx
  250-mail.ftacademy.net Hello localhost [127.0.0.1]
  250-SIZE 52428800
  250-8BITMIME
  250-PIPELINING
  250 HELP
Dovecot is a mail server that supports both POP3 and IMAP and has essentially replaced popd and imapd on GNU/Linux systems. Confirm that the server is installed.
  $ sudo aptitude search dovecot | grep ^i
  i A dovecot-core      - secure mail server that supports mbox, maildir, dbox and mdbox mailboxes
  i A dovecot-imapd     - secure IMAP server that supports mbox, maildir, dbox and mdbox mailboxes
  i A dovecot-pop3d     - secure POP3 server that supports mbox, maildir, dbox and mdbox mailboxes
Edit the /etc/dovecot/conf.d/10-mail.conf file to configure dovecot to expect mail to be in maildir format in user’s home directory. Comment out the existing mail_location entry and add in the mew naildir one.
  $ sudo /etc/dovecot/conf.d/10-mail.conf

  ...

  #mail_location = mbox:~/mail:INBOX=/var/mail/%u
  mail_location = maildir:~/Maildir
  ...
Restart the Dovecot service.
   service dovecot restart
  [ ok ] Restarting IMAP/POP3 mail server: dovecot.
$ mail dobriain@ftacademy.net Subject: This is a test message This is a test message to dobriain@ftacademy.net Cc:
$ cd Maildirs ~/Maildir$ ls cur new tmp ~/Maildir$ cd new ~/Maildir/new$ ls 1401784367.H869082P14584.mail.ftacademy.net
~/Maildir/new$ cat 1401784367.H869082P14584.mail.ftacademy.net Return-path: <dobriain@mail.ftacademy.net> Received: from dobriain by mail.ftacademy.net with local (Exim 4.80)
(envelope-from <dobriain@mail.ftacademy.net>) id 1Wrjwf-0000QG-RT for dobriain@ftacademy.net; Tue, 03 Jun 2014 09:19:45 +0100
To: dobriain@ftacademy.net Subject: Test mail Message-Id: <E1Wrjwf-0000QG-RT@mail.ftacademy.net> From: Diarmuid O'Briain <dobriain@mail.ftacademy.net> Date: Tue, 03 Jun 2014 09:19:45 +0100
This is a test mail.
  **//Simple Authentication and Security Layer (SASL)//**

  The **SASL** framework is used by network servers (e.g., IMAP, SMTP) to request authentication from clients, and in clients to authenticate against the servers. **saslauthd** is the daemon process that handles the plaintext authentication requests on behalf of the SASL library. Install SASL, **swaks**, the Swiss Army Knife SMTP all-purpose smtp transaction tester and a perl module that allows for the calling of Secure Sockets Layer (**SSL**) functions from perl scripts.
$ sudo apt-get install sasl2-bin swaks libnet-ssleay-perl
$ sudo vi /etc/default/saslauthd #START=no START=yes
n$ sudo service saslauthd start [ ok ] Starting SASL Authentication Daemon: saslauthd.
Generate a self-signed SSL Certificate (or purchase one).
n$ sudo /usr/share/doc/exim4-base/examples/exim-gencert [*] Creating a self signed SSL certificate for Exim! This may be sufficient to establish encrypted connections but for secure identification you need to buy a real certificate!
Please enter the hostname of your MTA at the Common Name (CN) prompt!
Generating a 1024 bit RSA private key
.....++++++
.....++++++
writing new private key to '/etc/exim4/exim.key'
-
You are about to be asked to enter information that will be incorporated
into your certificate request.
What you are about to enter is what is called a Distinguished Name or a DN.
There are quite a few fields but you can leave some blank
For some fields there will be a default value,
If you enter '.', the field will be left blank.
-
Country Code (2 letters) [US]:ie
State or Province Name (full name) []:Munster
Locality Name (eg, city) []:Limerick
Organization Name (eg, company; recommended) []:ftacademy.net
Organizational Unit Name (eg, section) []:education
Server name (eg. ssl.domain.tld; required!!!) []:mail.ftacademy.net
Email Address []:dobriain@ftacademy.net
[*] Done generating self signed certificates for exim!
Refer to the documentation and example configuration files
over at /usr/share/doc/exim4-base/ for an idea on how to enable TLS
support in your mail transfer agent.
$
Edit /etc/exim4/exim4.conf.template, and uncomment the login_saslauthd_server section.
  $ vi /etc/exim4/exim4.conf.template

  ...

  # login_saslauthd_server:
  #   driver = plaintext
  #   public_name = LOGIN
  #   server_prompts = "Username:: : Password::"
  #   # don't send system passwords over unencrypted connections
  #   server_condition = ${if saslauthd{{$auth1}{$auth2}}{1}{0}}
  #   server_set_id = $auth1
  #   .ifndef AUTH_SERVER_ALLOW_NOTLS_PASSWORDS
  #   server_advertise_condition = ${if eq{$tls_cipher}{}{}{*}}
  #   .endif
  login_saslauthd_server:
    driver = plaintext
    public_name = LOGIN
    server_prompts = "Username:: : Password::"
    # don't send system passwords over unencrypted connections
    server_condition = ${if saslauthd{{$auth1}{$auth2}}{1}{0}}
    server_set_id = $auth1
    .ifndef AUTH_SERVER_ALLOW_NOTLS_PASSWORDS
    server_advertise_condition = ${if eq{$tls_cipher}{}{}{*}}
    .endif
  ...
Enable Transport Layer Security (TLS) {Same as SSL} in the exim4 configuration.
  $ sudo -s
  # echo -e "\nMAIN_TLS_ENABLE = true" >> /etc/exim4/exim4.conf.localmacros
  # exit
  $
Add the Debian-exim user to the sasl group:
  $ sudo addgroup Debian-exim sasl
  Adding user `Debian-exim' to group `sasl' ...
  Adding user Debian-exim to group sasl
  Done.
Update the exim4 configuration files and retart the service.
  $ sudo update-exim4.conf

  $ sudo service exim4 restart
  [ ok ] Stopping MTA for restart: exim4_listener.
  [ ok ] Restarting MTA: exim4.
Test authentication, firstly by telnet to show server is operating and using swaks to see if the TLS (SSL) authentication is enacted.
  $ telnet localhost 25
  Trying ::1...
  Connected to localhost.
  Escape character is '^]'.
  220 mail.ftacademy.net ESMTP Exim 4.80 Tue, 03 Jun 2014 10:10:38 +0100
  ehlo xxx
  250-mail.ftacademy.net Hello localhost [::1]
  250-SIZE 52428800
  250-8BITMIME
  250-PIPELINING
  250-STARTTLS
  250 HELP
  quit
  221 mail.ftacademy.net closing connection
  Connection closed by foreign host.


  $ swaks -a -tls -q AUTH -s localhost -au
  Username: dobriain
  Password: oB851784
  === Trying localhost:25...
  === Connected to localhost.
  <-  220 mail.ftacademy.net ESMTP Exim 4.80 Tue, 03 Jun 2014 10:07:55 +0100
   -> EHLO mail.ftacademy.net
  <-  250-mail.ftacademy.net Hello localhost [::1]
  <-  250-SIZE 52428800
  <-  250-8BITMIME
  <-  250-PIPELINING
  <-  250-STARTTLS
  <-  250 HELP
   -> STARTTLS
  <-  220 TLS go ahead
  === TLS started w/ cipher DHE-RSA-AES256-SHA256
  === TLS peer subject DN="/C=ie/ST=Munster/L=Limerick/O=ftacademy.net/OU=education/CN=mail.ftacademy.net/emailAddress=dobriain@ftacademy.net"
   ~> EHLO mail.ftacademy.net
  <~  250-mail.ftacademy.net Hello localhost [::1]
  <~  250-SIZE 52428800
  <~  250-8BITMIME
  <~  250-PIPELINING
  <~  250 HELP
  *** Host did not advertise authentication
   ~> QUIT
  <~  221 mail.ftacademy.net closing connection
  === Connection closed with remote host.
Testing the Dovecot IMAP server.
  $ telnet localhost 143
  Trying ::1...
  Connected to localhost.
  Escape character is '^]'.
  * OK [CAPABILITY IMAP4rev1 LITERAL+ SASL-IR LOGIN-REFERRALS ID ENABLE IDLE STARTTLS AUTH=PLAIN] Dovecot ready.
  a1 LOGIN dobriain myPassword
  a1 OK [CAPABILITY IMAP4rev1 LITERAL+ SASL-IR LOGIN-REFERRALS ID ENABLE IDLE SORT SORT=DISPLAY THREAD=REFERENCES THREAD=REFS MULTIAPPEND UNSELECT CHILDREN NAMESPACE UIDPLUS LIST-EXTENDED I18NLEVEL=1 CONDSTORE QRESYNC ESEARCH ESORT SEARCHRES WITHIN CONTEXT=SEARCH LIST-STATUS SPECIAL-USE] Logged in
  a2 LIST "" "*"
  * LIST (\HasNoChildren) "." "INBOX"
  a2 OK List completed.
  a3 EXAMINE INBOX
  * FLAGS (\Answered \Flagged \Deleted \Seen \Draft)
  * OK [PERMANENTFLAGS ()] Read-only mailbox.
  * 5 EXISTS
  * 5 RECENT
  * OK [UNSEEN 1] First unseen.
  * OK [UIDVALIDITY 1401788410] UIDs valid
  * OK [UIDNEXT 6] Predicted next UID
  * OK [NOMODSEQ] No permanent modsequences
  a3 OK [READ-ONLY] Select completed.
  a4 FETCH 1 BODY[]
  * 1 FETCH (BODY[] {1401}
  Return-path: <dobriain@mail.ftacademy.net>
  Received: from dobriain by mail.ftacademy.net with local (Exim 4.80)
  	(envelope-from <dobriain@mail.ftacademy.net>)
  	id 1Wrjwf-0000QG-RT
  	for dobriain@ftacademy.net; Tue, 03 Jun 2014 09:19:45 +0100
  To: dobriain@ftacademy.net
  Subject: Test mail
  Message-Id: <E1Wrjwf-0000QG-RT@mail.ftacademy.net>
  From: Diarmuid O'Briain <dobriain@mail.ftacademy.net>
  Date: Tue, 03 Jun 2014 09:19:45 +0100

  This is a test mail.
  )
  a4 OK Fetch completed.
  a5 LOGOUT
  * BYE Logging out
  a5 OK Logout completed.
  Connection closed by foreign host.
Testing the Dovecot POP3 Server.
  $ telnet localhost 110
  Trying ::1...
  Connected to localhost.
  Escape character is '^]'.
  +OK Dovecot ready.
  USER dobriain
  +OK
  PASS myPassword
  +OK Logged in.
  LIST
  +OK 5 messages:
  1 1401
  2 1390
  3 1374
  4 1549
  5 1441
  .
  RETR 1
  +OK 1401 octets
  Return-path: <dobriain@mail.ftacademy.net>
  Received: from dobriain by mail.ftacademy.net with local (Exim 4.80)
  	(envelope-from <dobriain@mail.ftacademy.net>)
  	id 1Wrjwf-0000QG-RT
  	for dobriain@ftacademy.net; Tue, 03 Jun 2014 09:19:45 +0100
  To: dobriain@ftacademy.net
  Subject: Test mail
  Message-Id: <E1Wrjwf-0000QG-RT@mail.ftacademy.net>
  From: Diarmuid O'Briain <dobriain@mail.ftacademy.net>
  Date: Tue, 03 Jun 2014 09:19:45 +0100

  This is a test mail.
  .
  QUIT
  +OK Logging out.
  Connection closed by foreign host.
NNTP is a common means of transporting news articles. InterNet News (inn2) listens on TCP socket (TCP/119) for connections and accepts news articles using the ihave protocol. innd daemon, handles incoming NNTP feeds, coordinates the storage, retransmission, and overview generation for all accepted articles, and manages the active and history databases. It handles incoming connections on the NNTP port, and also creates and listens to a local Unix-domain stream socket in order to receive articles from local processes such as nnrpd and rnews.
When receiving an article, innd compares its message ID to the history file. Thus duplicate articles and articles that are too old or lack some required header field, such as Subject: are dropped. If innd finds that the article is acceptable, it looks at the Newsgroups: header line to find out what groups it has been posted to. If one or more of these groups are found in the active file, the article is filed to disk. Otherwise, it is filed to the special group junk.
Individual articles are kept below /var/spool/news, also called the news spool. Each newsgroup has a separate directory, in which each article is stored in a separate file. The file names are consecutive numbers. When innd finds that the directory it wants to store the article in does not exist, it creates it automatically.
nnrpd is the daemon that handles communication with clients. It performs user authentication, accepts posts, distributes posts, etc..
An nnrpd process is spawned when a client connects. It only reads the config files, readers.conf and inn.conf once, when it is originally spawned, so in order to force configuration changes to take effect for connected clients, you have to kill all of the nnrpd processes (killall nnrpd).
rnews injects individual articles into innd. It submits articles via ihave and is suitable for injecting articles received from other sources while local postings should generally use inews instead. The message is read from file if given, or standard input if no file is given and articles are sent to the server.
inews is used to post a Usenet article to the local news server. inews reads a Usenet news article, perhaps with headers, from file or standard input, it adds some headers and performs consistency checks. If it passes the checks, inews sends the article to the local news server as specified in inn.conf.
Install the InterNet News (INN) daemon and suck suck which is a utility to allow the pulling of a small newsfeed from an NNTP server, avoiding the use of the NEWNEWS command.
$ sudo apt-get install inn2 suck
The install does the following:
  $ cat /etc/passwd |grep news

  news:x:9:9:news:/var/spool/news:/bin/sh

  $ cat /etc/group |grep news

  news:x:9:
  $ ls /etc/news

  actsync.cfg        expire.ctl             innshellvars.tcl.local  nocem.ctl
  actsync.ign        filter                 innwatch.ctl            ovdb.conf
  buffindexed.conf   incoming.conf          localgroups             passwd.nntp
  control.ctl        inn.conf               moderators              radius.conf
  control.ctl.local  innfeed.conf           news2mail.cf            readers.conf
  cycbuff.conf       innreport.conf         newsfeeds               send-uucp.cf
  distrib.pats       innshellvars.local     nnrpd.track             storage.conf
  distributions      innshellvars.pl.local  nntpsend.ctl            subscriptions

  $ ls /usr/share/doc/inn2

  changelog.Debian.gz  copyright         history.gz    NEWS.gz
  changelog.gz         examples          hook-perl.gz  README.Debian
  checklist.gz         external-auth.gz  INSTALL.gz    README.gz
  CONTRIBUTORS.gz      FAQ.gz            IPv6-info
  $ ls /var/spool/news

  archive  articles  incoming  innfeed  outgoing  overview  tradspool.map
Some of the main configuration file in /etc/news/ are:
  $ sudo vi /etc/news/inn.conf

  organization:                "Free Technology Academy InterNetNews site"
  pathhost:                    news.ftacademy.net

  # General Settings
  domain:                      ftacademy.net
  server:                      mail.ftacademy.net

  # Posting
  fromhost:                    ftacademy.net
=== Permitted incoming clients === Append a new entry to the /etc/news/incoming.conf file to permit client.ftacademy.net to access the news server.
  $ sudo -s

  # cat >> /etc/news/incoming.conf << 'ICOMING'

  # Entry added to allow access by client.ftacademy.net

  peer client {
       hostname: 		client.ftacademy.net
  }
  ICOMING

  # exit
  $
Access rights
The /etc/news/readers.conf controls who is allowed to connect as a news reader and what they're allowed to do after they connect. nnrpd reads this file when it starts up.
  $ sudo -s

  # cat >> /etc/news/readers.conf << 'READERS'

  # Adding permissions for hosts on ftacademy.net

  auth "local" {
      hosts: "*.ftacademy.net, ftacademy.net"
      default: "<local>@ftacademy.net"
  }

  access "client.ftacademy.net" {
     users: "client.ftacademy.net"
     newsgroups: "*"
     access: RPA
  }

  READERS

  # exit

  $
>>>>>>>>>>>>>>>>>>>>
Di I need to create one ????
http://www.faqs.org/docs/linux_network/x-087-2-nntp.protocol.html
>>>>>>>>>>>>>>>>>>>>
Restart the InterNet News service to re-read the configuration files.
  $ sudo service inn2 restart
  Restarting innd: done.
Create a newsfeed for the domain. To begin feeding the site the ctlinnd utility sends a message to the control channel of the main inn2 daemon innd. The begin <site> option instructs the server to rescan the newsfeeds file for the specified site and sets up a newsfeed for it.
  $ sudo -s
  $ cat >> /etc/news/newsfeeds << 'NFEEDS'

  # newsfeed entry for news.ftacademy.net

  news.ftacademy.net/news.ftacademy.net,main.ftacademy.net\
  :ftacademy.*,!junk,!control*\
  :Tf,Wnm:news.ftacademy.net
  NFEEDS

  $ exit

  $ sudo ctlinnd begin news.ftacademy.net
  Ok
Connect to the InterNet News Service as follows and use the list active command to list the active groups.
  $ telnet news.ftacademy.net 119
  Trying 78.143.163.181...
  Connected to news.ftacademy.net.
  Escape character is '^]'.
  200 news.ftacademy.net InterNetNews server INN 2.5.3 ready (transit mode)

  HELP
  100 Legal commands
    AUTHINFO USER name|PASS password
    CAPABILITIES [keyword]
    CHECK message-ID
    HEAD message-ID
    HELP
    IHAVE message-ID
    LIST [ACTIVE [wildmat]|ACTIVE.TIMES [wildmat]|MOTD|NEWSGROUPS [wildmat]]
    MODE READER
    QUIT
    STAT message-ID
    TAKETHIS message-ID
    XBATCH size
  .

  LIST ACTIVE

  215 Newsgroups in form "group high low status"
  control 0000000000 0000000001 n
  control.cancel 0000000000 0000000001 n
  control.checkgroups 0000000000 0000000001 n
  control.newgroup 0000000000 0000000001 n
  control.rmgroup 0000000000 0000000001 n
  junk 0000000000 0000000001 n
  local.general 0000000000 0000000001 y
  local.test 0000000000 0000000001 y
  IHAVE <00001@news.ftacademy.net>

  From: dobriain@ftacademy.net
  Subject: GNU/Linux Advanced Administration Course message number 1
  Newsgroups: local.test
  Distribution: world
  Path: client.ftacademy.net
  Date: 6 June 2014
  Message-ID: <00001@client.ftacademy.net>
  Body:

  A GNU/Linux Advanced Administration course is being ran over the summer months. Visit http://www.ftacademy.com for more details.

  .

  335 Send it
Reading of articles on the InterNet News Server is performed in a special reader mode.
  MODE READER
  200 news.ftacademy.net InterNetNews NNRP server INN 2.5.3 ready (posting ok)
  HELP
  100 Legal commands
    ARTICLE [message-ID|number]
    AUTHINFO USER name|PASS password|SASL mechanism [initial-response]|GENERIC program [argument ...]
    BODY [message-ID|number]
    CAPABILITIES [keyword]
    DATE
    GROUP newsgroup
    HDR header [message-ID|range]
    HEAD [message-ID|number]
    HELP
    IHAVE message-ID
    LAST
    LIST [ACTIVE [wildmat]|ACTIVE.TIMES [wildmat]|COUNTS [wildmat]|DISTRIB.PATS|DISTRIBUTIONS|HEADERS [MSGID|RANGE]|MODERATORS|MOTD|NEWSGROUPS [wildmat]|OVERVIEW.FMT|SUBSCRIPTIONS [wildmat]]
    LISTGROUP [newsgroup [range]]
    MODE READER
    NEWGROUPS [yy]yymmdd hhmmss [GMT]
    NEWNEWS wildmat [yy]yymmdd hhmmss [GMT]
    NEXT
    OVER [range]
    POST
    QUIT
    STARTTLS
    STAT [message-ID|number]
    XGTITLE [wildmat]
    XHDR header [message-ID|range]
    XOVER [range]
    XPAT header message-ID|range pattern [pattern ...]
  Report problems to <usenet@debiangnu.obriain.com>.
  .
  LIST NEWSGROUPS
  215 Newsgroup descriptions in form "group description"
  control			Various control messages (no posting)
  control.cancel		Cancel messages (no posting)
  control.checkgroups	Hierarchy check control messages (no posting)
  control.newgroup	Newsgroup creation control messages (no posting)
  control.rmgroup		Newsgroup removal control messages (no posting)
  junk			Unfiled articles (no posting)
  local.general		Local general group
  local.test		Local test group
  .


  GROUP local.test
  211 0 1 0 local.test

  NEWNEWS local.test 140606 000000
Listing New Articles
When a newsreader first connects to a new server and the user chooses a newsgroup to browse, the newsreader will want to retrieve a list of new articles, those posted or received since the last login by the user. The newnews command is used for this purpose. Three mandatory arguments must be supplied: the name of the group or groups to query, the start date, and the start time from which to list. The date and time are each specified as six-digit numbers, with the most significant information first; yymmdd and hhmmss, respectively:
newnews junk 990101 000000 230 New news follows <7g2o5r$aa$6@news.vbrew.com> <7g5bhm$8f$2@news.vbrew.com> <7g5bk5$8f$3@news.vbrew.com> .
Sexton, R. (2014). InterNetNews (INN). (Accessed: 04/06/2014). Internet Systems Consortium.
In order to make use of the services provided by INN you'll have to use a user-level newsreader program such as trn. The newsreader is the program that fetches articles from the server and shows them to the user, remembering which the user has seen so that they don't get shown again. It also provides the posting interface for the user.
>>>>>>>>>>>>>>>>>>>>>>>>>>>>>>>>>>>>>> http://oreilly.com/openbook/linag2/book/ch23.html#AUTOID-18326 http://www.wiley.com/legacy/compbooks/negus/rhbf2/news_server.html http://stuff.mit.edu/afs/sipb/user/marthag/News/maint/faqs/inn2 >>>>>>>>>>>>>>>>>>>>>>>>>>>>>>>>>>>>>>
The news or discussion groups are supported through the Network News Transfer Protocol (NNTP). Installing a news server is necessary if we wish to read news offline, if we wish to have a repeater of the central servers or if we wish to have our own news master server. The most common servers are INN or CNEWS, but they are complex packages designed for large servers. Leafnode is a USENET package that implements a TNP server, especially suited for sites with small groups of users but from which we wish to access a large number of news groups. This server is installed in the basic Debian configuration and can be reconfigured with dpkg-reconfigure leafnode for all parameters such as central servers, type of connection etc. This daemon starts up from inetd in a similar way as imap (or with xinetd). Leafnode supports filters through regular indicated expressions (of the type ^Newsgroups:. * [,] alt.flame$) in /etc/news/leafnode/filters, where for each message the heading is compared to the regular expression and if there is a match, the message is rejected.
This server is simple to configure and all the files must be the property of a news user with authorisation to write (check that this owner exists in /etc/passwd). All control, news and configuration files are found in /var/spool/news except for the configuration of the server itself which is in the /etc/news/leafnode/config file. The configuration has some obligatory parameters that must be configured (for example, so that the server can connect to the master servers). They are server (news server from which the news will be obtained and sent) and expire (number of days that a thread or session has been read and will be deleted). Likewise, we have a set of optional parameters of a general or specific nature to the server that can be configured. For further information, see the documentation (leafnode man or /usr/doc/leafnode/README.Debian).
To check the server performance, we can run:
telnet localhost nntp
and if everything works correctly, it will show the server identification and will wait for a command, as a test, we can enter help [to abort, Ctrl+ (and then Quit)].
World Wide Web (httpd)
Apache is one of the most popular servers with the best capabilities in terms of hypertext transfer protocol (HTTP). Apache has a modular design and supports dynamic module extensions during its execution. It is highly configurable in the number of servers and available modules and supports various mechanisms of authentication, access control, metafiles, proxy caching, virtual servers etc. With modules (included in Debian) it is possible to have PHP3, Perl, Java Servlets, SSL and other extensions (see the documentation in http://www.apache.org).
Apache is designed to be executed as a daemon standalone process. This way it creates a set of subsidiary processes that will handle entry requests. It can also be executed as an Internet daemon through inetd, meaning that it will start up every time it receives a request. The server's configuration can be extremely complex depending on the requirements (check the documentation), however, here we can see a minimum acceptable configuration. The configuration files are in /etc/apache and are httpd.conf (main configuration file), srm.conf, access.conf (these last two are maintained for compatibility), mime.conf (MIME formats) and magic (file identification number). The log files are in /var/log/apache and are error.log (registers the errors in the server requests), access.log (register of who has accessed what) and apache.pid (process identifier).
Apache boots from the start up script /etc/init.d/apache and /etc/rcX.d, but can be controlled manually through the apachectl command. The apacheconfig command can also be used in order to configure the server. The default directories (in Debian) are:
/var/www: directory of HTML documents.
/usr/lib/cgibin: directory of executables (cgi) by the server.
http://server.domain/ user: users' personal pages.
/home/~user/public.html: directory of personal pages.
The default file that is read from each directory is index.html. After installing the apache and apache-common packages, Debian basically configures the server and initiates it. We can check that it functions by opening a browser (for example, the Konqueror, and typing "http://localhost" in the URL bar, which will load the page /var/www/index.html).
Manual (minimum) configuration of httpd.conf
Let's look at some of the most important parameters to be configured in Apache (the example is taken from Apache version 1.X and there are some minor changes if we use version 2).
ServerType standalone Recommended, more efficient ServerRoot /etc/apache Where the configuration files are found Port 80 Where the server will listen to requests User www-data User and group with which the server will be executed (important for security) must be valid users (they can be locked) Group www-data
ServerAdmin webmaster@pirulo.remix.com
User address that will attend to errors ServerName pirulo.remix.com Name of the server sent to users – must be a valid name in /etc/host or DNS – DocumentRoot /var/www Directory where the documents will be Alias /icons/ /usr/share/apache/icons/ Where the icons are ScriptAlias /cgibin/ /usr/lib/cgibin/ Where the CGI scripts are Apache 2.2 + SSL + PHP + MySQL
An important aspect of dynamic web servers is making the most of the advantages of Apache in secure mode (SSL), PHP (is programming language generally used to create web site content) and MySQL+PHPAdmin (database that will be discussed in later chapters and graphic interface for managing it) all working in combination. We will start by installing it on a Debian Sarge, but not through the deb packages but rather from the software downloaded from the relevant sites, this way we can repeat the experience with other distributions. Obviously, afterwards it will not be possible to control these packages using apt or another package manager. We need to take care with the versions, which can change, and not to install the package over already installed packages.
a) Download the necessary files (for example within the directory /root -> cd /root):
1) Apache: from http://httpd.apache.org/download.cgi: httpd-2.2.4.tar.bz2
2) PHP: from http://www.php.net/downloads.php PHP 5.2.1 (tar.bz2)
3) MySQL from http://mysql.org/get/Downloads/MySQL-4.1/mysql-standard-4.1.21-pc-linux-gnu-i686.tar.gz/from/pick
4) PHPAdmin from http://prdownloads.sourceforge.net/phpmyadmin/phpMyAdmin-2.9.1-all-languages.tar.bz2?download
b) Utilities: bzip2 libssl-dev openssl gcc g++ cpp make (verify that they are not installed or otherwise, run apt-get install bzip2 libssl-dev openssl gcc g++ cpp make.
c) Apache:
cd /root tar jxvf httpd-2.2.4.tar.bz2 cd httpd-2.2.4
With prefix, we indicate that we will install for example /usr/local/apache2 ./configure --prefix=/usr/local/apache2 \ –with ssl=/usr/include/openssl \ --enable-ssl make make install
We modify the configuration file /usr/local/apache2/conf/httpd.conf andchange the user and workgroup for www-data:
User www-data Group www-data We change the owner and group of the data directory to
www-data:chown -R www-data:www-data /usr/local/apache2/htdocs
We modify the user www-data to change its home directory in /etc/passwd:
www-data:x:33:33:www-data:/usr/local/apache2/htdocs:/bin/sh
Apache server installed. To initiate it (to stop it, change start for stop):
/usr/local/apache2/bin/apachectl start
We can place a script to start up the apache server upon booting.
ln -s /usr/local/apache2/bin/apachectl /etc/rcS.d/S99apache chmod 755 /etc/rcS.d/S99apache
d) SSL:
In /usr/local/apache2/conf/httpd.conf we remove the comment from the line Include conf/extra/httpd-ssl.conf The files are generated with the keys for the secure server, in /root we run (adjust the versions to the ones that have been downloaded) – the first openssl command is a long line and ends with 1024:
openssl genrsa -rand ../httpd-2.2.4.tar.bz2:../php-5.2.1.tar.bz2:../phpMyAdmin-2.9.1-all-languages.tar.bz2 -out server.key 1024 openssl rsa -in server.key -out server.pem openssl req -new -key server.key -out server.csr openssl x509 -req -days 720 -in server.csr -signkey server.key -out server.crt We copy the files...
cp server.crt /usr/local/apache2/conf/ cp server.key /usr/local/apache2/conf/ We restart the server...
/usr/local/apache2/bin/apachectl restart
We can check how to add the SSL module to a server that does not have it installed at http://www.debian-administration.org/articles/349.
e) MySQL (for more information see module 8):
We create a group and a user for MySQL if it does not exist.
groupadd mysql useradd -g mysql mysql In the directory where we will install MySQL (/usr/local/) we type: cd /usr/local/ gunzip < /root/mysql-standard-4.1.21-pc-linux-gnu-i686.tar.gz | tar xvf - ln -s mysql-standard-4.1.21-pc-linux-gnu-i686 mysql cd mysql We create a database and change the permissions scripts/mysql_install_db --user=mysql chown -R root. chown -R mysql data chgrp -R mysql. We can place a script for initiating the mySQL server. ln -s /usr/local/mysql/support-files/mysql.server /etc/rcS.d/S99mysql.server chmod 755 /etc/rcS.d/S99mysql.server We start the server /etc/rcS.d/S99mysql.server start We can enter the database and change the password of the root user for security (consulthttp://dev.mysql.com/doc/refman/5.0/en/index.htmlfor the syntax) /usr/local/mysql/bin/mysql Inside, we can type: USE mysql We place the password pirulo on the user root UPDATE user SET Password=PASSWORD('pirulo') WHERE User='root'; FLUSH privileges; To enter MySQL we will have to type /usr/local/mysql/bin/mysql -u root -ppirulo f) PHP (replace with the appropriate versions):
Necessary utilities:
apt-get install libxml2-dev curl \ libcurl3-dev libjpeg-mmx-dev zlib1g-dev \ libpng12-dev
With the Apache server stopped we can type:
cd /root tar jxvf php-5.2.0.tar.bz2 cd php-5.2.0
With the prefix we can indicate where we want to install it (all on one line):
./configure --prefix=/usr/local/php5 --enable-mbstring --with-apxs2=/usr/local/apache2/bin/apxs --with-mysql=/usr/local/mysql --with-curl=/usr/include/curl --with-jpeg-dir=/usr/include --with-zlib-dir=/usr/include --with-gd --with-xml --enable-ftp --enable-bcmath
make make install cp php.ini-dist /usr/local/php5/lib/php.ini
We modify Apache (/usr/local/apache2/conf/httpd.conf) in the indicated part:
<IfModule mime_module> AddType application/x-httpd-php .php .phtml AddType application/x-httpd-php-source .phps And also:
DirectoryIndex index.php index.html
We restart the server.
g) PHPAdmin
cd /usr/local/apache2/
The phpmyadmin is decompressed in the apache2 directory (be careful with the versions).
tar jxvf /root/phpMyAdmin-2.9.1-all-languages.tar.bz2 mv phpMyAdmin-2.9.1-all-languages phpmyadmin cd phpmyadmin cp config.sample.inc.php config.inc.php
We need to modify the configuration file (config.inc.php):
$cfg['blowfish_secret'] = 'pirulo';
We remove the user and user password by default two quotation marks (') one after the other:
$cfg['Servers'][$i]['controluser'] = ''; $cfg['Servers'][$i]['controlpass'] = ''; We change apache (/usr/local/apache2/conf/httpd.conf) adding in <IfModule alias_module>
<IfModule alias_module> Alias /phpmyadmin "/usr/local/apache2/phpmyadmin/" <Directory "/usr/local/apache2/phpmyadmin/"> Order allow, deny Allow from all </Directory> We reinitiate the server and we can it call with http://localhost/phpadmin
Further information can be obtained from the respective websites of each application and in LWP.
Proxy Service: Squid
Important
A Proxy server (PS) is used to save connection bandwidth, to improve security and to increase web-surfing speed.
Squid is one of the main PS, since it is OpenSource, it accepts ICP (characteristics that allow the exchange of hints with other PS), SSL (for secure connections between proxies) and supports FTP objects, Gopher, HTTP and HTTPS (secure). Its functioning is simple, it stores the most frequently requested objects in the RAM and the least requested objects in a database on the disk. Squid servers can also be configured hierarchically to form a tree of proxies according to requirements. There are two possible configurations:
1) As an httpd accelerator to achieve improved performance of the web service.
2) As a proxy-caching server to allow the users of a corporation to use the PS to exit towards the Internet.
In the first mode, it acts as an inverse proxy in other words, it accepts a client's request, serves the object if it has it, and if not, asks for it and passes it onto the client when it does, storing it for the next time. In the second option it can be used as a control to restrict the sites where a connection to the Internet can be obtained or to authorise access at specific times of day. Once installed (squid package in Debian, squid-cgi, squidguard or squidtaild can also be installed) three files are generated: /etc/squid.conf (configuration), /etc/init.d/squid (initialisation) and /etc/logrotate.d/squid (for log control).
Squid as an http accelerator
In this mode, if the web server is on the same machine as the PS, it will have to be reconfigured to attend to the requests of port 81 (in Apache, change Port 80 for Port 81 in httpd.conf). The configuration file (/etc/squid.conf) contains a large number of entries, but here we will only see the essential ones [Mou01]:
http_port 80
icp_port 0
hierarchy_stoplist cgi-bin \?
acl QUERY urlpath_regex cgi-bin \?
no_cache deny QUERY
Where it listens for httpd
Where it listens for ICP
cache_mem 100 MB
redirect_rewrites_host_header off
cache_replacement_policy lru
memory_replacement_policy lru
Memory for objects in progress cache_dir ufs /var/spool/squid 100 16 256
Database
emulate_httpd_log on
Type and place where we can find the disk cache acl all src 0.0.0.0/0.0.0.0
http_access allow all
cache_mgr root
cache_effective_user proxy
cache_effective_group proxy
httpd_accel_host192.168.1.1
httpd_accel_port 81
logfile_rotate 0
log_icp_queries off
buffered_logs on
Access for all
And for everything
Mail responsible
UID
GID
Real web server
Port
In this way, the option httpd_accel_host deactivates the possibility of it being executed as proxy-caching. For further information visit http://www.squid-cache.org/.
Squid as proxy-caching
This way, squid is enabled to control Internet access, when access will be given, the object that can be accessed. In this case, the configuration file will have to include the following modifications added in /etc/squid.conf:
acl localnet src 192.168.1.0/255.255.255.0 acl localhost src 127.0.0.1/255.255.255.255 acl Safe_ports port 80 443 210 70 21 102565535 acl CONNECT method CONNECT acl all src 0.0.0.0/0.0.0.0 http_access allow localnet http_access allow localhost http_access deny http_access deny CONNECT http_access deny all cache_emulate_httpd_logon The main difference with the other mode are the acl lines, in which case C class clients C 192.168.1.0 will be allowed access to the PS, also the localhost IP and other ports that will be able to access the Internet 80(http), 443(https), 210(whais), 70(gopher), and 21(ftp), also, the connect method is denied to avoid a connection from the outside to the PS and then all IP and ports over the PS are denied. [Mou01] More information at http://www.squid-cache.org/ and for a transparent-proxy at http://tldp.org/HOWTO/TransparentProxy-1.html.
http://techpubs.spinlocksolutions.com/dklar/ldap.html
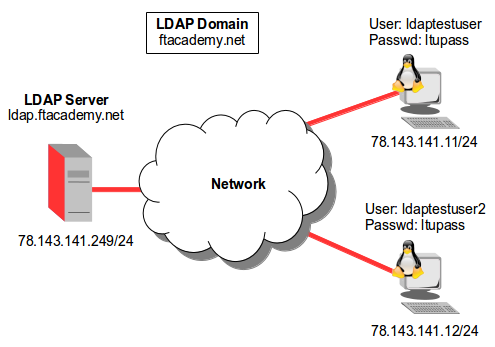 |
Add LDAP IP address to the /etc/hosts file.
  $ sudo -s
  # echo -e "\n# add own IP address for LDAP database\n109.106.96.158\tldap.ftacademy.net\tldap" >> /etc/hosts
  # exit
$ sudo apt-get install slapd ldap-utils
Edit the LDAP Configuration file. Uncomment the BASE and URI lines in the ldap.conf file and replace example with the domain.
  $ sudo vi /etc/ldap/ldap.conf

  ...
  BASE    dc=ftacademy,dc=net
  URI     ldap://ldap.ftacademy.net ldap://ldap-master.ftacademy.net:666
  ...
Rerun the OpenLDAP package configuration. Select the Hierarchical DataBase (HDB) rather than the Berkeley DataBase (BDB) as they are much the same with the former making use of indexing and caching to speed data access.
$ sudo dpkg-reconfigure slapd
Check LDAP Server is working.
  $ sudo slapcat
  dn: dc=ftacademy,dc=net
  objectClass: top
  objectClass: dcObject
  objectClass: organization
  o: Free Technology Academy
  dc: ftacademy
  structuralObjectClass: organization
  entryUUID: cdbf1d7a-72a8-1033-910e-1d6f2c8a447b
  creatorsName: cn=admin,dc=ftacademy,dc=net
  createTimestamp: 20140518072141Z
  entryCSN: 20140518072141.916942Z#000000#000#000000
  modifiersName: cn=admin,dc=ftacademy,dc=net
  modifyTimestamp: 20140518072141Z

  dn: cn=admin,dc=ftacademy,dc=net
  objectClass: simpleSecurityObject
  objectClass: organizationalRole
  cn: admin
  description: LDAP administrator
  userPassword:: e1NTSEF9TEoxM05hRGtTWmdoQUJTbWphNU9OazNXMnJ6WGM3M28=
  structuralObjectClass: organizationalRole
  entryUUID: cdc10f22-72a8-1033-910f-1d6f2c8a447b
  creatorsName: cn=admin,dc=ftacademy,dc=net
  createTimestamp: 20140518072141Z
  entryCSN: 20140518072141.929700Z#000000#000#000000
  modifiersName: cn=admin,dc=ftacademy,dc=net
  modifyTimestamp: 20140518072141Z
The /etc/ldap/slapd.d directory contains cn=config a special LDAP database that keeps the OpenLDAP server configuration, and is viewable and modifiable in runtime. All changes made to cn=config are applied instantly applied to the LDAP server daemon and are saved to /etc/ldap/slapd.d/.
  $ ls /etc/ldap/slapd.d
  cn=config  cn=config.ldif
Verify that all the necessary LDAP schema definitions (core, cosine, nis and inetorgperson) have been loaded (ignore duplicate errors).
  $ sudo ldapadd -c -Y EXTERNAL -H ldapi:/// -f /etc/ldap/schema/core.ldif

  SASL/EXTERNAL authentication started
  SASL username: gidNumber=0+uidNumber=0,cn=peercred,cn=external,cn=auth
  SASL SSF: 0
  adding new entry "cn=core,cn=schema,cn=config"
  ldap_add: Other (e.g., implementation specific) error (80)
  	additional info: olcAttributeTypes: Duplicate attributeType: "2.5.4.2"


  $ sudo ldapadd -c -Y EXTERNAL -H ldapi:/// -f /etc/ldap/schema/cosine.ldif

  SASL/EXTERNAL authentication started
  SASL username: gidNumber=0+uidNumber=0,cn=peercred,cn=external,cn=auth
  SASL SSF: 0
  adding new entry "cn=cosine,cn=schema,cn=config"
  ldap_add: Other (e.g., implementation specific) error (80)
  	additional info: olcAttributeTypes: Duplicate attributeType: "0.9.2342.19200300.100.1.2"


  $ sudo ldapadd -c -Y EXTERNAL -H ldapi:/// -f /etc/ldap/schema/nis.ldif

  SASL/EXTERNAL authentication started
  SASL username: gidNumber=0+uidNumber=0,cn=peercred,cn=external,cn=auth
  SASL SSF: 0
  adding new entry "cn=nis,cn=schema,cn=config"
  ldap_add: Other (e.g., implementation specific) error (80)
  	additional info: olcAttributeTypes: Duplicate attributeType: "1.3.6.1.1.1.1.2"


  $ sudo ldapadd -c -Y EXTERNAL -H ldapi:/// -f /etc/ldap/schema/inetorgperson.ldif

  SASL/EXTERNAL authentication started
  SASL username: gidNumber=0+uidNumber=0,cn=peercred,cn=external,cn=auth
  SASL SSF: 0
  adding new entry "cn=inetorgperson,cn=schema,cn=config"
  ldap_add: Other (e.g., implementation specific) error (80)
  	additional info: olcAttributeTypes: Duplicate attributeType: "2.16.840.1.113730.3.1.1"
Replace the default log level olcLogLevel: none with olcLogLevel: 256.
  $ echo -e "dn: cn=config\nchangetype: modify\nreplace: olcLogLevel\nolcLogLevel: 256" > /var/tmp/loglevel.ldif
  $ sudo ldapmodify -Y EXTERNAL -H ldapi:/// -f /var/tmp/loglevel.ldif

  SASL/EXTERNAL authentication started
  SASL username: gidNumber=0+uidNumber=0,cn=peercred,cn=external,cn=auth
  SASL SSF: 0
  modifying entry "cn=config"
Add an equality (eq) search index for the attribute uid.
  $ echo -e "dn: olcDatabase={1}hdb,cn=config\nchangetype: modify\nadd: olcDbIndex\nolcDbIndex: uid eq" > /var/tmp/uid_eq.ldif
  $ sudo ldapmodify -Y EXTERNAL -H ldapi:/// -f /var/tmp/uid_eq.ldif

  SASL/EXTERNAL authentication started
  SASL username: gidNumber=0+uidNumber=0,cn=peercred,cn=external,cn=auth
  SASL SSF: 0
  modifying entry "olcDatabase={1}hdb,cn=config"
Allow the LDAP administrator account to see and modify the cn=config configuration database. This allows access and modification of the slapd configuration from any location as long as the user knows the correct administrator DN and password.
  $ echo -e "dn: olcDatabase={0}config,cn=config\nchangetype: modify\nadd: olcAccess\nolcAccess: to * by dn="cn=admin,dc=sp Linlock,dc=hr" write" > /var/tmp/access.ldif
  $ sudo ldapmodify -c -Y EXTERNAL -H ldapi:/// -f /var/tmp/access.ldif

  SASL/EXTERNAL authentication started
  SASL username: gidNumber=0+uidNumber=0,cn=peercred,cn=external,cn=auth
  SASL SSF: 0
  modifying entry "olcDatabase={0}config,cn=config"
The LDAP database is structured as a tree with the domain name at the top of the tree. Beneath that the organisation is broken into hosts, groups, users etc.. The next job is to create organisational units People and Group to correspond with the GNU/Linux /etc/passwd and /etc/group files in LDAP Data Interchange Format (LDIP). Then load the LDIP file to the LDAP Server.
  $ echo -e "dn: ou=People,dc=ftacademy,dc=net\nou: People\nobjectClass: organizationalUnit\n" > /var/tmp/ou.ldif
  $ echo -e "dn: ou=Group,dc=ftacademy,dc=net\nou: Group\nobjectClass: organizationalUnit" >> /var/tmp/ou.ldif

  $ sudo invoke-rc.d slapd stop
  [ ok ] Stopping OpenLDAP: slapd.

  $ sudo slapadd -c -v -l /var/tmp/ou.ldif
  added: "ou=People,dc=ftacademy,dc=net" (00000003)
  added: "ou=Group,dc=ftacademy,dc=net" (00000004)
  _#################### 100.00% eta   none elapsed            none fast!
  Closing DB...

  $ sudo invoke-rc.d slapd start
  [ ok ] Starting OpenLDAP: slapd.
Test the configuration is loaded to the LDAP Server OK.
  $ ldapsearch -x ou=people

  # extended LDIF
  #
  # LDAPv3
  # base <dc=ftacademy,dc=net> (default) with scope subtree
  # filter: ou=people
  # requesting: ALL
  #

  # People, ftacademy.net
  dn: ou=People,dc=ftacademy,dc=net
  ou: People
  objectClass: organizationalUnit

  # search result
  search: 2
  result: 0 Success

  # numResponses: 2
  # numEntries: 1

  $ ldapsearch -x ou=group

  # extended LDIF
  #
  # LDAPv3
  # base <dc=ftacademy,dc=net> (default) with scope subtree
  # filter: ou=group
  # requesting: ALL
  #

  # Group, ftacademy.net
  dn: ou=Group,dc=ftacademy,dc=net
  ou: Group
  objectClass: organizationalUnit

  # search result
  search: 2
  result: 0 Success

  # numResponses: 2
  # numEntries: 1
Create a user LDIF file as /var/tmp/ldaptestuser.ldif.
  cat > /var/tmp/ldaptestuser.ldif << 'LDAPUSER'
  dn: cn=ldaptestuser,ou=group,dc=ftacademy,dc=net
  cn: ldaptestuser
  gidNumber: 20000
  objectClass: top
  objectClass: posixGroup

  dn: uid=ldaptestuser,ou=people,dc=ftacademy,dc=net
  uid: ldaptestuser
  uidNumber: 20000
  gidNumber: 20000
  cn: ldaptestuser
  sn: ldaptestuser
  objectClass: top
  objectClass: person
  objectClass: posixAccount
  objectClass: shadowAccount
  loginShell: /bin/bash
  homeDirectory: /home/ldaptestuser
  LDAPUSER
Load the new user to the server.
  $ ldapadd -c -x -D cn=admin,dc=ftacademy,dc=net -W -f /var/tmp/ldaptestuser.ldif
  Enter LDAP Password: ldappass
  adding new entry "cn=ldaptestuser,ou=group,dc=ftacademy,dc=net"

  adding new entry "uid=ldaptestuser,ou=people,dc=ftacademy,dc=net"
Add a password for the new user to the server.
  $ ldappasswd -x -D cn=admin,dc=ftacademy,dc=net -W -S uid=ldaptestuser,ou=people,dc=ftacademy,dc=net
  New password: ltupass
  Re-enter new password: ltupass
  Enter LDAP Password: ldappass
Confirm the user has been added successfully.
  $ ldapsearch -x uid=ldaptestuser
  # extended LDIF
  #
  # LDAPv3
  # base <dc=ftacademy,dc=net> (default) with scope subtree
  # filter: uid=ldaptestuser
  # requesting: ALL
  #

  # ldaptestuser, People, ftacademy.net
  dn: uid=ldaptestuser,ou=People,dc=ftacademy,dc=net
  uid: ldaptestuser
  uidNumber: 20000
  gidNumber: 20000
  cn: ldaptestuser
  sn: ldaptestuser
  objectClass: top
  objectClass: person
  objectClass: posixAccount
  objectClass: shadowAccount
  loginShell: /bin/bash
  homeDirectory: /home/ldaptestuser

  # search result
  search: 2
  result: 0 Success

  # numResponses: 2
  # numEntries: 1
Add LDAP Server IP address to the /etc/hosts file.
  $ sudo -s
  # echo -e "\n# add own IP address for LDAP database\n109.106.96.158\tldap.ftacademy.net\tldap" >> /etc/hosts
  # exit
Install the following utilities for LDAP support on the client computers.
$ sudo apt-get install libnss-ldap libpam-ldap ldap-utils
Edit the LDAP Configuration file. Uncomment the BASE and URI lines in the ldap.conf file and replace example with the domain.
  $ sudo vi /etc/ldap/ldap.conf

  ...
  BASE    dc=ftacademy,dc=net
  URI     ldap://ldap.ftacademy.net ldap://ldap-master.ftacademy.net:666
  ...
Make LDAP an authentication method for passwd, group, shadow and netgroup. Change only the lines indicated, leave the rest as they are.
  $ sudo cp /etc/nsswitch.conf  /etc/nsswitch.conf.orig
  $ sudo vi /etc/nsswitch.conf

  ...
  passwd:         compat ldap
  group:          compat ldap
  shadow:         compat ldap
  ...

  netgroup:       ldap
  ...
In the PAM common-password file, remove use_authtok from the password line where it exists.
  $ sudo cp /etc/pam.d/common-password /etc/pam.d/common-password.orig
  $ sudo vi /etc/pam.d/common-password.orig

  ...
  #password     [success=1 user_unknown=ignore default=die]     pam_ldap.so **use_authtok** try_first_pass
  password     [success=1 user_unknown=ignore default=die]     pam_ldap.so try_first_pass
  ...
In the PAM common-session file, set a session rule to create home directory automatically at the first login of the user because the user will be configured on the server and will not have local home directory. The /etc/skel creates standard files for the new user.
  $ sudo cp /etc/pam.d/common-session /etc/pam.d/common-session.orig
  $ sudo -s
  # echo -e "\n# LDAP create home directory automatically at the first login\nsession optional\tpam_mkhomedir.so skel=/etc/skel umask=077" >> /etc/pam.d/common-session
  # exit
Use the ldapsearch -x command to test the new LDAP Server.
  $ ldapsearch -x

  # extended LDIF
  #
  # LDAPv3
  # base <dc=ftacademy,dc=net> (default) with scope subtree
  # filter: (objectclass=*)
  # requesting: ALL
  #

  # ftacademy.net
  dn: dc=ftacademy,dc=net
  objectClass: top
  objectClass: dcObject
  objectClass: organization
  o: Free Technology Academy
  dc: ftacademy

  # admin, ftacademy.net
  dn: cn=admin,dc=ftacademy,dc=net
  objectClass: simpleSecurityObject
  objectClass: organizationalRole
  cn: admin
  description: LDAP administrator

  # search result
  search: 2
  result: 0 Success

  # numResponses: 3
  # numEntries: 2
Test the user.
  ldapsearch -x -LLL -D uid=ldaptestuser,ou=People,dc=ftacademy,dc=net -w ltupass
  Enter LDAP Password:
  dn: dc=ftacademy,dc=net
  objectClass: top
  objectClass: dcObject
  objectClass: organization
  o: Free Technology Academy
  dc: ftacademy

  dn: cn=admin,dc=ftacademy,dc=net
  objectClass: simpleSecurityObject
  objectClass: organizationalRole
  cn: admin
  description: LDAP administrator

  dn: ou=People,dc=ftacademy,dc=net
  ou: People
  objectClass: organizationalUnit

  dn: ou=Group,dc=ftacademy,dc=net
  ou: Group
  objectClass: organizationalUnit

  dn: cn=ldaptestuser,ou=Group,dc=ftacademy,dc=net
  cn: ldaptestuser
  gidNumber: 20000
  objectClass: top
  objectClass: posixGroup

  dn: uid=ldaptestuser,ou=People,dc=ftacademy,dc=net
  uid: ldaptestuser
  uidNumber: 20000
  gidNumber: 20000
  cn: ldaptestuser
  sn: ldaptestuser
  objectClass: top
  objectClass: person
  objectClass: posixAccount
  objectClass: shadowAccount
  loginShell: /bin/bash
  homeDirectory: /home/ldaptestuser
  userPassword:: e1NTSEF9endHa3NuL21TSEVKZTg4ZnlFWWRITVRYVXBCUlpuMm4=
>>>>>>>>>>>>>>>>>>>>>>>>>>>>>>>.
Start the Name Service Cache Daemon (nscd) service that was stopped in a previous steps.
  $ sudo invoke-rc.d nscd start
  [ ok ] Starting Name Service Cache Daemon: nscd.

  nscd: nss_ldap: failed to bind to LDAP server
| << Back | HOME |