| << Back | HOME |
Last updated: 08-07-2014 13:20
For Mail and file services I used Dovecot IMAP Server with Exim4, Squirrelmail and Spamassassin to create a mail server. Using a Debian GNU/Linux Server the installation of the task mail-server and an ntp server plus swapping the exim4-daemon-light for exim4-daemon-heavy to benefit from the latter's extended feature set. Configuration involved the following steps:
Security administration is such a large area on GNU/Linux so in this section I carryed out the required tests and introduced a number of tools. as Nmap is the father of most GNU/Linux security tools I spend some time with it and its graphical front-end zenmap.
Of the larger tools I take a comprehensive view of the Open Vulnerability Assessment System (OpenVAS) framework which has several services and tools for vulnerability scanning and vulnerability management. This view of OpenVAS includes the use of its graphical client as well as command line usage.
Additionally I took a look at the more commercially driven Metasploit from Rapid7. In this I ran reports using its Web User Interface (UI) and a short assessment of the command line interface. At this stage I decided to stop as I was in danger of getting way off piste and not having the time to complete the rest of the assignment.
The assignment required a look at detection of an attack or attempted attack, to this end I looked at p0f as a fingerprinting tool and the Port Scan Attack Detector (psad) that makes use of iptables log messages from /var/log/messages file. It detects, alerts, and optionally blocks port scans and other suspect traffic. I took a brief look at the Passive Asset Detection System (pads) as part of a security administration function it is very useful to have a constant and up-to-date list of network assets.
For the first part of this section of the CAA I chose to use MariaDB, the community maintained fork of Oracle MySQL. It is so similar to MySQL that it is an effective drop-in replacement.
The second part was an area quite new to me. I installed and ran Yet Another Computer Algebra System (yacas) and ran a couple of calculations. I also established it in server mode and accessed the server from a client over the network using the Transmission Control Protocol (TCP) port with telnet.
This section focused on system performance and clustering.
Another area where there is a multitude of tools in GNU/Linux. To this end I analysed the pseudo-file system /proc for runtime system information and to view system resources. I took a detailed look at:
A great source I looked at was the System Activity Reporter (sar) which collects and reports information about the system activity to that point. To analyse the memory resources on the system I looked at the free command. This led on to a review of disk space availability with the df command to report on the file system disk space usage. top proves to be a great tool for a dynamic real-time view of a running system and I discovered a number of similar tools like htop an interactive process viewer. Bandwidth usage by interface by host can be analysed using the iftop utility and bmon continues the network performance suite as a bandwidth monitor and rate estimator. Finally I used dstat to display system resource statistics.
The assignment required a build of the sumdis program to perform addition of a series of numbers, to generate load. Given an initial number, it adds each sequential number in turn to the previous answer up to a given end number. I built the program and then ran it used htop to compare the before and after system performance. A massive significant jump in CPU utilisation from 14 to 100% without any noticeable impact on memory or swap space.
The last part of this section required a look at Munin and Monit as system monitors. I installed the munin-node on a device to be monitored which in turn sent data to the munin daemon I had installed on the server creating the graphs using RRDtool that were then served up on a web interface. I installed Monit to allow me to monitor the Apache and SSH services as well as monitor the /var directory.
I installed MPICH as a Message Passing Interface (MPI) to build a cluster to allow the use of the processors on multiple computers to run a demanding process. To implement this I:
/mirror directory.
/mirror directory to the local /mirror directory.
build-essential package.
hosts file with a list of nodes in the cluster.
mpicc to compile and the mpiexec to execute jobs.
I used the given example cpi.c to demonstrate this working successfully. The assignment also asked to do the same for monte.c however initial attempts to compile it failed. The examples referred to in the assignment are related to v1.2.1 of mpich from 2003. In the version that currently installs on Debian GNU/Linux, mpich2 - version 1.4.1 this example has been removed. I tried to compile the v1.2.1 of monte.c which produced errors due to the lack of MPI Parallel Environment (MPE) related header files. I attempted to meet the dependencies by copying the header files one by one proved to be a thankless task. I then installed the MPI Parallel Environment version 2 (MPE2) and managed to compile monte.c with the mpicc compiler however running it resulted in a segmentation fault and I determined monte.c to be unfriendly in a mpich2 - v1.4.1 with MPE2 - v1.3 environment. I concluded that the resultant error difference was minuscule, with a maximum difference of 1.4 x 10^-15 and a maximum processing time difference observed of 30.16 mS with no apparent pattern showing. I temper any conclusions however as the evaluation involved just two machines.
I also ran into a problem after building the mpich2 cluster with two nodes and despite the fact that all looked OK the binaries would not run on the other node. After a lot of troubleshooting I identified the problem as a difference in architecture between the master node and the other node. The master was a 32-bit processor architecture while the other node was a 64-bit architecture. It appears that libmpich does not have multiarch support and therefore one should always use nodes with the same processor architecture because each node is running the same file shared via NFS but it is only compiled on one node.
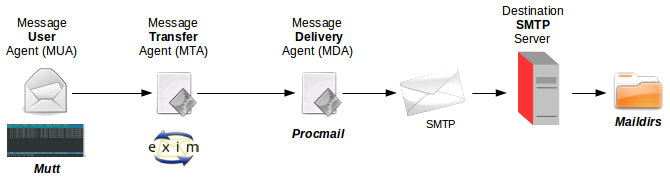
A Mail system consists of three main functions:
|
There are many MUAs available, on GNU/Linux any of these can be used:
Mutt is a small but very powerful text based program for reading and sending e-mail under UNIX and GNU/Linux operating systems. It includes support for colour terminals, Multi-purpose Internet Mail Extensions (MIME), Open Pretty Good Privacy (OpenPGP), and a threaded sorting mode.
  ob:~$ mutt

  /home/dobriain/Mail does not exist. Create it? ([yes]/no): yes
 |
An mail transport agent (MTA) is responsible for sending/receiving mails from an e-mail server to/from Internet, implementing the Simple Mail Transfer Protocol (SMTP). By default, Debian uses exim4, it is easier to configure than other MTA packages, such as smail or sendmail. exim4 offers advanced features such as rejecting known SPAM site connections, it has defences against junk mail or mail bombing and is extremely efficient at processing large amounts of mail. It is run through inetd or xinetd.
inetd smtp entry
  ob:~$ cat /etc/inetd.conf | grep smtp

  smtp stream   tcp     nowait  Debian-exim     /usr/sbin/exim4 exim4 -bs
xinetd exim4 file.
  ob:~$ cat /etc/xinetd.d/exim4

  service smtp
  {
      disable     = no
      flags       = NAMEINARGS
      socket_type = stream
      protocol    = tcp
      wait        = no
      user        = Debian-exim
      group       = Debian-exim
      server      = /usr/sbin/exim4
      server_args = exim4 -bs
  }
exim4 uses a configuration file in /etc/exim4/exim.conf, which can be modified manually, but it is advisable to do so using a shell script called eximconfig, in order to be able to configure exim interactively. The configuration values will depend on the machine's situation; however, its connection is extremely easy, since the script itself suggests the default values. Nonetheless, in /usr/share/doc/exim4 we can find examples of typical configurations.
ob:~$ sudo dpkg-reconfigure exim4-config
Test whether the configuration is valid with exim4 -bV and, if there are errors in the configuration file, the program will show them on screen or, if everything is correct, it will simply indicate the version and date.
  ob:~$ sudo exim4 -bV
  Exim version 4.80 #3 built 02-Jan-2013 18:59:25
  Copyright (c) University of Cambridge, 1995 - 2012
  (c) The Exim Maintainers and contributors in ACKNOWLEDGMENTS file, 2007 - 2012
  Berkeley DB: Berkeley DB 5.1.29: (October 25, 2011)
  Support for: crypteq iconv() IPv6 GnuTLS move_frozen_messages DKIM
  Lookups (built-in): lsearch wildlsearch nwildlsearch iplsearch cdb dbm dbmjz dbmnz dnsdb dsearch nis nis0 passwd
  Authenticators: cram_md5 plaintext
  Routers: accept dnslookup ipliteral manualroute queryprogram redirect
  Transports: appendfile/maildir/mailstore autoreply lmtp pipe smtp
  Fixed never_users: 0
  Size of off_t: 8
  Configuration file is /var/lib/exim4/config.autogenerated
To test if it can recognise a local mailbox, use:
  $ sudo exim4 -v -bt dobriain
  R: system_aliases for dobriain@mail.ftacademy.net
  R: userforward for dobriain@mail.ftacademy.net
  R: procmail for dobriain@mail.ftacademy.net
  R: maildrop for dobriain@mail.ftacademy.net
  R: lowuid_aliases for dobriain@mail.ftacademy.net (UID 1001)
  R: local_user for dobriain@mail.ftacademy.net
  dobriain@mail.ftacademy.net
    router = local_user, transport = mail_spool
Which will show the layers of transport used and the user's local address. We can also do the following test with a remote user by replacing local user with a remote address to see how it behaves.
  ob:~$ sudo exim4 -v -bt diarmuid@obriain.com
  R: dnslookup for diarmuid@obriain.com
  diarmuid@obriain.com
    router = dnslookup, transport = remote_smtp
    host mx.obriain.com [66.96.142.52] MX=30
    host mx.obriain.com [66.96.142.51] MX=30
    host mx.obriain.com [66.96.142.50] MX=30
Then try sending a local mail message and remotely, passing the messages directly to exim (without using an agent, for example, mailx), by keying in the example (all together). Note that this would normally be how the MUA would create the message prior to passing it to the MTA:
  ob:~$ sudo exim4 diarmuid@obriain.com
  From: dobriain@ftacademy.net
  To: diarmuid@obriain.com
  Subject: Test exim4
  This is a test email.
  <CRTL-D>
Review the exim4 logs. Analyse the mainlog track file in /var/log/exim4/ to see its behaviour and see what error messages have been generated. Another opton is to run exim4 in debug mode using -d<#> as a parameter, where <#> is the debug level (1-9).
  ob:~$ sudo ls /var/log/exim4/
  mainlog  mainlog.1  mainlog.10.gz  mainlog.2.gz  mainlog.3.gz  mainlog.4.gz  mainlog.5.gz  mainlog.6.gz  mainlog.7.gz  mainlog.8.gz  mainlog.9.gz

  ob:~$ sudo cat /var/log/exim4/mainlog

  2014-05-21 07:23:21 exim 4.80 daemon started: pid=6345, -q30m, listening for SMTP on [78.143.141.205]:25
  2014-05-21 07:23:21 Start queue run: pid=6351
  2014-05-21 07:32:19 1Wn03U-0001jq-0X <= root@mail.ftacademy.net U=root P=local S=354
  2014-05-21 07:32:20 1Wn03U-0001jq-0X ** diarmuid@obriain.com R=dnslookup T=remote_smtp: SMTP error from remote mail server after MAIL FROM:<root@mail.ftacademy.net> SIZE=1388: host mx.obriain.com [66.96.142.51]: 550 5.1.0 error: R4.1: 78.143.141.205
  2014-05-21 07:32:20 1Wn04a-0001kP-4R <= <> R=1Wn03U-0001jq-0X U=Debian-exim P=local S=1319
  2014-05-21 07:32:20 1Wn03U-0001jq-0X Completed
The final step in the chain is the Delivery of the mail to the destination Internet message access protocol (IMAP) server. This is carried out by the MDA. A popular MDA on GNU/Linux is procmail, though exim is capable of carrying out this function also as shown above. procmail is considered an autonomous mail processor. THE MDA delivers the mail to the destination Mail server using Simple Mail Transfer Protocol (SMTP). The destination mail server is determined by the domain name portion of the destination email address and the associated DNS Server is polled for its Mail eXchange (MX) record, the IP address of the mail server. The mail is delivered to it using Simple Mail Transfer Protocol (SMTP) on port 25.
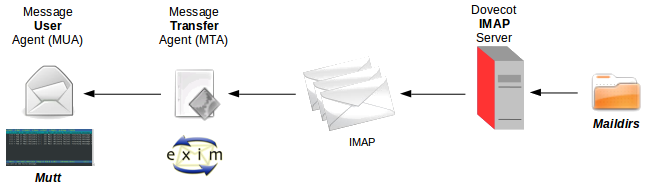 |
A mail Server receive mails via SMTP on port 25, it stores the mails until the owner takes the mails using Internet message access protocol (IMAP).
The IMAP protocol is used to download email from an email server. IMAP has many features that its predecessor Post Office Protocol 3 (POP3) did not, for example IMAP can allow users keep email on the server even after they have downloaded them. For this reason IMAP requires more disk space on the server and more CPU resources than POP3, as all emails are stored on the server. IMAP uses port 143. Essentially IMAP stores the mail on the server even after the client has downloaded locally.
Mail on GNU/Linux is stored in one of three formats:
mbox
This is the traditional method to store mail in UNIX/Linix. Individual messages are simply concatenated together, and saved within a single mail-file. Mails are separated by a special marker. The mail file has a locking mechanism that prevents multiple access thereby allowing only one process access the file. It suffers the disadvantage that if anyone needs to update the mbox mail-file, other users are required to wait until the update is completed.
mbx
A slightly modified version of mbox is the mbx mail storage format. This version still require locking. It differs from the mbox format in that instead of a message separator each message is preceded with a message specific metadata header record in the file is preceded by a record that carries some message-specific metadata. This allows processes that in mbox required the full mail-file to be re-written can now target the specific message(s) via their header record.
Maildirs
Maildirs was developed to overcome the perceived inadequacies of mbox. With Maildirs individual messages are stored in their own file and each file is named by a nomenclature. As each message is a separate file their is no locking required and the Maildirs can be accessed by multiple processes at the same time.
Debian GNU/Linux has Mail Server as one of its installation task options. The following commands show what packages are included in the task.
  fta:~$ tasksel --list-tasks

  i desktop		Debian desktop environment
  u web-server		Web server
  u print-server		Print server
  u database-server	SQL database
  u dns-server		DNS Server
  u file-server		File server
  u mail-server		Mail server
  i ssh-server		SSH server
  i laptop		Laptop

  fta:~$ apt-cache show task-mail-server

  Package: task-mail-server
  Source: tasksel
  Version: 3.14.1
  Installed-Size: 21
  Maintainer: Debian Install System Team <debian-boot@lists.debian.org>
  Architecture: all
  Depends: tasksel, exim4
  Recommends: dovecot-imapd, dovecot-pop3d, mailx, mutt, exim4-daemon-light, exim4-config, procmail, mailagent, spamassassin, sa-exim
  Description-en: Mail server
   This task selects a variety of packages useful for a general purpose mail
   server system.
  Description-md5: 90fb7c11a5b4626cfaeb11f0411caf7a
  Tag: role::program
  Section: tasks
  Priority: optional
  Filename: pool/main/t/tasksel/task-mail-server_3.14.1_all.deb
  Size: 820
  MD5sum: 4a1f686927b4f9e7c4277595f9673d82
  SHA1: ef922f6c4c0f8bdded527f46246c9240fe760807
  SHA256: 1ab9e05ff2473d022cf4008eacbd736808769de4369eafa396b7d23301b19902
As shown Debian GNU/Linux installs the following packages for the Mail Server. exim4, dovecot-imapd, dovecot-pop3d, mailx, mutt, exim4-daemon-light, exim4-config, procmail, mailagent, spamassassin and sa-exim. Install the task. Additionally install a Network Time Protocol (ntp) daemon so that timestamps in emails are accurate.
  fta:~$ sudo tasksel install mail-server
  fta:~$ sudo apt-get install ntp
Confirm exim4 is installed and re-configure.
  fta:~$ sudo aptitude search exim4 | grep ^i
  i   exim4                           - metapackage to ease Exim MTA (v4) installa
  i   exim4-base                      - support files for all Exim MTA (v4) packag
  i   exim4-config                    - configuration for the Exim MTA (v4)
  i   exim4-daemon-light              - lightweight Exim MTA (v4) daemon
Replace exim4-daemon-light with exim4-daemon-heavy.
  fta:~$ sudo apt-get install exim4-heavy

  fta:~$ sudo aptitude search exim4 | grep ^i
  i A exim4                           - metapackage to ease Exim MTA (v4) installa
  i A exim4-base                      - support files for all Exim MTA (v4) packag
  i A exim4-config                    - configuration for the Exim MTA (v4)
  i   exim4-daemon-heavy              - Exim MTA (v4) daemon with extended feature
Reconfigure Exim4
  fta:~$ sudo dpkg-reconfigure exim4-config

  - General type of mail configuration:
    - **internet site; mail is sent and received directly using SMTP**
    - mail sent by smarthost; received via SMTP or fetchmail
    - mail sent by smarthost; no local mail
    - local delivery only; not on a network
    - no configuration at this time

  - System mail name: **fta.obriain.com**

  - IP-addresses to listen on for incoming SMTP connections: **Set blank**

  - semicolon-separated list of recipient domains for which this machine should consider itself the final destination
    - Other destinations for which mail is accepted: **fta.obriain.com;localhost**

  - semicolon-separated list of recipient domains for which this system will relay mail
    - Domains to relay mail for: **fta.obriain.com**

  - semicolon-separated list of IP address ranges for which this system will unconditionally relay mail, functioning as a smarthost
   - Machines to relay mail for: **Set blank**

  - Keep number of DNS-queries minimal (Dial-on-Demand)? **No**

  -  Delivery method for local mail: **Maildir format in home directory**

  - Split configuration into small files?  **No**


  [ ok ] Stopping MTA for restart: exim4_listener.
  [ ok ] Restarting MTA: exim4.
Test the SMTP Server
Test the SMTP Server is operational. With the telnet to port 25 look for a 250 response.
  fta:~$ sudo exim4 -v -bt dobriain@fta.obriain.com
  R: system_aliases for dobriain@fta.obriain.com
  R: userforward for dobriain@fta.obriain.com
  R: procmail for dobriain@fta.obriain.com
  R: maildrop for dobriain@fta.obriain.com
  R: lowuid_aliases for dobriain@fta.obriain.com (UID 1000)
  R: local_user for dobriain@fta.obriain.com
  dobriain@fta.obriain.com
    router = local_user, transport = maildir_home

  fta:~$ telnet 127.0.0.1 25
  Trying 127.0.0.1...
  Connected to 127.0.0.1.
  Escape character is '^]'.
  220 fta.obriain.com ESMTP Exim 4.80 Tue, 03 Jun 2014 09:00:52 +0100
  ehlo xxx
  250-fta.obriain.com Hello localhost [127.0.0.1]
  250-SIZE 52428800
  250-8BITMIME
  250-PIPELINING
  250 HELP
 |
Dovecot is a mail server that supports both POP3 and IMAP and has essentially replaced popd and imapd on GNU/Linux systems. Confirm that the server is installed and remove the Post Office Protocol v3 (POP3).
  fta:~$ sudo aptitude search dovecot | grep ^i
  i A dovecot-core      - secure mail server that supports mbox, maildir, dbox and mdbox mailboxes
  i A dovecot-imapd     - secure IMAP server that supports mbox, maildir, dbox and mdbox mailboxes
  i A dovecot-pop3d     - secure POP3 server that supports mbox, maildir, dbox and mdbox mailboxes


  fta:~$ sudo apt-get remove dovecot-pop3d

  fta:~$ sudo aptitude search dovecot | grep ^i
  i A dovecot-core      - secure mail server that supports mbox, maildir, dbox and mdbox mailboxes
  i A dovecot-imapd     - secure IMAP server that supports mbox, maildir, dbox and mdbox mailboxes
Edit the /etc/dovecot/conf.d/10-mail.conf file to configure dovecot to expect mail to be in maildir format in user’s home directory. Comment out the existing mail_location entry and add in the new maildir one.
  fta:~$ sudo cp /etc/dovecot/conf.d/10-mail.conf /etc/dovecot/conf.d/10-mail.conf.bak

  fta:~$ sudo sed -i -e 's|^mail_location = mbox:~/mail:INBOX=/var/mail/%u|#mail_location = mbox:~/mail:INBOX=/var/mail/%u\nmail_location = maildir:~/Maildir|g' /etc/dovecot/conf.d/10-mail.conf

  fta:~$ diff /etc/dovecot/conf.d/10-mail.conf.bak /etc/dovecot/conf.d/10-mail.conf

  30c30,31
  < mail_location = mbox:~/mail:INBOX=/var/mail/%u
  ---
  > #mail_location = mbox:~/mail:INBOX=/var/mail/%u
  > mail_location = maildir:~/Maildir

  fta:~$ sudo rm /etc/dovecot/conf.d/10-mail.conf.bak
Enable debugging in Dovecot.
  fta:~$ sudo -s

  fta:~# cat >> /etc/dovecot/dovecot.conf << DEBUG

  # Authentication debugging for testing
  auth_debug = yes
  auth_debug_passwords = yes

  DEBUG

  fta:~# exit
Restart the Dovecot service.
  fta:~$ sudo service dovecot restart
  [ ok ] Restarting IMAP/POP3 mail server: dovecot.
Send a test message.
  fta:~$ mail dobriain@fta.obriain.com
  Subject: This is a test message
  This is a test message to dobriain@fta.obriain.com
  Cc:

  This is a test

  <Control-D>
  EOT
Review that the mail was stored.
  fta:~$ cd /home/dobriain/Maildir
  fta:~/Maildir$ ls
  cur  new  tmp

  fta:~/Maildir$ cd new

  fta:~/Maildir/new$ ls
  1404333586.H922551P28119.fta.obriain.com

  fta:~/Maildir/new$ cat 1404333586.H922551P28119.fta.obriain.com

  Return-path: <dobriain@fta.obriain.com>
  Envelope-to: dobriain@fta.obriain.com
  Delivery-date: Wed, 02 Jul 2014 21:39:46 +0100
  Received: from dobriain by fta.obriain.com with local (Exim 4.80)
  	(envelope-from <dobriain@fta.obriain.com>)
  	id 1X2RJi-0007JT-R1
  	for dobriain@fta.obriain.com; Wed, 02 Jul 2014 21:39:46 +0100
  Date: Wed, 02 Jul 2014 21:39:46 +0100
  To: dobriain@fta.obriain.com
  Subject: This is a test message
  User-Agent: Heirloom mailx 12.5 6/20/10
  MIME-Version: 1.0
  Content-Type: text/plain; charset=us-ascii
  Content-Transfer-Encoding: 7bit
  Message-Id: <E1X2RJi-0007JT-R1@fta.obriain.com>
  From: dobriain <dobriain@fta.obriain.com>

  This is a test message to dobriain@fta.obriain.com
  Cc:
  This is a test


  fta:~$ sudo exim4 -v -bt diarmuid.obriain@gmail.com
  R: dnslookup for diarmuid.obriain@gmail.com
  diarmuid.obriain@gmail.com
    router = dnslookup, transport = remote_smtp
    host gmail-smtp-in.l.google.com      [2a00:1450:400c:c03::1b] MX=5
    host gmail-smtp-in.l.google.com      [173.194.66.27]          MX=5
    host alt1.gmail-smtp-in.l.google.com [2a00:1450:4010:c04::1b] MX=10
    host alt1.gmail-smtp-in.l.google.com [173.194.71.27]          MX=10
    host alt2.gmail-smtp-in.l.google.com [2607:f8b0:400e:c03::1a] MX=20
    host alt2.gmail-smtp-in.l.google.com [74.125.25.27]           MX=20
    host alt3.gmail-smtp-in.l.google.com [2607:f8b0:4003:c02::1a] MX=30
    host alt3.gmail-smtp-in.l.google.com [173.194.64.27]          MX=30
    host alt4.gmail-smtp-in.l.google.com [2607:f8b0:4001:c03::1b] MX=40
    host alt4.gmail-smtp-in.l.google.com [74.125.142.27]          MX=40
Simple Authentication and Security Layer (SASL)
The SASL framework is used by network servers (e.g., IMAP, SMTP) to request authentication from clients, and in clients to authenticate against the servers. saslauthd is the daemon process that handles the plaintext authentication requests on behalf of the SASL library. Install SASL, swaks, the Swiss Army Knife SMTP all-purpose smtp transaction tester and a perl module that allows for the calling of Secure Sockets Layer (SSL) functions from perl scripts.
  fta:~$ sudo apt-get install sasl2-bin swaks libnet-ssleay-perl

  fta:~$ sudo cp /etc/default/saslauthd /etc/default/saslauthd.bak

  fta:~$ sudo sed -i -e 's|^START=no|#START=no\nSTART=yes|g' /etc/default/saslauthd

  fta:~$ diff /etc/default/saslauthd.bak /etc/default/saslauthd

  7c7,8
  < START=no
  ---
  > #START=no
  > START=yes

  fta:~$ sudo rm /etc/default/saslauthd.bak

  fta:~$ sudo service saslauthd start
  [ ok ] Starting SASL Authentication Daemon: saslauthd.
Generate a self-signed SSL Certificate (or purchase one).
  fta:~$ sudo /usr/share/doc/exim4-base/examples/exim-gencert
  [*] Creating a self signed SSL certificate for Exim!
      This may be sufficient to establish encrypted connections but for
      secure identification you need to buy a real certificate!

      Please enter the hostname of your MTA at the Common Name (CN) prompt!

  Generating a 1024 bit RSA private key
  .....++++++
  .....++++++
  writing new private key to '/etc/exim4/exim.key'
  -----
  You are about to be asked to enter information that will be incorporated
  into your certificate request.
  What you are about to enter is what is called a Distinguished Name or a DN.
  There are quite a few fields but you can leave some blank
  For some fields there will be a default value,
  If you enter '.', the field will be left blank.
  -----
  Country Code (2 letters) [US]:ie
  State or Province Name (full name) []:Munster
  Locality Name (eg, city) []:Limerick
  Organization Name (eg, company; recommended) []:fta.obriain.com
  Organizational Unit Name (eg, section) []:education
  Server name (eg. ssl.domain.tld; required!!!) []:fta.obriain.com
  Email Address []:dobriain@fta.obriain.com
  [*] Done generating self signed certificates for exim!
      Refer to the documentation and example configuration files
      over at /usr/share/doc/exim4-base/ for an idea on how to enable TLS
      support in your mail transfer agent.
Edit /etc/exim4/exim4.conf.template, and uncomment the login_saslauthd_server section.
  fta:~$ sudo vi /etc/exim4/exim4.conf.template

  ...

  # login_saslauthd_server:
  #   driver = plaintext
  #   public_name = LOGIN
  #   server_prompts = "Username:: : Password::"
  #   # don't send system passwords over unencrypted connections
  #   server_condition = ${if saslauthd{{$auth1}{$auth2}}{1}{0}}
  #   server_set_id = $auth1
  #   .ifndef AUTH_SERVER_ALLOW_NOTLS_PASSWORDS
  #   server_advertise_condition = ${if eq{$tls_cipher}{}{}{*}}
  #   .endif
  login_saslauthd_server:
    driver = plaintext
    public_name = LOGIN
    server_prompts = "Username:: : Password::"
    # don't send system passwords over unencrypted connections
    server_condition = ${if saslauthd{{$auth1}{$auth2}}{1}{0}}
    server_set_id = $auth1
    .ifndef AUTH_SERVER_ALLOW_NOTLS_PASSWORDS
    server_advertise_condition = ${if eq{$tls_cipher}{}{}{*}}
    .endif
  ...
Enable Transport Layer Security (TLS) {Same as SSL} in the exim4 configuration.
fta:~$ sudo bash -c "echo -ne '\nMAIN_TLS_ENABLE = true' >> /etc/exim4/exim4.conf.localmacros"
Add the Debian-exim user to the sasl group:
  fta:~$ sudo addgroup Debian-exim sasl
  Adding user `Debian-exim' to group `sasl' ...
  Adding user Debian-exim to group sasl
  Done.
Update the exim4 configuration files and retart the service.
  fta:~$ sudo update-exim4.conf

  fta:~$ sudo service exim4 restart
  [ ok ] Stopping MTA for restart: exim4_listener.
  [ ok ] Restarting MTA: exim4.
Test authentication, firstly by telnet to show server is operating and using swaks to see if the TLS (SSL) authentication is enacted.
  fta:~$ telnet localhost 25
  Trying ::1...
  Connected to localhost.
  Escape character is '^]'.
  220 fta.obriain.com ESMTP Exim 4.80 Tue, 03 Jun 2014 10:10:38 +0100
  ehlo xxx
  250-fta.obriain.com Hello localhost [::1]
  250-SIZE 52428800
  250-8BITMIME
  250-PIPELINING
  250-STARTTLS
  250 HELP
  quit
  221 fta.obriain.com closing connection
  Connection closed by foreign host.


  fta:~$ swaks -a -tls -q AUTH -s localhost -au
  Username: dobriain
  Password: MyPassword
  === Trying localhost:25...
  === Connected to localhost.
  <-  220 fta.obriain.com ESMTP Exim 4.80 Tue, 03 Jun 2014 10:07:55 +0100
   -> EHLO fta.obriain.com
  <-  250-fta.obriain.com Hello localhost [::1]
  <-  250-SIZE 52428800
  <-  250-8BITMIME
  <-  250-PIPELINING
  <-  250-STARTTLS
  <-  250 HELP
   -> STARTTLS
  <-  220 TLS go ahead
  === TLS started w/ cipher DHE-RSA-AES256-SHA256
  === TLS peer subject DN="/C=ie/ST=Munster/L=Limerick/O=fta.obriain.com/OU=education/CN=fta.obriain.com/emailAddress=dobriain@fta.obriain.com"
   ~> EHLO fta.obriain.com
  <~  250-fta.obriain.com Hello localhost [::1]
  <~  250-SIZE 52428800
  <~  250-8BITMIME
  <~  250-PIPELINING
  <~  250 HELP
   ~> AUTH LOGIN
  <~  334 VXNlcm5hbWU6
   ~> ZG9icmlhaW4=
  <~  334 UGFzc3dvcmQ6
   ~> b0I4NTE3ODQ=
  <~  235 Authentication succeeded
   ~> QUIT
  <~  221 fta.obriain.com closing connection
  === Connection closed with remote host.
Test the Dovecot IMAP server.
  fta:~$ telnet localhost 143

  Trying ::1...
  Connected to localhost.
  Escape character is '^]'.
  * OK [CAPABILITY IMAP4rev1 LITERAL+ SASL-IR LOGIN-REFERRALS ID ENABLE IDLE STARTTLS AUTH=PLAIN] Dovecot ready.

  a1 LOGIN dobriain myPassword
  a1 OK [CAPABILITY IMAP4rev1 LITERAL+ SASL-IR LOGIN-REFERRALS ID ENABLE IDLE SORT SORT=DISPLAY THREAD=REFERENCES THREAD=REFS MULTIAPPEND UNSELECT CHILDREN NAMESPACE UIDPLUS LIST-EXTENDED I18NLEVEL=1 CONDSTORE QRESYNC ESEARCH ESORT SEARCHRES WITHIN CONTEXT=SEARCH LIST-STATUS SPECIAL-USE] Logged in

  a2 LIST "" "*"
  * LIST (\HasNoChildren) "." "INBOX"
  a2 OK List completed.

  a3 EXAMINE INBOX
  * FLAGS (\Answered \Flagged \Deleted \Seen \Draft)
  * OK [PERMANENTFLAGS ()] Read-only mailbox.
  * 5 EXISTS
  * 5 RECENT
  * OK [UNSEEN 1] First unseen.
  * OK [UIDVALIDITY 1401788410] UIDs valid
  * OK [UIDNEXT 6] Predicted next UID
  * OK [NOMODSEQ] No permanent modsequences
  a3 OK [READ-ONLY] Select completed.

  a4 FETCH 1 BODY[]
  * 1 FETCH (BODY[] {732}
  Return-path: <dobriain@fta.obriain.com>
  Envelope-to: dobriain@fta.obriain.com
  Delivery-date: Wed, 02 Jul 2014 21:39:46 +0100
  Received: from dobriain by fta.obriain.com with local (Exim 4.80)
  	(envelope-from <dobriain@fta.obriain.com>)
  	id 1X2RJi-0007JT-R1
  	for dobriain@fta.obriain.com; Wed, 02 Jul 2014 21:39:46 +0100
  Date: Wed, 02 Jul 2014 21:39:46 +0100
  To: dobriain@fta.obriain.com
  Subject: This is a test messag
  User-Agent: Heirloom mailx 12.5 6/20/10
  MIME-Version: 1.0
  Content-Type: text/plain; charset=us-ascii
  Content-Transfer-Encoding: 7bit
  Message-Id: <E1X2RJi-0007JT-R1@fta.obriain.com>
  From: dobriain <dobriain@fta.obriain.com>

  This is a test message to dobriain@fta.obriain.com
  Cc:
  This is a test
  )
  a4 OK Fetch completed.

  a5 LOGOUT
  * BYE Logging out
  a5 OK Logout completed.
  Connection closed by foreign host.
Thunderbird configuration
Server settings:
Outgoing Server (SMTP) Settings:
Test mail sent from Thunderbird.
Mail received at Gmail.
Reply sent from Gmail.
Reply received from Gmail at Thunderbird.
Debug
The following is the tail from /var/log/exim4/mainlog.
  2014-07-02 23:23:24 1X2Svz-00083g-Qx <= dobriain@fta.obriain.com H=([10.1.0.73]) [82.153.48.149] P=esmtpsa X=TLS1.0:DHE_RSA_AES_128_CBC_SHA1:128 A=login_saslauthd_server:dobriain S=1231 id=53B485CD.2050009@fta.obriain.com
  2014-07-02 23:23:24 1X2Svz-00083g-Qx gmail-smtp-in.l.google.com [2a00:1450:400c:c03::1b] Network is unreachable
  2014-07-02 23:23:25 1X2Svz-00083g-Qx => diarmuid.obriain@gmail.com R=dnslookup T=remote_smtp H=gmail-smtp-in.l.google.com [173.194.66.27] X=TLS1.2:RSA_ARCFOUR_SHA1:128 DN="C=US,ST=California,L=Mountain View,O=Google Inc,CN=mx.google.com"
  2014-07-02 23:23:25 1X2Svz-00083g-Qx Completed
  2014-07-02 23:27:53 no host name found for IP address 82.153.48.149
  2014-07-02 23:27:59 1X2T0Q-00083w-AL <= dobriain@fta.obriain.com H=([10.1.0.73]) [82.153.48.149] P=esmtpsa X=TLS1.0:DHE_RSA_AES_128_CBC_SHA1:128 A=login_saslauthd_server:dobriain S=1557 id=53B48767.6020906@fta.obriain.com
  2014-07-02 23:27:59 1X2T0Q-00083w-AL gmail-smtp-in.l.google.com [2a00:1450:400c:c03::1a] Network is unreachable
  2014-07-02 23:28:00 1X2T0Q-00083w-AL => diarmuid.obriain@gmail.com R=dnslookup T=remote_smtp H=gmail-smtp-in.l.google.com [173.194.66.27] X=TLS1.2:RSA_ARCFOUR_SHA1:128 DN="C=US,ST=California,L=Mountain View,O=Google Inc,CN=mx.google.com"
  2014-07-02 23:28:00 1X2T0Q-00083w-AL Completed
  2014-07-02 23:30:24 1X2T2m-000840-Ji DKIM: d=gmail.com s=20120113 c=relaxed/relaxed a=rsa-sha256 [invalid - public key record (currently?) unavailable]
  2014-07-02 23:30:24 1X2T2m-000840-Ji <= diarmuid.obriain@gmail.com H=mail-we0-f182.google.com [74.125.82.182] P=esmtps X=TLS1.0:RSA_ARCFOUR_SHA1:128 S=2929 id=CAJ0Nev6GdPDm7dMCdtprZ9MjvUOy6q5MkVqJ9f9dirkrh5Vcmw@mail.gmail.com
  2014-07-02 23:30:24 1X2T2m-000840-Ji => dobriain <dobriain@fta.obriain.com> R=local_user T=maildir_home
  2014-07-02 23:30:24 1X2T2m-000840-Ji Completed
  2014-07-02 23:33:41 Start queue run: pid=31007
  2014-07-02 23:33:41 1X2NUw-0002kI-Q5 Message is frozen
  2014-07-02 23:33:41 End queue run: pid=31007
Virtual user: aine.doody@fta.obriain.com
Create a system virtual user that will act on the system for the virtual mail users. This user is called vmail in a group called vmail.
fta:~$ sudo useradd --system --home /var/local/vmail --group vmail
Make two directories that will be used for the virtual mail users.
  fta:~$ sudo mkdir -p /etc/vmail/fta.obriain.com
  fta:~$ sudo mkdir -p /var/local/vmail/fta.obriain.com
Give ownership to the /var/local/vmail directory to the new user mail.
fta:~$ sudo chown -R vmail:vmail /var/local/vmail
Create a virtual user aliases file in the virtual users directory for the fta.obriain.com domain. In this case Aine Doody is the only virtual user created. To add new users simply add the aliases in the same format below Aine. If a mail arrives and there is no local user Maildirs to accept the mail, exim4 will examine this files in the /etc/vmail/fta.obriain.com for a virtual user before failing.
  fta:~$ sudo -s
  fta:~# cat > /etc/vmail/fta.obriain.com/aliases
   <<ALIASES
  postmaster: root
  webmaster: root
  security: root
  admin: root
  root: dobriain@obriain.com

  aine: aine.doody@fta.obriain.com
  ALIASES
Create a passwd file for the fta.obriain.com domain. Starting with the user aine.doody first generate a password for her using the doveadm, the Dovecot administration utility. pw is an Message Digest 5 (MD5) hash generator. Using the generated hash create the password file with for Aine with the generated hash. The file is stored in the /etc/vmail/fta.obriain.com directory and requires 0640 privileges.
  fta:~$ doveadm pw
  Enter new password: shannon
  Retype new password: shannon
  {CRAM-MD5}ec7f846825644aacd08c88f5c354bac0650bcc90fa7f4e15edf1da55f4e5c630

  fta:~$ sudo bash -c "echo 'aine.doody:{CRAM-MD5}ec7f846825644aacd08c88f5c354bac0650bcc90fa7f4e15edf1da55f4e5c630' >> /etc/vmail/fta.obriain.com/passwd"

  fta:~$ chmod 0640 /etc/vmail/fta.obriain.com/passwd
Exim Configuration
Edit the exim4 main configuration file to define variables.
  fta:~$ sudo -s

  fta:~# cat >> /etc/exim4/conf.d/main/00_vmail_config << 'MAIN'
  VMAIL_DELIVERY=dovecot_vmail
  VMAIL_DOMAINS=dsearch;/etc/vmail
  VMAIL_ALIASES=/etc/vmail/$domain/aliases
  VMAIL_PASSWD=/etc/vmail/$domain/passwd
  VMAIL_MAILBOX_DIR=/var/local/vmail/$domain
  MAIN

  fta:~# exit
Edit the exim4 main listmacrosdefs configuration file to include the VMAIL_DOMAINS as defined in the 00_vmail_config file.
  ta:~$ sudo vi /etc/exim4/conf.d/main/01_exim4-config_listmacrosdefs

  ...
  # List of domains considered local for exim. Domains not listed here
  # need to be deliverable remotely.
  domainlist local_domains = MAIN_LOCAL_DOMAINS : VMAIL_DOMAINS
  domainlist main_local_domains = MAIN_LOCAL_DOMAINS
  ...
Edit the exim4 router configuration by the inclusion of a routes for virtual mail as well as rules for virtual users.
  fta:~$ sudo -s

  fta:~# cat > /etc/exim4/conf.d/router/170_exim4-config_vmail_aliases << VALIASES
  vmail_aliases:
  driver = redirect
  domains = VMAIL_DOMAINS
  allow_fail
  allow_defer
  data = ${lookup{$local_part}lsearch{VMAIL_ALIASES}}
  qualify_domain = $domain
  VALIASES


  fta:~# cat > /etc/exim4/conf.d/router/180_exim4-config_vmail_user << VUSR
  vmail_user:
  driver = accept
  domains = VMAIL_DOMAINS
  local_parts = lsearch;VMAIL_PASSWD
  transport = VMAIL_DELIVERY

  vmail_no_such_user:
  driver = redirect
  domains = VMAIL_DOMAINS
  allow_fail = true
  data = :fail: Unknown user
  more = false
  VUSR
Define for exim4 transport for vmail users as dovecot.
  fta:~# cat > /etc/exim4/conf.d/transport/30_dovecot_vmail << TPT
  dovecot_vmail:
  driver = pipe
  command = /usr/lib/dovecot/deliver -d $local_part@$domain -f $sender_address -a $original_local_part@$original_domain
  message_prefix =
  message_suffix =
  log_output
  delivery_date_add
  envelope_to_add
  return_path_add
  user = vmail
  temp_errors = 64 : 69 : 70: 71 : 72 : 73 : 74 : 75 : 78
  TPT

  fta:~# exit
Regenerate the exim4 configuration file template. The -n option switch overwrites the existing template and -r means run. Once complete regenerate the exim4 configuration files.
    fta:~$ sudo update-exim4.conf.template -rn

    fta:~$ sudo update-exim4.conf
Restart the Dovecot and exim4 services.
  fta:~$ sudo service dovecot restart
  [ ok ] Restarting IMAP/POP3 mail server: dovecot.

  fta:~$ sudo service exim4 restart
  [ ok ] Stopping MTA for restart: exim4_listener.
  [ ok ] Restarting MTA: exim4.
Test the virtual user Aine using the username aine.doody and the alias aine.
  fta:~$ sudo exim -bt aine.doody@fta.obriain.com
  aine.doody@fta.obriain.com
  router = vmail_user, transport = dovecot_vmail

  fta:/etc/exim4/conf.d/main$ sudo exim -bt aine@fta.obriain.com
  aine.doody@fta.obriain.com
    <-- aine@fta.obriain.com
  router = vmail_user, transport = dovecot_vmail
So what happened ?
Dovecot Configuration
Confirm that the dovecot configuration has Maildir as its defined mail location.
  fta:~$ grep "^mail_location = maildir:~/Maildir" /etc/dovecot/conf.d/10-mail.conf
  mail_location = maildir:~/Maildir
Include the auth-passwdfile.conf.ext in 10-auth.conf.
fta:~$ sudo sed -i -e 's|^#!include auth-passwdfile.conf.ext|!include auth-passwdfile.conf.ext|g' /etc/dovecot/conf.d/10-auth.conf
Build a new auth-passwdfile.conf.ext file to point to the domain passwd file.
  fta:~$ cp /etc/dovecot/conf.d/auth-passwdfile.conf.ext /etc/dovecot/conf.d/auth-passwdfile.conf.ext.bak

  fta:~$ sudo -s

  fta:~# cat >> /etc/dovecot/conf.d/auth-passwdfile.conf.ext << AUTHP
  # auth-passwdfile.conf.ext

  passdb {
    driver = passwd-file
    args = username_format=%n /etc/vmail/%d/passwd
  }

  userdb {
    driver = static
    args = uid=vmail gid=vmail home=/home/vmail/%d/%u
  }
  AUTHP

  fta:~# exit
Add the following authenticators to Exim4.
  fta:~$ sudo -s

  fta:~# cat >> /etc/exim4/conf.d/auth/10_exim4-config_dovecot_auth << DAUTH
    dovecot_plain:
    driver = dovecot
    public_name = PLAIN
    server_socket = /var/run/dovecot/auth-client
    server_mail_auth_condition = false

  dovecot_login:
    driver = dovecot
    public_name = LOGIN
    server_socket = /var/run/dovecot/auth-client
    server_mail_auth_condition = false
  DAUTH

  fta:~# exit
Restart the Dovecot and exim4 services.
  fta:~$ sudo service dovecot restart
  [ ok ] Restarting IMAP/POP3 mail server: dovecot.

  fta:~$ sudo service exim4 restart
  [ ok ] Stopping MTA for restart: exim4_listener.
  [ ok ] Restarting MTA: exim4.
Test Dovecot configuration
Send a test mail to aine.doody@fta.obriain.com.
fta:~$ echo "TEST MESSAGE" | mail -s "TEST" aine.doody@fta.obriain.com
Test the Dovecot IMAP server with the virtual user aine.doody.
  fta:~$ telnet localhost 143

  Trying ::1...
  Connected to localhost.
  Escape character is '^]'.
  * OK [CAPABILITY IMAP4rev1 LITERAL+ SASL-IR LOGIN-REFERRALS ID ENABLE
  IDLE STARTTLS AUTH=PLAIN] Dovecot ready.

  a1 LOGIN aine.doody@fta.obriain.com shannon
  a1 OK [CAPABILITY IMAP4rev1 LITERAL+ SASL-IR LOGIN-REFERRALS ID ENABLE IDLE SORT SORT=DISPLAY THREAD=REFERENCES THREAD=REFS MULTIAPPEND UNSELECT CHILDREN NAMESPACE UIDPLUS LIST-EXTENDED I18NLEVEL=1 CONDSTORE QRESYNC ESEARCH ESORT SEARCHRES WITHIN CONTEXT=SEARCH LIST-STATUS SPECIAL-USE] Logged in

  a2 LIST "" "*"
  * LIST (\HasNoChildren) "." "INBOX"
  a2 OK List completed.

  a3 EXAMINE INBOX
  * OK [CLOSED] Previous mailbox closed.
  * FLAGS (\Answered \Flagged \Deleted \Seen \Draft)
  * OK [PERMANENTFLAGS ()] Read-only mailbox.
  * 13 EXISTS
  * 13 RECENT
  * OK [UNSEEN 1] First unseen.
  * OK [UIDVALIDITY 1404815169] UIDs valid
  * OK [UIDNEXT 14] Predicted next UID
  * OK [NOMODSEQ] No permanent modsequences
  a3 OK [READ-ONLY] Select completed.

  a4 FETCH 1 BODY[]
  * 1 FETCH (BODY[] {809}
  Return-path: <root@fta.obriain.com>
  Envelope-to: aine.doody@fta.obriain.com
  Delivery-date: Tue, 08 Jul 2014 11:26:09 +0100
  Received: from root by fta.obriain.com with local (Exim 4.80) (envelope-from <root@fta.obriain.com>) id 1X4SbB-0002Sr-DS for aine.doody@fta.obriain.com; Tue, 08 Jul 2014 11:26:09 +0100
  Date: Tue, 08 Jul 2014 11:26:09 +0100
  To: aine.doody@fta.obriain.com
  Subject: TEST
  User-Agent: Heirloom mailx 12.5 6/20/10
  MIME-Version: 1.0
  Content-Type: text/plain; charset=us-ascii
  Content-Transfer-Encoding: 7bit
  Message-Id: <E1X4SbB-0002Sr-DS@fta.obriain.com>
  From: root <root@fta.obriain.com>
  X-SA-Exim-Connect-IP: <locally generated>
  X-SA-Exim-Mail-From: root@fta.obriain.com
  X-SA-Exim-Scanned: No (on fta.obriain.com); SAEximRunCond expanded to false

  TEST MESSAGE
  )
  a4 OK Fetch completed.


  a5 LOGOUT
  * BYE Logging out
  a5 OK Logout completed.
  Connection closed by foreign host.
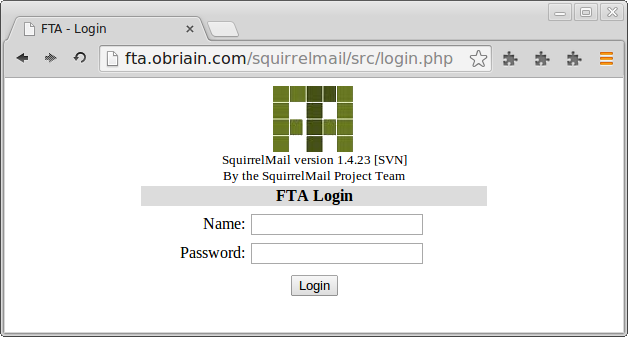
Install squirrelmail.
  fta:~$ sudo apt-get install squirrelmail squirrelmail-locales

  Put the FTA logo in ``/usr/share/squirrelmail/images``.

  Configure squirrellmail.

  fta:~$ sudo squirrelmail-configure

  Organization Preferences
  1.  Organization Name      : FTA
  2.  Organization Logo      : ../images/fta-logo.png
  3.  Org. Logo Width/Height : (82/66)
  4.  Organization Title     : FTA webmail $version
  5.  Signout Page           :
  6.  Top Frame              : _top
  7.  Provider link          : http://fta.obriain.com
  8.  Provider name          : FTA

  R   Return to Main Menu
  C   Turn color off
  S   Save data
  Q   Quit
Put the squirrellmail apache.conf file in the apache conf.d directory as squirrelmail.conf. To do this create a softlink and restart Apache to have the change take effect.
  fta:~$ sudo ln -s /etc/squirrelmail/apache.conf /etc/apache2/conf.d/squirrelmail.conf
  fta:~$ sudo service apache2 restart
  [ ok ] Restarting web server: apache2 ... waiting .
 |
Spamassassin will already be installed on the system after the earlier setup.
  fta:~$ aptitude search spamassassin | grep ^i
  i   spamassassin                    - Perl-based spam filter using text analysis
Enable Spamassassin.
fta:~$ sudo sed -i -e 's|^ENABLED=0|ENABLED=1|g' /etc/default/spamassassin
Update the Spamassassin rules.
fta:~$ sudo sa-update -D
Set the spam threshold value and rewrite subject variable
fta:~$ sudo bash -c "echo -ne '\nrewrite_subject 1\nrequired_hits 5\n' >> /etc/mail/spamassassin/local.cf"
Restart Spamassassin.
  fta:~$ sudo service spamassassin restart
  Restarting SpamAssassin Mail Filter Daemon: spamd.
I chose to install the ownCloud web-based file server. This system allows access to files from most platforms, GNU/Linux, Apple OS X, iPADs and iPhones, Microsoft Windows and Surface as well as Android Mobile and Tablets. Clients can be downloaded from the ownCloud website.
Run the Debian backports to the server to allow access to owncloud package.
  fta:~$ sudo bash -c "echo -ne '\n# wheezy backports' >> /etc/apt/sources.list"
  fta:~$ sudo bash -c "echo -ne 'deb http://ftp.debian.org/debian wheezy-backports main contrib non-free\n' /etc/apt/sources.list"
  fta:~$ sudo apt-get update
Add the following packages to the Server.
  fta:~$ sudo apt-get install apache2
  fta:~$ sudo apt-get install php5

  fta:~$ sudo apt-get install python-software-properties
  fta:~$ sudo apt-key adv --recv-keys --keyserver keyserver.ubuntu.com 0xcbcb082a1bb943db
  fta:~$ sudo add-apt-repository 'deb http://ftp.heanet.ie/mirrors/mariadb/repo/10.0/debian wheezy main'
  fta:~$ sudo apt-get update
  fta:~$ sudo apt-get install mariadb-server

  - New password for the MariaDB "root" user: mariapw
  fta:~$ sudo bash -c "echo 'deb http://download.opensuse.org/repositories/isv:ownCloud:community/Debian_7.0/ /' >> /etc/apt/sources.list.d/owncloud.list"

  fta:~$ wget http://download.opensuse.org/repositories/isv:ownCloud:community/Debian_7.0/Release.key

  fta:~$ apt-key add - < Release.key

  fta:~$ apt-get update

  fta:~$ sudo apt-get install owncloud
Check the server locale.
  fta:~$ locale -a
  C
  C.UTF-8
  en_IE.utf8
  POSIX
Select locale-gen en_US.UTF-8 as well as the configured locale.
  fta:~$ sudo  dpkg-reconfigure locales
  Generating locales (this might take a while)...
    en_IE.UTF-8... done
    en_US.UTF-8... done
  Generation complete.
Create a table in the MySQL database for owncloud.
  fta:~$ mysql -u root -p
  Enter password: mariapw
  MariaDB [(none)]> CREATE DATABASE owncloud;
  MariaDB [(none)]> USE owncloud;
  MariaDB [owncloud]> CREATE USER 'owncloudusr'@'localhost' IDENTIFIED BY 'owncloudpass';
  MariaDB [owncloud]> GRANT ALL ON owncloud.* TO 'owncloudusr'@'localhost';
  MariaDB [owncloud]> exit
  Bye
Login to database to ensure it is created correctly.
  fta:~$ mysql -u owncloudusr -p
  Enter password: owncloudpass
Now you can connect to the owncloud service to configure.
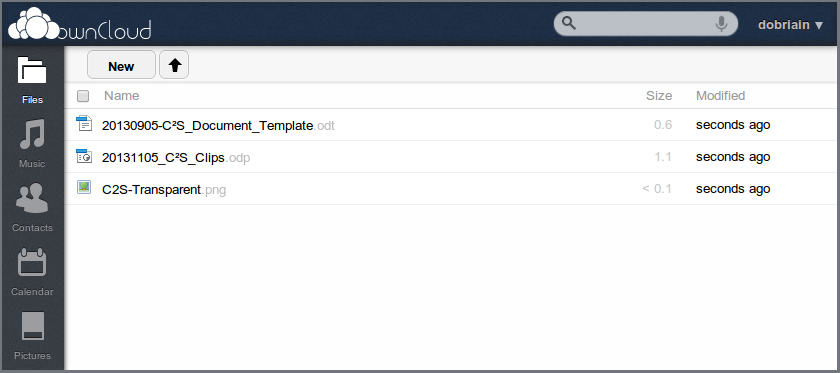 |
Add users to the service as necessary.
On Linux clients add the owncloud client service.
fta:~$ sudo apt-get install owncloud-client
Clients for other operating systems can be downloaded from: Owncloud clients
Mobile Operating System clients can be downloaded from the respective app stores.
 |
Security administration at it most basic can be performed with the nmap, Network exploration tool and security / port scanner.
A number of excellent security tools exist for GNU/Linux, in fact some of them are whole distributions dedicated to security.
Network Mapper (Nmap) is an open source tool for network exploration and security auditing. It forms the basis for most of the other tools that are used for penetration testing and scanning.
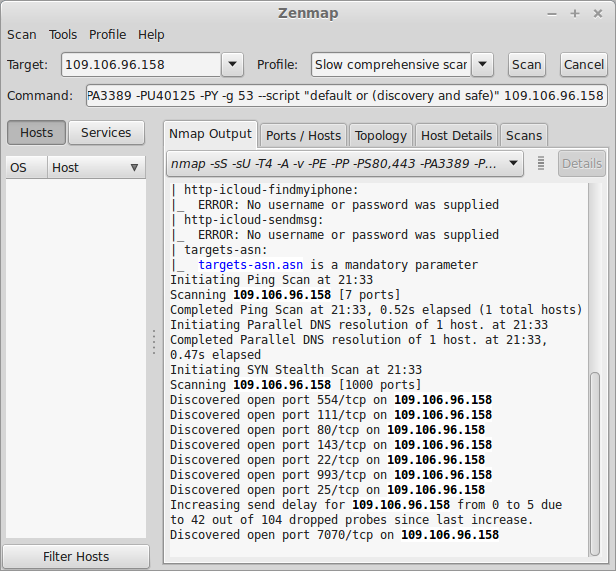
  ob:~$ sudo apt-get install nmap zenmap xprobe

  ob:~$ nmap -p 0-65535 -PN 109.106.96.158 > /home/dobriain/20140702-nmap-output.txt
The output files for fta.obriain.com are included in the CAA3 submission.
Zenmap is a very useful tool. It gives a graphical interface to Nmap and is an easy way to sort through the multitude of options within the parent tool.
 |
The Open Vulnerability Assessment System (OpenVAS) is a GNU General Public License (GNU GPL) framework of several services and tools offering a comprehensive and powerful vulnerability scanning and vulnerability management solution.
The actual security scanner is accompanied with a daily updated feed of Network Vulnerability Tests (NVTs), over 35,000 in total.
ob:~$ sudo apt-get install openvas-server openvas-plugins-base openvas-client openvas-plugins-dfsg
Use openvas-nvt-sync to update the OpenVAS security checks from the OpenVAS site (www.openvas.org). Do this on a very regular basis to ensure the scan is being performed with the most uptodate set of checks.
ob:~$ sudo openvas-nvt-sync
Add a user to run the client. Restrict the user to scanning the subnet with the mail server.
  ob:~$ sudo openvas-adduser

  Using /var/tmp as a temporary file holder.

  Add a new openvasd user
  -----------------------

  Login : dobriain
  Authentication (pass/cert) [pass] :
  Login password :
  Login password (again) :

  User rules
  ----------

  openvasd has a rules system which allows you to restrict the hosts that dobriain has the right to test.
  For instance, you may want him to be able to scan his own host only.

  Please see the openvas-adduser(8) man page for the rules syntax.

  Enter the rules for this user, and hit ctrl-D once you are done:
  (the user can have an empty rules set)
  109.106.96.152/29

  Login             : dobriain
  Password          : MyPassword

  Rules             : 109.106.96.152/29

  Is that ok? (y/n) [y]
  user added.
Change the user and group of the openvas files in the home directory of the user.
$ sudo chown dobriain:dobriain .openvas*
Start the OpenNAS server.
ob:~$ sudo service openvas-server start
( A number of plugins will report a description max length is exceeded, this is normal)
Create a list of targets in a test file.
ob:~$ echo "109.106.96.158" > /home/dobriain/scanme.txt
  ob:~$ sudo OpenVAS-Client &
  [3] 24326
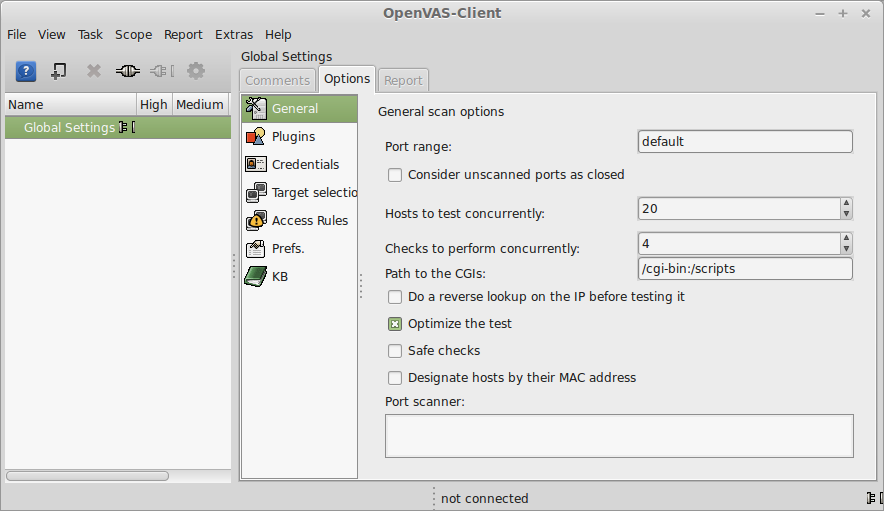 |
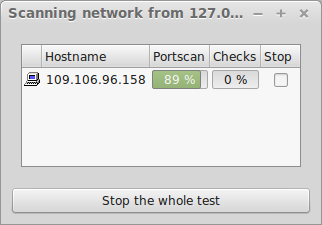 |
Once the scan completes (be prepared to wait some time) it gives access to the report.
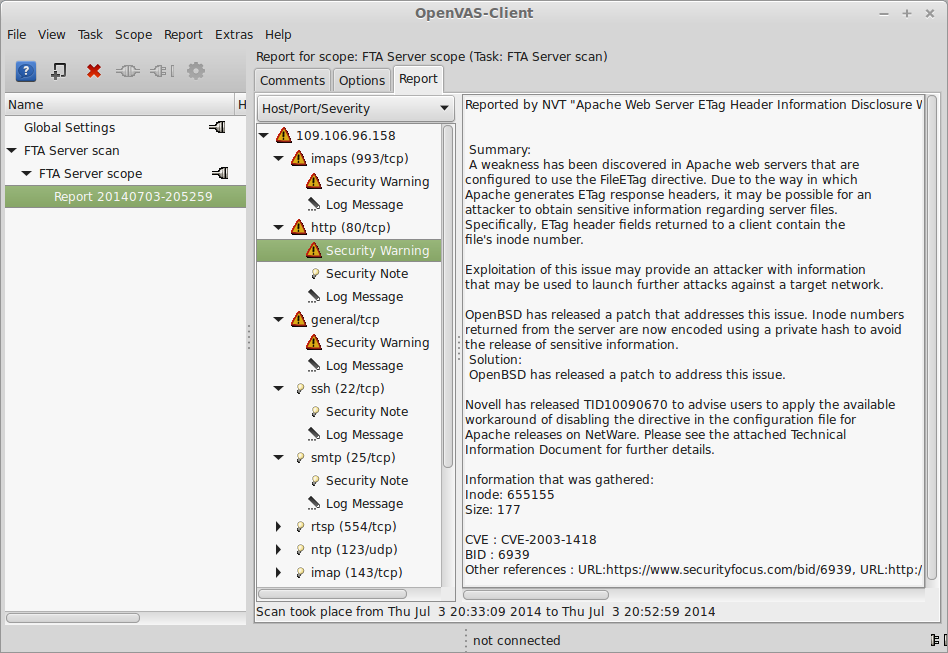 |
The output files for fta.obriain.com are included in the CAA3 submission.
A scan can alternatively be run on the CLI by feeding the client the variables.
openvas-client -q <OpenVAS Server> <Port #> <username> <password> <targets list> <output filename> -T <type> -V -x
  ob:~$ openvas-client -q 127.0.0.1 9390 dobriain MyPassword /home/dobriain/scanme.txt openvas-output-.html -T html -V -x


  attack|109.106.96.158|2|35150
  portscan|109.106.96.158|100|4482
  portscan|109.106.96.158|200|4482
  portscan|109.106.96.158|300|4482
  portscan|109.106.96.158|400|4482
  portscan|109.106.96.158|500|4482

  ...

  ...

  attack|109.106.96.158|31635|35150
  attack|109.106.96.158|32338|35150
  attack|109.106.96.158|33041|35150
  attack|109.106.96.158|33744|35150
  attack|109.106.96.158|34447|35150
  attack|109.106.96.158|35150|35150
The output files for fta.obriain.com are included in the CAA3 submission.
  ob~$ sudo apt-get remove openvas-server openvas-plugins-base openvas-client openvas-plugins-dfsg

  ob~$ wget -P /tmp http://downloads.metasploit.com/data/releases/metasploit-latest-linux-x64-installer.run

  ob~$ chmod +x /tmp/metasploit-latest-linux-x64-installer.run

  ob~$ cd /tmp

  ob~/tmp $ sudo ./metasploit-latest-linux-x64-installer.run
 |
https://localhost:3790/
The webpage will ask to create a New User Setup.
  ob:~$ sudo service metasploit restart

  worker is stopped
  metasploit is stopped
  prosvc is stopped
  nginx is stopped
  /opt/metasploit/postgresql/scripts/ctl.sh : postgresql stopped
  /opt/metasploit/postgresql/scripts/ctl.sh : postgresql  started at port 7337
  prosvc is running
  >> Deleting stale PID file log/thin.pid
  Worker starting in background
Once the main window appears select default from the list of projects or create a new project.
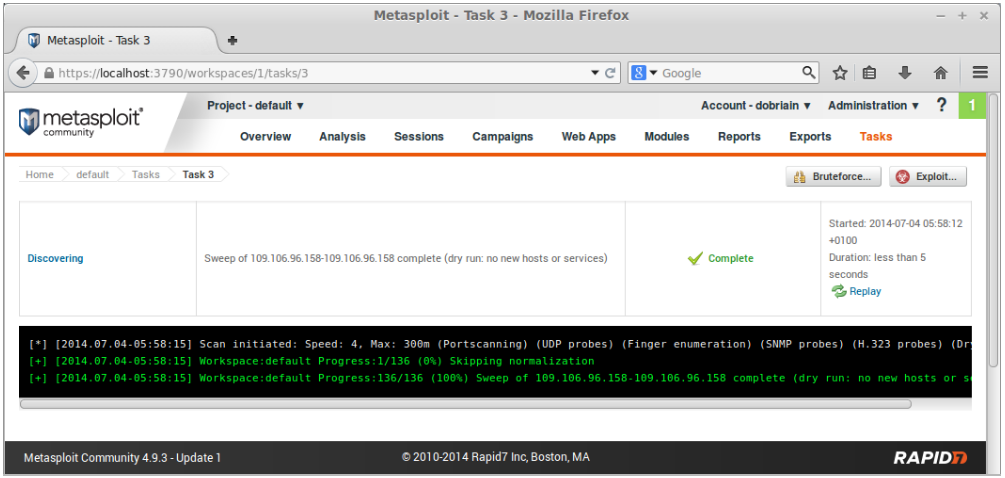 |
The output files for fta.obriain.com are included in the CAA3 submission.
Run the msfconsole.
  ob:~$ sudo msfconsole

    +-------------------------------------------------------+
    |  METASPLOIT by Rapid7                                 |
    +---------------------------+---------------------------+
    |      __________________   |                           |
    |  ==c(______(o(______(_()  | |""""""""""""|======[***  |
    |             )=\           | |  EXPLOIT   \            |
    |            // \\          | |_____________\_______    |
    |           //   \\         | |==[msf >]============\   |
    |          //     \\        | |______________________\  |
    |         // RECON \\       | \(@)(@)(@)(@)(@)(@)(@)/   |
    |        //         \\      |  *********************    |
    +---------------------------+---------------------------+
    |      o O o                |        \'\/\/\/'/         |
    |              o O          |         )======(          |
    |                 o         |       .'  LOOT  '.        |
    | |^^^^^^^^^^^^^^|l___      |      /    _||__   \       |
    | |    PAYLOAD     |""\___, |     /    (_||_     \      |
    | |________________|__|)__| |    |     __||_)     |     |
    | |(@)(@)"""**|(@)(@)**|(@) |    "       ||       "     |
    |  = = = = = = = = = = = =  |     '--------------'      |
    +---------------------------+---------------------------+


  Trouble managing data? List, sort, group, tag and search your pentest data
  in Metasploit Pro -- learn more on http://rapid7.com/metasploit

         =[ metasploit v4.9.3-1 [core:4.9 api:1.0]          ]
  + -- --=[ 1312 exploits - 790 auxiliary - 222 post        ]
  + -- --=[ 335 payloads - 35 encoders - 8 nops             ]
  + -- --=[ Free Metasploit Pro trial: http://r-7.co/trymsp ]

  msf >
Metasploit uses modules which are in effect other security tools like OpenVAS and Nessus.
  msf > load openvas
  [*] Welcome to OpenVAS integration by kost and averagesecurityguy.
  [*]
  [*] OpenVAS integration requires a database connection. Once the
  [*] database is ready, connect to the OpenVAS server using openvas_connect.
  [*] For additional commands use openvas_help.
  [*]
  [*] Successfully loaded plugin: OpenVAS
Each module has its own particular command line to manipulate it and establish a scan like from the Web UI.
  msf > openvas_help
  [*] openvas_help                  Display this help
  [*] openvas_debug                 Enable/Disable debugging
  [*] openvas_version               Display the version of the OpenVAS server
  [*]
  [*] CONNECTION
  [*] ==========
  [*] openvas_connect               Connects to OpenVAS
  [*] openvas_disconnect            Disconnects from OpenVAS
  [*]
  [*] TARGETS
  [*] =======
  [*] openvas_target_create         Create target
  [*] openvas_target_delete         Deletes target specified by ID
  [*] openvas_target_list           Lists targets
  [*]
  [*] TASKS
  [*] =====
  [*] openvas_task_create           Create task
  [*] openvas_task_delete           Delete a task and all associated reports
  [*] openvas_task_list             Lists tasks
  [*] openvas_task_start            Starts task specified by ID
  [*] openvas_task_stop             Stops task specified by ID
  [*] openvas_task_pause            Pauses task specified by ID
  [*] openvas_task_resume           Resumes task specified by ID
  [*] openvas_task_resume_or_start  Resumes or starts task specified by ID
  [*]
  [*] CONFIGS
  [*] =======
  [*] openvas_config_list           Lists scan configurations
  [*]
  [*] FORMATS
  [*] =======
  [*] openvas_format_list           Lists available report formats
  [*]
  [*] REPORTS
  [*] =======
  [*] openvas_report_list           Lists available reports
  [*] openvas_report_delete         Delete a report specified by ID
  [*] openvas_report_import         Imports an OpenVAS report specified by ID
  [*] openvas_report_download       Downloads an OpenVAS report specified by ID
p0f is a passive OS fingerprinting tool. p0f uses a fingerprinting technique based on analysing the structure of a TCP/IP packet to determine the operating system and other configuration properties of a remote host.
  fta:~$ sudo p0f -i eth0 -tvo /home/dobriain/20140702-p0f-output.txt

  fta:~$ tail 20140702-p0f-output.txt
  <Thu Jul  3 21:59:31 2014> 86.140.55.1:58319 - UNKNOWN [1024:31:0:44:M1448:.:?:?]
    -> 109.106.96.158:5963 (link: unknown-1488)
  <Thu Jul  3 21:59:31 2014> 86.140.55.1:58319 - UNKNOWN [1024:38:0:44:M1448:.:?:?]
    -> 109.106.96.158:1287 (link: unknown-1488)
  <Thu Jul  3 21:59:31 2014> 86.140.55.1:58319 - UNKNOWN [1024:31:0:44:M1448:.:?:?]
    -> 109.106.96.158:26214 (link: unknown-1488)
  <Thu Jul  3 21:59:31 2014> 86.140.55.1:58319 - UNKNOWN [1024:29:0:44:M1448:.:?:?]
    -> 109.106.96.158:1259 (link: unknown-1488)
  <Thu Jul  3 21:59:31 2014> 86.140.55.1:58319 - UNKNOWN [1024:22:0:44:M1448:.:?:?]
    -> 109.106.96.158:85 (link: unknown-1488)
In this example the p0f utility detected an nmap scan from 86.140.55.1.
The Port Scan Attack Detector (psad) makes use of iptables log messages from the /var/log/messages file to detect, alert, and optionally block port scans and other suspect traffic.
Variables can be adjusted in the /etc/psad/psad.conf. In the example below psad detects an nmap port scan from 86.140.55.1.
  fta:~$ sudo apt-get install psad
  Setting up psad (2.2-3.1) ...
  [ ok ] Starting Port Scan Attack Detector: psad.
Set the IP Tables logging rules.
  fta:~$ sudo iptables -F
  fta:~$ sudo iptables -A INPUT -j LOG
  fta:~$ sudo iptables -A FORWARD -j LOG

  fta:~$ sudo iptables -S
  -P INPUT ACCEPT
  -P FORWARD ACCEPT
  -P OUTPUT ACCEPT
  -A INPUT -j LOG
  -A FORWARD -j LOG
Update psad signatures.
  fta:~$ sudo psad --sig-update
  fta:~$ sudo service psad restart
  [info] Stopping the psadwatchd process.
  [info] Stopping the kmsgsd process.
  [info] Stopping the psad process.
  [ ok ] Stopping Port Scan Attack Detector: psad.
  [ ok ] Starting Port Scan Attack Detector: psad.
Check the status of psad.
  fta:~$ sudo service psad status

  Status of Port Scan Attack Detector:
  [+] psadwatchd (pid: 2887)  %CPU: 0.0  %MEM: 0.0
      Running since: Thu Jul  3 22:25:59 2014

  [+] psad (pid: 2885)  %CPU: 1.4  %MEM: 3.0
      Running since: Thu Jul  3 22:25:59 2014
      Command line arguments: [none specified]
      Alert email address(es): root@localhost

  [+] Version: psad v2.2

  [+] Top 50 signature matches:
        "DDOS Trin00 Master to Daemon default password attempt" (udp),  Count: 4,  Unique sources: 1,  Sid: 237
        "MISC Microsoft PPTP communication attempt" (tcp),  Count: 2,  Unique sources: 1,  Sid: 100082
        "ICMP PING" (icmp),  Count: 1,  Unique sources: 1,  Sid: 384
        "ICMP traceroute" (icmp),  Count: 1,  Unique sources: 1,  Sid: 385

  [+] Top 25 attackers:
        86.140.55.1     DL: 3, Packets: 489, Sig count: 8
        78.143.141.200  DL: 2, Packets: 46, Sig count: 0

  [+] Top 20 scanned ports:
        tcp 80    118 packets
        tcp 25    4 packets
        tcp 1723  2 packets
        tcp 21071 1 packets
        tcp 34978 1 packets
        tcp 143   1 packets
        tcp 9088  1 packets
        tcp 9443  1 packets

        udp 27892 9 packets
        udp 26415 9 packets
        udp 28543 8 packets
        udp 22124 8 packets
        udp 30544 8 packets
        udp 22123 6 packets
        udp 21698 6 packets
        udp 27482 6 packets
        udp 32779 6 packets
        udp 123   6 packets
        udp 24511 6 packets
        udp 24007 5 packets
        udp 32818 5 packets
        udp 25546 5 packets
        udp 31189 5 packets
        udp 30303 5 packets
        udp 34358 5 packets
        udp 32931 5 packets
        udp 36893 5 packets
        udp 21525 5 packets

  [+] iptables log prefix counters:
          [NONE]

      Total packet counters: tcp: 129 udp: 408 icmp: 1

  [+] IP Status Detail:

  SRC:  86.140.55.1, DL: 3, Dsts: 1, Pkts: 489, Unique sigs: 2, Email alerts: 5

      DST: 109.106.96.158, Local IP
          Scanned ports: UDP 123-58178, Pkts: 359, Chain: INPUT, Intf: eth0
          Scanned ports: TCP 25-34978, Pkts: 129, Chain: INPUT, Intf: eth0
          Signature match: "MISC Microsoft PPTP communication attempt"
              TCP, Chain: INPUT, Count: 1, DP: 1723, SYN, Sid: 100082
          Signature match: "DDOS Trin00 Master to Daemon default password attempt"
              UDP, Chain: INPUT, Count: 1, DP: 27444, Sid: 237

  SRC:  78.143.141.200, DL: 2, Dsts: 1, Pkts: 46, Unique sigs: 0, Email alerts: 4

      DST: 109.106.96.158, Local IP
          Scanned ports: UDP 34114-60963, Pkts: 46, Chain: INPUT, Intf: eth0

      Total scan sources: 2
      Total scan destinations: 1

  [+] These results are available in: /var/log/psad/status.out


  fta:~$ sudo tail -f /var/log/psad/status.out
              UDP, Chain: INPUT, Count: 1, DP: 27444, Sid: 237

  SRC:  78.143.141.200, DL: 2, Dsts: 1, Pkts: 46, Unique sigs: 0, Email alerts: 4

      DST: 109.106.96.158, Local IP
          Scanned ports: UDP 34114-60963, Pkts: 46, Chain: INPUT, Intf: eth0

      Total scan sources: 2
      Total scan destinations: 1
Passive Asset Detection System (pads) is a libpcap based detection engine used to passively detect network assets. It is designed to complement IDS technology by providing context to IDS alerts. Discovered devices are logged in /var/lib/pads/assets.csv. This can be changed along with many other variables in /etc/pads/pads.conf.
  fta:~$ sudo apt-get install pads
  Setting up pads (1.2-11) ...
  [ ok ] Starting Passive Asset Detection System: pads.

  fta:~$ cat /var/lib/pads/assets.csv
  asset,port,proto,service,application,discovered
  109.106.96.153,0,0,ARP (Intel Corporation),0:04:23:B1:8F:E2,1404421526
 |
MariaDB is a fork of Oracle MySQL. It is community maintained under the GPL v2 license and all code in MariaDB is open source. MariaDB is a binary drop in replacement for MySQL. It includes the XtraDB storage engine as a replacement for InnoDB. Whilst remaining application compatible with MySQL, it adds many new capabilities to address the most challenging web and enterprise applications. Its lead developer is Michael Widenius is also the founder of MySQL. MariaDB implements the SQL standard. It is found on most distributions of Linux and exists for many Operating Systems including Linux, FreeBSD, BSD UNIX and Microsoft Windows but if not on yours it can be downloaded from: MariaDB Downloads and documentation is located in the MariaDB Knowledgebase.
Many Graphical tools are available for MySQL. The distribution has a tool called MySQL Navigator and there is the phpMyAdmin project. I find phpMyAdmin to be the best of those available at the time of writing, if you do not have it installed you can download it from: www.phpmyadmin.net. On Microsoft Windows the distribution includes a graphical management tool called WinMySQLAdmin.
Here are the commands to run to add MariaDB to Debian GNU/Linux 7 Wheezy. Details for other Linux Distributions at the MariaDB Repository Configuration Tool
  ob:~$ sudo apt-get install python-software-properties
  ob:~$ sudo apt-key adv --recv-keys --keyserver keyserver.ubuntu.com 0xcbcb082a1bb943db
  ob:~$ sudo add-apt-repository 'deb http://ftp.heanet.ie/mirrors/mariadb/repo/10.0/debian wheezy main'
Once the key is imported and the repository added install MariaDB with the commands:
  ob:~$ sudo apt-get update
  ob:~$ sudo apt-get install mariadb-server

  New password for the MariaDB "root" user: MyDBroot
Confirm mariadb packages are installed. The Debian package management system (dpkg) has a facility to indicate what is installed on Debian based systems while Fedora systems use the Redhat package management system (rpm) to achieve a similar outcome. The ii indicates they are installed.
  $ dpkg -l mariadb-* |grep ^ii
  ii  mariadb-client-10.0                  10.0.11+maria-1~wheezy             i386         MariaDB database client binaries
  ii  mariadb-client-core-10.0             10.0.11+maria-1~wheezy             i386         MariaDB database core client binaries
  ii  mariadb-common                       10.0.11+maria-1~wheezy             all          MariaDB database common files (e.g. /etc/mysql/conf.d/mariadb.cnf)
  ii  mariadb-server                       10.0.11+maria-1~wheezy             all          MariaDB database server (metapackage depending on the latest version)
  ii  mariadb-server-10.0                  10.0.11+maria-1~wheezy             i386         MariaDB database server binaries
  ii  mariadb-server-core-10.0             10.0.11+maria-1~wheezy             i386         MariaDB database core server files
Note: On RedHat Package Manager (RPM) based systems
  fedora:~$ sudo yum install mariadb-server
  New password for the MariaDB "root" user: MyDBroot
The MariaDB Daemon running on the server. It can be accessed either by:
Communication between MariaDB Server and Client is formatted in 16 byte segments that are carried between them using Transmission Control Protocol (TCP), a Unix Socket or a Microsoft named-pipe. The example COM_QUIT tells the server that the client wants to close the connection.
Communication types are:
Responses to communications are via Generic Response Packets:
The MariaDB daemon mydqld can be started using either the mysqld_safe or the service command. mysqld_safe adds some safety features such as restarting the server when an error occurs and logging runtime information to an error log file.
  ob:~$ sudo mysqld_safe
  130921 16:20:07 mysqld_safe Logging to syslog.
  130921 16:20:07 mysqld_safe Starting mysqld daemon with databases from /var/lib/mysql

  ob:~$ sudo service mysql start
  [ ok ] Starting MariaDB database server: mysqld.
  [info] Checking for corrupt, not cleanly closed and upgrade needing tables..
On Linux you can gracefully shutdown the mysqld service with the following command:
  ob:~$ sudo service mysql stop
  [ ok ] Stopping MariaDB database server: mysqld.
  ob:~$ sudo service mysql restart
  [ ok ] Stopping MariaDB database server: mysqld.
  [ ok ] Starting MariaDB database server: mysqld.
  [info] Checking for corrupt, not cleanly closed and upgrade needing tables..
The working MariaDB files and directories are in /var/lib/mysql/
  ob:~$ ls /var/lib/mysql
  aria_log.00000001  ibdata1      multi-master.info   news.err
  aria_log_control   ib_logfile0  mysql               news.pid
  debian-10.0.flag   ib_logfile1  mysql_upgrade_info  performance_schema
To logon to a database initially use the command:
  ob:~$ mysql -u root -p
  Enter password: MyDBroot

  Welcome to the MariaDB monitor.  Commands end with ; or \g.
  Your MariaDB connection id is 37
  Server version: 10.0.11-MariaDB-1~wheezy mariadb.org binary distribution

  Copyright (c) 2000, 2014, Oracle, SkySQL Ab and others.

  Type 'help;' or '\h' for help. Type '\c' to clear the current input statement.

  MariaDB [(none)]>
The show databases SQL query will return the list of existing databases. As none have been created then we will only see the two default databases.
  MariaDB [(none)]> SHOW DATABASES;
  +--------------------+
  | Database           |
  +--------------------+
  | information_schema |
  | mysql              |
  | performance_schema |
  +--------------------+
  3 rows in set (0.05 sec)
Login as root to create the FTA_DB database.
  MariaDB [(none)]> CREATE DATABASE FTA_DB;
  Query OK, 1 row affected (0.01 sec)

  MariaDB [(none)]> SHOW DATABASES;
  +--------------------+
  | Database           |
  +--------------------+
  | FTA_DB             |
  | information_schema |
  | mysql              |
  | performance_schema |
  +--------------------+
  4 rows in set (0.00 sec)
Creating a database does not select it for use; you must do that explicitly.
  MariaDB [(none)]> USE FTA_DB;
  Database changed

  MariaDB [FTA_DB]>
Users are stored in a users table in a special systems database called mysql. To see this add a user, list users, remove the user and list the users again.
  MariaDB [FTA_DB]> CREATE USER 'MyDBuser'@'localhost' IDENTIFIED BY 'MyDBpass';

  MariaDB [FTA_DB]> SELECT USER FROM mysql.user;
  +------------------+
  | USER             |
  +------------------+
  | root             |
  | root             |
  | MyDBuser         |
  | debian-sys-maint |
  | root             |
  | root             |
  +------------------+
  6 rows in set (0.00 sec)
Where did all those root users appear from ? Well there is a `root` user for each possible host. This can be seen from the following command. For the moment MyDBuser will be used from the localhost terminal so no other iterations of the user are necessary apary from MyDBuser@loclhost.
  MariaDB [FTA_DB]> SELECT USER, HOST FROM mysql.user;

  +------------------+-----------+
  | USER             | HOST      |
  +------------------+-----------+
  | root             | 127.0.0.1 |
  | root             | ::1       |
  | MyDBuser         | localhost |
  | debian-sys-maint | localhost |
  | root             | localhost |
  | root             | news      |
  +------------------+-----------+
  6 rows in set (0.00 sec)
Login as the root user again to grant user rights to the new user MyDBuser to the FTA_DB database.
  MariaDB [(none)]> GRANT ALL ON FTA_DB.* TO 'MyDBuser'@'localhost';
  Query OK, 0 rows affected (0.00 sec)
Quit as the root user and login with the new user.
  MariaDB [FTA_DB]> quit

  ob:~$ mysql -u MyDBuser -p
  Enter password: MyDBpass
  Welcome to the MariaDB monitor.  Commands end with ; or \g.
  Your MariaDB connection id is 45
  Server version: 10.0.11-MariaDB-1~wheezy mariadb.org binary distribution

  Copyright (c) 2000, 2014, Oracle, SkySQL Ab and others.

  Type 'help;' or '\h' for help. Type '\c' to clear the current input statement.

  MariaDB [(none)]>

  MariaDB [(none)]> USE FTA_DB;
  Database changed
Create 4 tables to the FTA_DB database.
  MariaDB [(none)]> USE FTA_DB;

  MariaDB [FTA_DB]> CREATE TABLE FTA_TBL_01 ( Col_A VARCHAR(10) NOT NULL, Col_B TEXT NULL, Col_C INT NULL, Col_D INT NULL, PRIMARY KEY (Col_A) );
  Query OK, 0 rows affected (0.49 sec)
Copy and paste following lines to create the remaining three database tables.
  CREATE TABLE FTA_TBL_02 ( Col_A VARCHAR(10) NOT NULL, Col_B TEXT NULL, Col_C INT NULL, Col_D INT NULL, PRIMARY KEY (Col_A) );
  CREATE TABLE FTA_TBL_03 ( Col_A VARCHAR(10) NOT NULL, Col_B TEXT NULL, Col_C INT NULL, Col_D INT NULL, PRIMARY KEY (Col_A) );
  CREATE TABLE FTA_TBL_04 ( Col_A VARCHAR(10) NOT NULL, Col_B TEXT NULL, Col_C INT NULL, Col_D INT NULL, PRIMARY KEY (Col_A) );
Here four tables called FTA_TBL_01, FTA_TBL_02, FTA_TBL_03 and FTA_TBL_04 was added to the database with four columns each.
1. Column called Col_A with a type of VARCHAR(10) with a limit of 10 bytes (1 ACSII character per byte). I used this data type as I want to use this column as a Primary Key. It is also defined as 'NOT NULL' which means that in each row this column must have an entry.
1. Column called ``Col_B with a type of TEXT.
2. The remaining columns are simple integer (INT) columns.
3. A PRIMARY KEY column is also defined. It is worth noting that this column must be defined as NOT NULL. Here it is tied to the column Col_A in each case.
Verify the table exists in the database.
  MariaDB [FTA_DB]> SHOW TABLES;
  +------------------+
  | Tables_in_FTA_DB |
  +------------------+
  | FTA_TBL_01       |
  | FTA_TBL_02       |
  | FTA_TBL_03       |
  | FTA_TBL_04       |
  +------------------+
  4 rows in set (0.00 sec)
Look at the tables in more detail.
  MariaDB [FTA_DB]> SHOW COLUMNS FROM FTA_TBL_01;
  +-------+-------------+------+-----+---------+-------+
  | Field | Type        | Null | Key | Default | Extra |
  +-------+-------------+------+-----+---------+-------+
  | Col_A | varchar(10) | NO   | PRI | NULL    |       |
  | Col_B | text        | YES  |     | NULL    |       |
  | Col_C | int(11)     | YES  |     | NULL    |       |
  | Col_D | int(11)     | YES  |     | NULL    |       |
  +-------+-------------+------+-----+---------+-------+
  4 rows in set (0.01 sec)

  MariaDB [FTA_DB]> SHOW COLUMNS FROM FTA_TBL_02;
  +-------+-------------+------+-----+---------+-------+
  | Field | Type        | Null | Key | Default | Extra |
  +-------+-------------+------+-----+---------+-------+
  | Col_A | varchar(10) | NO   | PRI | NULL    |       |
  | Col_B | text        | YES  |     | NULL    |       |
  | Col_C | int(11)     | YES  |     | NULL    |       |
  | Col_D | int(11)     | YES  |     | NULL    |       |
  +-------+-------------+------+-----+---------+-------+
  4 rows in set (0.00 sec)

  MariaDB [FTA_DB]> SHOW COLUMNS FROM FTA_TBL_03;
  +-------+-------------+------+-----+---------+-------+
  | Field | Type        | Null | Key | Default | Extra |
  +-------+-------------+------+-----+---------+-------+
  | Col_A | varchar(10) | NO   | PRI | NULL    |       |
  | Col_B | text        | YES  |     | NULL    |       |
  | Col_C | int(11)     | YES  |     | NULL    |       |
  | Col_D | int(11)     | YES  |     | NULL    |       |
  +-------+-------------+------+-----+---------+-------+
  4 rows in set (0.00 sec)

  MariaDB [FTA_DB]> SHOW COLUMNS FROM FTA_TBL_04;
  +-------+-------------+------+-----+---------+-------+
  | Field | Type        | Null | Key | Default | Extra |
  +-------+-------------+------+-----+---------+-------+
  | Col_A | varchar(10) | NO   | PRI | NULL    |       |
  | Col_B | text        | YES  |     | NULL    |       |
  | Col_C | int(11)     | YES  |     | NULL    |       |
  | Col_D | int(11)     | YES  |     | NULL    |       |
  +-------+-------------+------+-----+---------+-------+
  4 rows in set (0.01 sec)
Data can be added by refering each entry to a corresponding column directly.
  MariaDB [FTA_DB]> INSERT INTO FTA_TBL_01 (Col_A, Col_B, Col_C, Col_D) VALUES (
      -> 'ROW 01',
      -> 'ddf',
      -> 73,
      -> 1001
      -> );
  Query OK, 1 row affected (0.08 sec)
If the data is input in the correct sequency to match the column sequence then the column names can be left out before the term VALUES.
  MariaDB [FTA_DB]> INSERT INTO FTA_TBL_01 VALUES ( 'ROW 02', 'gvd', 23, 1002 );
  Query OK, 1 row affected (0.08 sec)
Create the remaining lines by copy and past of the following lines to the MariaDB client.
  INSERT INTO FTA_TBL_01 VALUES ( 'ROW 03', 'dwew', 21, 1003 );
  INSERT INTO FTA_TBL_01 VALUES ( 'ROW 04', 'wse4', 17, 1004 );
  INSERT INTO FTA_TBL_01 VALUES ( 'ROW 05', 'wwe3', 33, 1005 );
  INSERT INTO FTA_TBL_01 VALUES ( 'ROW 06', 'ww1', 68, 1006 );
  INSERT INTO FTA_TBL_01 VALUES ( 'ROW 07', '12w', 40, 1007 );
  INSERT INTO FTA_TBL_01 VALUES ( 'ROW 08', 'eed', 77, 1008 );
  INSERT INTO FTA_TBL_01 VALUES ( 'ROW 09', 'w2w', 57, 1009 );
  INSERT INTO FTA_TBL_01 VALUES ( 'ROW 10', 'sw4', 100, 1010 );
Populate the remaining tables.
  INSERT INTO FTA_TBL_02 VALUES ( 'ROW 01', 'rre', 38, 2001 );
  INSERT INTO FTA_TBL_02 VALUES ( 'ROW 02', 'eder', 18, 2002 );
  INSERT INTO FTA_TBL_02 VALUES ( 'ROW 03', 'eedd', 43, 2003 );
  INSERT INTO FTA_TBL_02 VALUES ( 'ROW 04', 'dde', 43, 2004 );
  INSERT INTO FTA_TBL_02 VALUES ( 'ROW 05', 'd2ew', 60, 2005 );
  INSERT INTO FTA_TBL_02 VALUES ( 'ROW 06', 'scr6', 94, 2006 );
  INSERT INTO FTA_TBL_02 VALUES ( 'ROW 07', '90o', 37, 2007 );
  INSERT INTO FTA_TBL_02 VALUES ( 'ROW 08', 'hggt', 23, 2008 );
  INSERT INTO FTA_TBL_02 VALUES ( 'ROW 09', 'fr4', 67, 2009 );
  INSERT INTO FTA_TBL_02 VALUES ( 'ROW 10', 'gtrt55', 70, 2010 );
  INSERT INTO FTA_TBL_03 VALUES ( 'ROW 01', '35t', 83, 3001 );
  INSERT INTO FTA_TBL_03 VALUES ( 'ROW 02', 'sw34', 16, 3002 );
  INSERT INTO FTA_TBL_03 VALUES ( 'ROW 03', 'yy6', 26, 3003 );
  INSERT INTO FTA_TBL_03 VALUES ( 'ROW 04', '7yu', 73, 3004 );
  INSERT INTO FTA_TBL_03 VALUES ( 'ROW 05', 'gyt7', 96, 3005 );
  INSERT INTO FTA_TBL_03 VALUES ( 'ROW 06', 'yt5', 85, 3006 );
  INSERT INTO FTA_TBL_03 VALUES ( 'ROW 07', 'eky', 60, 3007 );
  INSERT INTO FTA_TBL_03 VALUES ( 'ROW 08', 'ee3', 77, 3008 );
  INSERT INTO FTA_TBL_03 VALUES ( 'ROW 09', '2w43', 49, 3009 );
  INSERT INTO FTA_TBL_03 VALUES ( 'ROW 10', 'as2', 96, 3010 );
  INSERT INTO FTA_TBL_04 VALUES ( 'ROW 01', 'frc', 88, 4001 );
  INSERT INTO FTA_TBL_04 VALUES ( 'ROW 02', '65tt', 8, 4002 );
  INSERT INTO FTA_TBL_04 VALUES ( 'ROW 03', '6yt5', 98, 4003 );
  INSERT INTO FTA_TBL_04 VALUES ( 'ROW 04', 'gt6', 50, 4004 );
  INSERT INTO FTA_TBL_04 VALUES ( 'ROW 05', 'lpo', 35, 4005 );
  INSERT INTO FTA_TBL_04 VALUES ( 'ROW 06', 'ffr7', 33, 4006 );
  INSERT INTO FTA_TBL_04 VALUES ( 'ROW 07', 'sjuyy', 81, 4007 );
  INSERT INTO FTA_TBL_04 VALUES ( 'ROW 08', '33e', 93, 4008 );
  INSERT INTO FTA_TBL_04 VALUES ( 'ROW 09', '3e3', 7, 4009 );
  INSERT INTO FTA_TBL_04 VALUES ( 'ROW 10', 'sd3', 49, 4010 );
Review the entries in the table, the With this command we get an ASCII graphical representation of the table contents.
  MariaDB [FTA_DB]> SELECT * FROM FTA_TBL_01;
  +--------+-------+-------+-------+
  | Col_A  | Col_B | Col_C | Col_D |
  +--------+-------+-------+-------+
  | ROW 01 | ddf   |    73 |  1001 |
  | ROW 02 | gvd   |    23 |  1002 |
  | ROW 03 | dwew  |    21 |  1003 |
  | ROW 04 | wse4  |    17 |  1004 |
  | ROW 05 | wwe3  |    33 |  1005 |
  | ROW 06 | ww1   |    68 |  1006 |
  | ROW 07 | 12w   |    40 |  1007 |
  | ROW 08 | eed   |    77 |  1008 |
  | ROW 09 | w2w   |    57 |  1009 |
  | ROW 10 | sw4   |   100 |  1010 |
  +--------+-------+-------+-------+
  10 rows in set (0.00 sec)

  MariaDB [FTA_DB]> SELECT * FROM FTA_TBL_02;
  +--------+--------+-------+-------+
  | Col_A  | Col_B  | Col_C | Col_D |
  +--------+--------+-------+-------+
  | ROW 01 | rre    |    38 |  2001 |
  | ROW 02 | eder   |    18 |  2002 |
  | ROW 03 | eedd   |    43 |  2003 |
  | ROW 04 | dde    |    43 |  2004 |
  | ROW 05 | d2ew   |    60 |  2005 |
  | ROW 06 | scr6   |    94 |  2006 |
  | ROW 07 | 90o    |    37 |  2007 |
  | ROW 08 | hggt   |    23 |  2008 |
  | ROW 09 | fr4    |    67 |  2009 |
  | ROW 10 | gtrt55 |    70 |  2010 |
  +--------+--------+-------+-------+
  10 rows in set (0.00 sec)

  MariaDB [FTA_DB]> SELECT * FROM FTA_TBL_03;
  +--------+-------+-------+-------+
  | Col_A  | Col_B | Col_C | Col_D |
  +--------+-------+-------+-------+
  | ROW 01 | 35t   |    83 |  3001 |
  | ROW 02 | sw34  |    16 |  3002 |
  | ROW 03 | yy6   |    26 |  3003 |
  | ROW 04 | 7yu   |    73 |  3004 |
  | ROW 05 | gyt7  |    96 |  3005 |
  | ROW 06 | yt5   |    85 |  3006 |
  | ROW 07 | eky   |    60 |  3007 |
  | ROW 08 | ee3   |    77 |  3008 |
  | ROW 09 | 2w43  |    49 |  3009 |
  | ROW 10 | as2   |    96 |  3010 |
  +--------+-------+-------+-------+
  10 rows in set (0.00 sec)

  MariaDB [FTA_DB]> SELECT * FROM FTA_TBL_04;
  +--------+-------+-------+-------+
  | Col_A  | Col_B | Col_C | Col_D |
  +--------+-------+-------+-------+
  | ROW 01 | frc   |    88 |  4001 |
  | ROW 02 | 65tt  |     8 |  4002 |
  | ROW 03 | 6yt5  |    98 |  4003 |
  | ROW 04 | gt6   |    50 |  4004 |
  | ROW 05 | lpo   |    35 |  4005 |
  | ROW 06 | ffr7  |    33 |  4006 |
  | ROW 07 | sjuyy |    81 |  4007 |
  | ROW 08 | 33e   |    93 |  4008 |
  | ROW 09 | 3e3   |     7 |  4009 |
  | ROW 10 | sd3   |    49 |  4010 |
  +--------+-------+-------+-------+
  10 rows in set (0.01 sec)
A separated listing of each table, sorted by values of column 3 in increasing order.
  MariaDB [FTA_DB]> SELECT * FROM FTA_TBL_01 ORDER BY Col_C;
  +--------+-------+-------+-------+
  | Col_A  | Col_B | Col_C | Col_D |
  +--------+-------+-------+-------+
  | ROW 04 | wse4  |    17 |  1004 |
  | ROW 03 | dwew  |    21 |  1003 |
  | ROW 02 | gvd   |    23 |  1002 |
  | ROW 05 | wwe3  |    33 |  1005 |
  | ROW 07 | 12w   |    40 |  1007 |
  | ROW 09 | w2w   |    57 |  1009 |
  | ROW 06 | ww1   |    68 |  1006 |
  | ROW 01 | ddf   |    73 |  1001 |
  | ROW 08 | eed   |    77 |  1008 |
  | ROW 10 | sw4   |   100 |  1010 |
  +--------+-------+-------+-------+
  10 rows in set (0.00 sec)

  MariaDB [FTA_DB]> SELECT * FROM FTA_TBL_02 ORDER BY Col_C;
  +--------+--------+-------+-------+
  | Col_A  | Col_B  | Col_C | Col_D |
  +--------+--------+-------+-------+
  | ROW 02 | eder   |    18 |  2002 |
  | ROW 08 | hggt   |    23 |  2008 |
  | ROW 07 | 90o    |    37 |  2007 |
  | ROW 01 | rre    |    38 |  2001 |
  | ROW 03 | eedd   |    43 |  2003 |
  | ROW 04 | dde    |    43 |  2004 |
  | ROW 05 | d2ew   |    60 |  2005 |
  | ROW 09 | fr4    |    67 |  2009 |
  | ROW 10 | gtrt55 |    70 |  2010 |
  | ROW 06 | scr6   |    94 |  2006 |
  +--------+--------+-------+-------+
  10 rows in set (0.00 sec)

  MariaDB [FTA_DB]> SELECT * FROM FTA_TBL_03 ORDER BY Col_C;
  +--------+-------+-------+-------+
  | Col_A  | Col_B | Col_C | Col_D |
  +--------+-------+-------+-------+
  | ROW 02 | sw34  |    16 |  3002 |
  | ROW 03 | yy6   |    26 |  3003 |
  | ROW 09 | 2w43  |    49 |  3009 |
  | ROW 07 | eky   |    60 |  3007 |
  | ROW 04 | 7yu   |    73 |  3004 |
  | ROW 08 | ee3   |    77 |  3008 |
  | ROW 01 | 35t   |    83 |  3001 |
  | ROW 06 | yt5   |    85 |  3006 |
  | ROW 05 | gyt7  |    96 |  3005 |
  | ROW 10 | as2   |    96 |  3010 |
  +--------+-------+-------+-------+
  10 rows in set (0.00 sec)

  MariaDB [FTA_DB]> SELECT * FROM FTA_TBL_04 ORDER BY Col_C;
  +--------+-------+-------+-------+
  | Col_A  | Col_B | Col_C | Col_D |
  +--------+-------+-------+-------+
  | ROW 09 | 3e3   |     7 |  4009 |
  | ROW 02 | 65tt  |     8 |  4002 |
  | ROW 06 | ffr7  |    33 |  4006 |
  | ROW 05 | lpo   |    35 |  4005 |
  | ROW 10 | sd3   |    49 |  4010 |
  | ROW 04 | gt6   |    50 |  4004 |
  | ROW 07 | sjuyy |    81 |  4007 |
  | ROW 01 | frc   |    88 |  4001 |
  | ROW 08 | 33e   |    93 |  4008 |
  | ROW 03 | 6yt5  |    98 |  4003 |
  +--------+-------+-------+-------+
  10 rows in set (0.00 sec)
Here is an integrated listing of data from Col_A and Col_D from the four tables, sorted by the values of Col_D in decreasing order.
  MariaDB [FTA_DB]> (SELECT Col_A, Col_D FROM FTA_TBL_01)
      -> UNION (SELECT Col_A, Col_D FROM FTA_TBL_02)
      -> UNION (SELECT Col_A, Col_D FROM FTA_TBL_03)
      -> UNION (SELECT Col_A, Col_D FROM FTA_TBL_04)
      -> ORDER BY Col_D DESC;

  +--------+-------+
  | Col_A  | Col_D |
  +--------+-------+
  | ROW 10 |  4010 |
  | ROW 09 |  4009 |
  | ROW 08 |  4008 |
  | ROW 07 |  4007 |
  | ROW 06 |  4006 |
  | ROW 05 |  4005 |
  | ROW 04 |  4004 |
  | ROW 03 |  4003 |
  | ROW 02 |  4002 |
  | ROW 01 |  4001 |
  | ROW 10 |  3010 |
  | ROW 09 |  3009 |
  | ROW 08 |  3008 |
  | ROW 07 |  3007 |
  | ROW 06 |  3006 |
  | ROW 05 |  3005 |
  | ROW 04 |  3004 |
  | ROW 03 |  3003 |
  | ROW 02 |  3002 |
  | ROW 01 |  3001 |
  | ROW 10 |  2010 |
  | ROW 09 |  2009 |
  | ROW 08 |  2008 |
  | ROW 07 |  2007 |
  | ROW 06 |  2006 |
  | ROW 05 |  2005 |
  | ROW 04 |  2004 |
  | ROW 03 |  2003 |
  | ROW 02 |  2002 |
  | ROW 01 |  2001 |
  | ROW 10 |  1010 |
  | ROW 09 |  1009 |
  | ROW 08 |  1008 |
  | ROW 07 |  1007 |
  | ROW 06 |  1006 |
  | ROW 05 |  1005 |
  | ROW 04 |  1004 |
  | ROW 03 |  1003 |
  | ROW 02 |  1002 |
  | ROW 01 |  1001 |
  +--------+-------+
  40 rows in set (0.00 sec)
Replace the numerical value of Col_D by the numerical value of Col_C minus the current value of Col_D divided by 3.
  MariaDB [FTA_DB]> UPDATE FTA_TBL_01 SET Col_D = Col_C - Col_D / 3;
  Query OK, 10 rows affected (0.11 sec)
  Rows matched: 10  Changed: 10  Warnings: 0

  MariaDB [FTA_DB]> UPDATE FTA_TBL_02 SET Col_D = Col_C - Col_D / 3;
  Query OK, 10 rows affected (0.10 sec)
  Rows matched: 10  Changed: 10  Warnings: 0

  MariaDB [FTA_DB]> UPDATE FTA_TBL_03 SET Col_D = Col_C - Col_D / 3;
  Query OK, 10 rows affected (0.06 sec)
  Rows matched: 10  Changed: 10  Warnings: 0

  MariaDB [FTA_DB]> UPDATE FTA_TBL_04 SET Col_D = Col_C - Col_D / 3;
  Query OK, 10 rows affected (0.12 sec)
  Rows matched: 10  Changed: 10  Warnings: 0

  MariaDB [FTA_DB]> (SELECT Col_D FROM FTA_TBL_01)
      -> UNION (SELECT Col_D FROM FTA_TBL_02)
      -> UNION (SELECT Col_D FROM FTA_TBL_03)
      -> UNION (SELECT Col_D FROM FTA_TBL_04)
      -> ORDER BY Col_D DESC;
  +-------+
  | Col_D |
  +-------+
  |  -237 |
  |  -259 |
  |  -261 |
  |  -267 |
  |  -279 |
  |  -296 |
  |  -302 |
  |  -311 |
  |  -313 |
  |  -318 |
  |  -575 |
  |  -600 |
  |  -603 |
  |  -608 |
  |  -625 |
  |  -629 |
  |  -632 |
  |  -646 |
  |  -649 |
  |  -906 |
  |  -907 |
  |  -917 |
  |  -926 |
  |  -928 |
  |  -942 |
  |  -954 |
  |  -975 |
  |  -985 |
  | -1236 |
  | -1243 |
  | -1246 |
  | -1255 |
  | -1285 |
  | -1288 |
  | -1300 |
  | -1302 |
  | -1326 |
  | -1329 |
  +-------+
  38 rows in set (0.00 sec)
Create a separate table for an entity called Student with the following entries:
  DATE_FORMAT(NOW(),'%y%m%d');

  MariaDB [FTA_DB]> CREATE TABLE Student (
      -> student_no INT(8) NOT NULL,
      -> christian_name TEXT NULL,
      -> sir_name TEXT NULL,
      -> house TEXT NULL,
      -> street TEXT NULL,
      -> area TEXT NULL,
      -> town_city TEXT NULL,
      -> county TEXT NULL,
      -> dob DATE NULL,
      -> PRIMARY KEY (student_no) );
  Query OK, 0 rows affected (0.54 sec)


  MariaDB [FTA_DB]> SHOW COLUMNS FROM Student;
  +----------------+--------+------+-----+---------+-------+
  | Field          | Type   | Null | Key | Default | Extra |
  +----------------+--------+------+-----+---------+-------+
  | student_no     | int(8) | NO   | PRI | NULL    |       |
  | christian_name | text   | YES  |     | NULL    |       |
  | sir_name       | text   | YES  |     | NULL    |       |
  | house          | text   | YES  |     | NULL    |       |
  | street         | text   | YES  |     | NULL    |       |
  | area           | text   | YES  |     | NULL    |       |
  | town_city      | text   | YES  |     | NULL    |       |
  | county         | text   | YES  |     | NULL    |       |
  | dob            | date   | YES  |     | NULL    |       |
  +----------------+--------+------+-----+---------+-------+
  9 rows in set (0.00 sec)
Add data to the table.
  MariaDB [FTA_DB]> INSERT INTO Student VALUES ( 01, 'Diarmuid', 'O Briain', 'My House', 'My Street', 'Corbally', 'Limerick City', 'Limerick', '1967-08-21' );
  Query OK, 1 row affected (0.11 sec)

  MariaDB [FTA_DB]> SELECT * FROM Student;
  +------------+----------------+----------+----------+-----------+----------+---------------+----------+------------+
  | student_no | christian_name | sir_name | house    | street    | area     | town_city     | county   | dob        |
  +------------+----------------+----------+----------+-----------+----------+---------------+----------+------------+
  |          1 | Diarmuid       | O Briain | My House | My Street | Corbally | Limerick City | Limerick | 1967-08-21 |
  +------------+----------------+----------+----------+-----------+----------+---------------+----------+------------+
  1 row in set (0.00 sec)
To see the names and dates of birth in the specified format YYMMDD use the following query.
  MariaDB [FTA_DB]> SELECT student_no, christian_name, sir_name, DATE_FORMAT(dob, '%y%m%d') dob FROM Student;
  +------------+----------------+----------+--------+
  | student_no | christian_name | sir_name | dob    |
  +------------+----------------+----------+--------+
  |          1 | Diarmuid       | O Briain | 670821 |
  +------------+----------------+----------+--------+
  1 row in set (0.00 sec)
To save a database use the mysqldump command. This produces a dump file that can be stored off system and a new system can be built from the file.
  ob~$ mysqldump -u MyDBuser -p FTA_DB > FTA_DB.sql
  Enter password: MyDBpass

  ob~$  ls
  FTA_DB.sql
A number of different systems exist for GNU/Linux. Here is a subset of them.
Install YACAS and the YACAS documentation.
ob~$ sudo apt-get install yacas yacas-doc
  ob~$  yacas
  True;
  This is Yacas version '1.3.3'.
  Yacas is Free Software--Free as in Freedom--so you can redistribute Yacas or
  modify it under certain conditions. Yacas comes with ABSOLUTELY NO WARRANTY.
  See the GNU General Public License (GPL) for the full conditions.
  Type ?license or ?licence to see the GPL; type ?warranty for warranty info.
  See http://yacas.sf.net for more information and documentation on Yacas.
  Type ?? for help. Or type ?function for help on a function.

  To exit Yacas, enter  Exit(); or quit or Ctrl-c.
  Type 'restart' to restart Yacas.
  To see example commands, keep typing Example();
  In>
Here are a few example calculations locally.
  IN> 5*6/7+47!;
  Out> 1810362690578177264500750486075283859784383426723840000000030/7

  In> (5*5!)/5+2;
  Out> 122

  In> Simplify((x+y)^3-(x-y)^3);
  Out> 6*x^2*y+2*y^3


  In> PrettyForm(x^2+3*x == 0)

   2
  x  + 3 * x == 0

  Out> True


  In> PrettyForm(%)

  In> Solve(x^2+3*x == 0, x);
  Out> {x==0,x==(-3)}
The default operation of YACAS is to run in the interactive console mode. YACAS can be run as a server with a pre-defined Transmission Control Protocol (TCP) port number. The YACAS Server will listen to the socket behind that port instead of expecting console input. The Server can be accessed by accessing the TCP port with telnet.
The server is ran by using the --server option switch and a port number.
  fta:~$ yacas --server 3010
  Accepting requests from port 3010
The hostname of the YACAS Server is configured in the Domain Name Server (DNS) or in the client /etc/hosts file. Telnet to the server and once connected commands can be sent to the waiting server who will respond when it has answers.
  ob~$ telnet yacas 3010
  Trying 78.143.163.181...
  Connected to yacas.ftacademy.net.
  Escape character is '^]'.
  Solve(x^2+3*x == 0, x);
  ]
  {x==0,x==(-3)};
  ]
sumdis.c given in the Clusters chapter with some modifications. For example, you can use sumdis 1 2000000.
cpi.c and monte.c to calculate the value of Pi by launching at least 6 processes for each program (if possible in two or more processors, though not necessarily in different machines). The source code of these examples may be already included in the packages of your MPI installation. If that is not the case, you can find them in the tar file downloadable from the address ftp://ftp.mcs.anl.gov/pub/mpi/using/UsingMPI.tar.gz, which is part of the MPI page on which you can also find other relevant information http://www.mcs.anl.gov/research/projects/mpi/usingmpi/examples/main.htm
Analysing the performance of a GNU/Linux system is relatively easy to do given tools like /proc. and the performance of the system with the tools you consider appropriate and diagnose the usage of resources (CPU, disk, memory, swap and I/O). Determine the possible bottlenecks that could exist in the system. Simulate different loads on the system with programs that use both the CPU, output to the screen and disk read and/or write.
The /proc directory on GNU/Linux is a window into the running kernel. It is a pseudo-file system showing runtime system information. It is also the first place to look at system resources.
The cpuinfo pesudo-file gives a detailed picture of exactly what Central Processing Unit (CPU) is on the system and what features it supports. Bogus and Millions of Instructions Per Second (MIPS) give the Linux kernel measurement of CPU speed. It is not a scientific MIP measurement but gives an indication of the computational speed of the CPU.
  ob~$ sudo cat /proc/cpuinfo
  processor	: 0
  vendor_id	: GenuineIntel
  cpu family	: 6
  model		: 13
  model name	: Intel(R) Pentium(R) M processor 1.86GHz
  stepping	: 8
  microcode	: 0x20
  cpu MHz		: 800.000
  cache size	: 2048 KB
  fdiv_bug	: no
  hlt_bug		: no
  f00f_bug	: no
  coma_bug	: no
  fpu		: yes
  fpu_exception	: yes
  cpuid level	: 2
  wp		: yes
  flags		: fpu vme de pse tsc msr pae mce cx8 apic sep mtrr pge mca cmov clflush dts acpi mmx fxsr sse sse2 ss tm pbe nx up bts est tm2
  bogomips	: 1595.62
  clflush size	: 64
  cache_alignment	: 64
  address sizes	: 32 bits physical, 32 bits virtual
  power management:
mpstat command from the sysstat package reports processors statistics.
  ob~$ sudo apt-get install sysstat

  ob~$  mpstat
  Linux 3.2.0-4-686-pae (precisionM70) 	24/06/14 	_i686_	(1 CPU)

  22:56:16     CPU    %usr   %nice    %sys %iowait    %irq   %soft  %steal  %guest   %idle
  22:56:16     all   14.31    0.01    5.23    1.40    0.00    0.01    0.00    0.00   79.04
sar collects and reports information about today's system activity so far. Before using it however data collection must be enabled in the /etc/default/sysstat file.
  ob~$ sudo vi /etc/default/sysstat

  ENABLED="true"
After data has been collected run the sar utility.
  03:35:01        CPU     %user     %nice   %system   %iowait    %steal     %idle
  03:45:01        all     14.44      0.01      5.37      1.13      0.00     79.06
  03:55:01        all     14.56      0.01      5.27      1.01      0.00     79.16
  04:05:01        all     14.42      0.01      5.40      1.23      0.00     78.95
  04:15:01        all     14.47      0.01      5.30      1.09      0.00     79.13
  04:25:01        all     14.40      0.01      5.42      1.36      0.00     78.82
  04:35:01        all     14.46      0.00      5.26      1.09      0.00     79.19
  04:45:01        all     14.48      0.01      5.31      1.24      0.00     78.96
  04:55:01        all     14.48      0.01      5.27      1.12      0.00     79.12
  05:05:01        all     14.57      0.01      5.23      1.16      0.00     79.03
  05:15:01        all     14.44      0.01      5.45      1.27      0.00     78.84
  05:25:01        all     14.45      0.01      5.25      1.09      0.00     79.19
  05:35:01        all     15.43      0.01      5.40      1.43      0.00     77.73
  05:45:01        all     15.89      0.01      5.47      1.12      0.00     77.50
  05:55:01        all     15.90      0.01      5.49      1.34      0.00     77.26
  06:05:01        all     15.96      0.01      5.45      1.32      0.00     77.26
  06:15:01        all     15.98      0.01      5.48      1.53      0.00     77.00
  06:25:01        all     15.96      0.02      5.50      1.43      0.00     77.09
  Average:        all     14.75      0.01      5.36      1.20      0.00     78.67
The free command will display the amount of free and used memory in the system.
  ob~$ free
               total       used       free     shared    buffers     cached
  Mem:       1034016     902628     131388          0      38132     369644
  -/+ buffers/cache:     494852     539164
  Swap:      2095100       9236    2085864
The meminfo pseudo-file displays information about system memory and swap usage.
  ob~$ sudo cat /proc/meminfo
  MemTotal:        1034016 kB
  MemFree:           86748 kB
  Buffers:           81212 kB
  Cached:           370172 kB
  SwapCached:          172 kB
  Active:           443708 kB
  Inactive:         452664 kB
  Active(anon):     219392 kB
  Inactive(anon):   226912 kB
  Active(file):     224316 kB
  Inactive(file):   225752 kB
  Unevictable:          16 kB
  Mlocked:              16 kB
  HighTotal:        137064 kB
  HighFree:           1824 kB
  LowTotal:         896952 kB
  LowFree:           84924 kB
  SwapTotal:       2095100 kB
  SwapFree:        2093004 kB
  Dirty:                24 kB
  Writeback:             0 kB
  AnonPages:        444900 kB
  Mapped:            79860 kB
  Shmem:              1316 kB
  Slab:              27844 kB
  SReclaimable:      16820 kB
  SUnreclaim:        11024 kB
  KernelStack:        2720 kB
  PageTables:         5728 kB
  NFS_Unstable:          0 kB
  Bounce:                0 kB
  WritebackTmp:          0 kB
  CommitLimit:     2612108 kB
  Committed_AS:    2025052 kB
  VmallocTotal:     122880 kB
  VmallocUsed:       37268 kB
  VmallocChunk:      84548 kB
  HardwareCorrupted:     0 kB
  AnonHugePages:         0 kB
  HugePages_Total:       0
  HugePages_Free:        0
  HugePages_Rsvd:        0
  HugePages_Surp:        0
  Hugepagesize:       2048 kB
  DirectMap4k:        8184 kB
  DirectMap2M:      903168 kB
The ioinfo pseudo-file displays the current map of the system's memory for each physical device
  ob~$ cat /proc/iomem
  00000000-0000ffff : reserved
  00010000-0009efff : System RAM
  0009f000-0009ffff : reserved
  000a0000-000bffff : Video RAM area
  000c0000-000c7fff : Video ROM
  000f0000-000fffff : System ROM
  00100000-3ffd7fff : System RAM
    01000000-012c9e7f : Kernel code
    012c9e80-0141a17f : Kernel data
    01486000-0150bfff : Kernel bss
  3ffd8000-3fffffff : reserved
    3ffd8000-3fffffff : pnp 00:00
  40000000-43ffffff : PCI Bus 0000:03
    40000000-43ffffff : PCI CardBus 0000:04
  44000000-441fffff : PCI Bus 0000:02
  48000000-48000fff : 0000:03:01.0
    48000000-48000fff : yenta_socket
  4c000000-4fffffff : PCI CardBus 0000:04
  c0000000-cfffffff : PCI Bus 0000:01
    c0000000-cfffffff : 0000:01:00.0
  dce00000-dcefffff : PCI Bus 0000:03
    dcefd000-dcefdfff : 0000:03:01.5
    dcefe000-dcefefff : 0000:03:01.5
    dceff000-dcefffff : 0000:03:03.0
  dcf00000-dcffffff : PCI Bus 0000:02
    dcff0000-dcffffff : 0000:02:00.0
      dcff0000-dcffffff : tg3
  dd000000-dfefffff : PCI Bus 0000:01
    dd000000-ddffffff : 0000:01:00.0
    de000000-deffffff : 0000:01:00.0
    dfe00000-dfe1ffff : 0000:01:00.0
  dffffd00-dffffdff : 0000:00:1e.2
    dffffd00-dffffdff : Intel ICH6
  dffffe00-dfffffff : 0000:00:1e.2
    dffffe00-dfffffff : Intel ICH6
  e0000000-f0006fff : reserved
    e0000000-efffffff : PCI MMCONFIG 0000 [bus 00-ff]
      e0000000-efffffff : pnp 00:00
    f0000000-f0003fff : pnp 00:00
    f0004000-f0004fff : pnp 00:00
    f0005000-f0005fff : pnp 00:00
    f0006000-f0006fff : pnp 00:00
  f0008000-f000bfff : reserved
    f0008000-f000bfff : pnp 00:00
  fec00000-fec0ffff : reserved
    fec00000-fec003ff : IOAPIC 0
  fed20000-fee0ffff : reserved
    fed20000-fed9ffff : pnp 00:00
    feda0000-fedfffff : pnp 00:00
    fee00000-fee0ffff : pnp 00:00
      fee00000-fee00fff : Local APIC
  ffa80800-ffa80bff : 0000:00:1d.7
    ffa80800-ffa80bff : ehci_hcd
  ffb00000-ffffffff : reserved
    ffb00000-ffffffff : pnp 00:00
The df command reports on the file system disk space usage on the system.
  ob~$ df -h
  Filesystem                                              Size  Used Avail Use% Mounted on
  rootfs                                                   90G  4.0G   82G   5% /
  udev                                                     10M     0   10M   0% /dev
  tmpfs                                                   101M  696K  101M   1% /run
  /dev/disk/by-uuid/00a15275-969b-4131-adab-988d48d55f90   90G  4.0G   82G   5% /
  tmpfs                                                   5.0M     0  5.0M   0% /run/lock
  tmpfs                                                   612M   84K  612M   1% /run/shm
top provides a dynamic real-time view of a running system. It is installed by default on most GNU/Linux systems.
ob~$ top
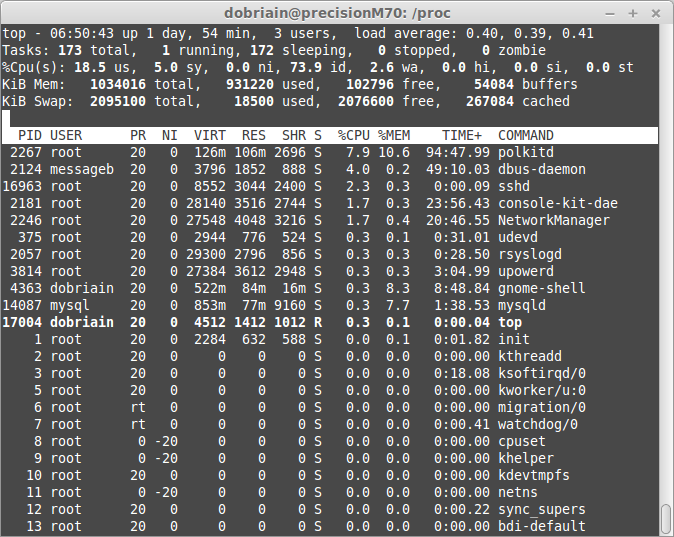 |
htop is similar to the top utility. It is an interactive process viewer.
  ob~$ sudo apt-get install iftop
  ob~$ htop
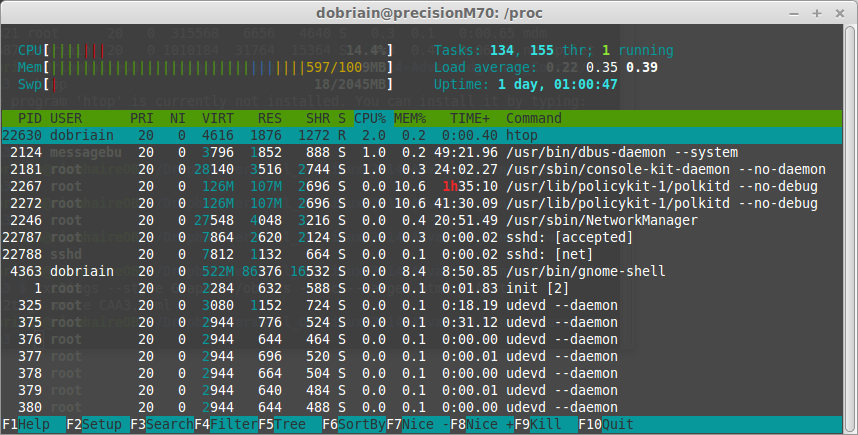 |
The ihtop utility displays the bandwidth usage on an interface by host.
  ob~$ sudo apt-get install iftop
  ob~$ sudo iftop
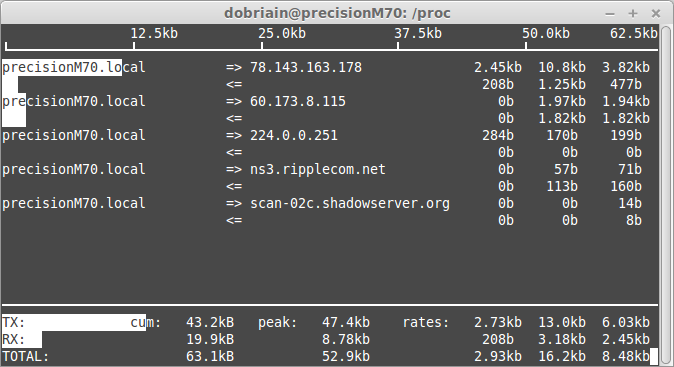 |
bmon is a bandwidth monitor and rate estimator.
  ob~$ sudo apt-get install bmon
  ob~$ bmon
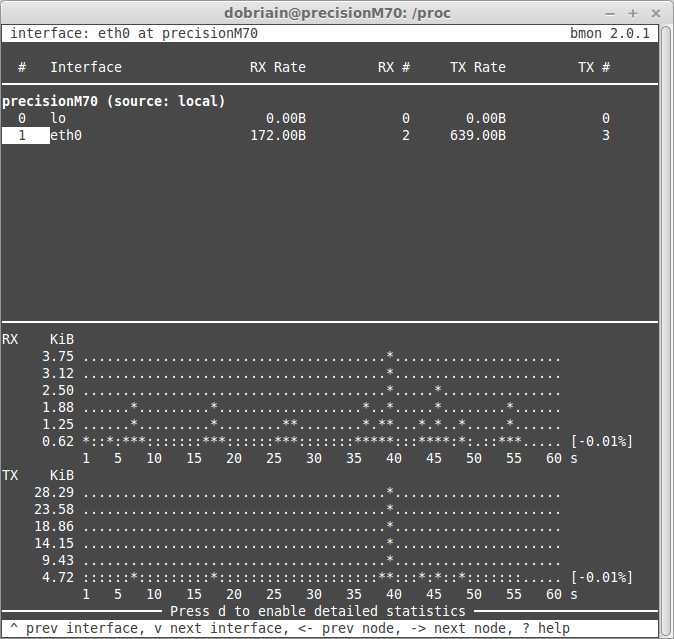 |
dstat is a utility for displaying system resource statistics on one window.
  ob~$ sudo apt-get install dstat
  ob~$ dstat
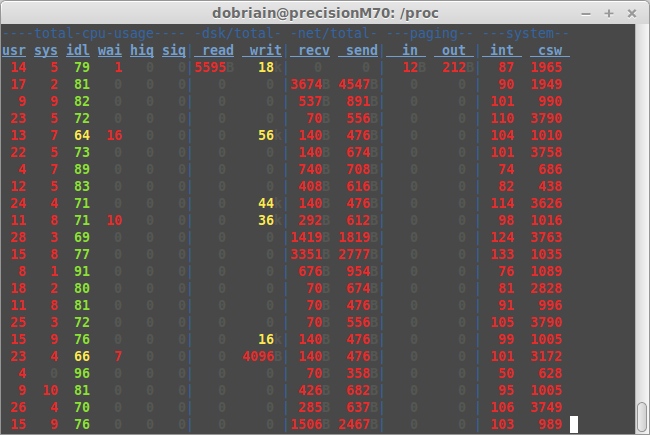 |
The sumdis program is a simple C program to perform addition of a series of numbers. It will start at a given initial number and then add each sequential number in turn to the previous answer. Take for example below, the program starts with 1, it adds 2 to get 3. It then adds 3 to get 6 and 4 to get 10 and finally adds 5 to get 15. As this is the end of the given sequence the program outputs 15.000000 to stdout.
  ob~$ ./sumdis 1 5
  15.000000
Before the C program can be compiled the GNU C/C++ Compiler gcc must be installed. Install the package build-essential.
ob~$ sudo apt-get install build-essential
Copy the sumdis.c source code to a directory on the GNU/Linux computer.
  ob~$ cat sumdis.c

  #include <stdio.h>
  #include <stdlib.h>

  int main (int argc, char** argv){

  	float initial, final, result, tmp;

  	if (argc < 2) {
  		printf ("Use: %s N.° initial N.° final\n", argv[0]);
  		exit(1);

  	} else {
  		initial = atol (argv[1]);
  		final = atol (argv[2]);
  		result = 0.0;
  	}

  	for (tmp = initial; tmp <= final; tmp++) {
  		result += tmp;
  	}

  	printf("%f\n", result);
  	return 0;
  }
Compile the program such that the final executable is called sumdis.
ob~$ gcc -o sumdis sumdis.c
Now run the program to see it in operation.
  ob~$ ./sumdis
  Use: ./sumdis N.° initial N.° final

  ob~$ ./sumdis 1 200000
  20000260096.000000
Run the program with the time utility which will display information about resources used by sumdis once it completes. In this case the program used 5 milliseconds (0.005 seconds) to perform the calculation.
  ob~$ time ./sumdis 1 200000
  20000260096.000000

  real	0m0.005s
  user	0m0.004s
  sys	0m0.004s
Now run for 2 billion and review system resources.
ob~$ time ./sumdis 1 20000000
 |
Comparing the htop now to when it was ran earlier, the CPU was at 14% whereas now it is at 100% utilisation due to the sumdis instance running. It is also worth noting that the program has no impact on memory or swap space.
Install the Munin package to monitor the system load and Monit to view the processes / services currently running. Monitor at least three services: apache, sshd, etc. In this exercise you must submit a description of the steps followed to install and configure the monitoring, including the configuration files generated and the results obtained.
  |
The Munin System and Network monitoring tool uses RRDTool to generate network visualisation of resource usage on devices implementing the munin-node. RRDtool is a GNU licensed high performance data logging and graphing system for time series data. munin-nodes send data to the munin daemon running on the server creating the graphs that are served up on a web interface.
[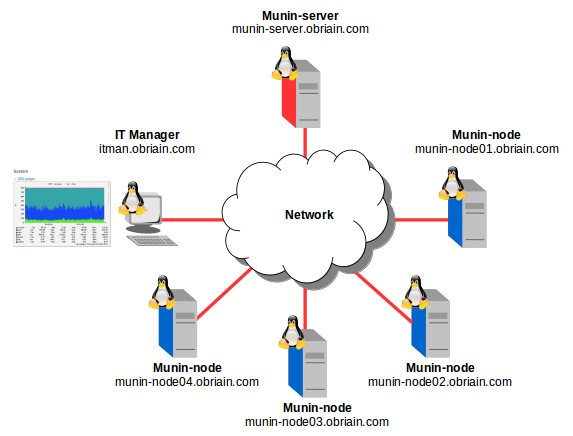 |
Confirm connectivity to the munin-server.
  ob~$ ping -c1 munin-server
  PING munin-server.obriain.com (78.143.163.182) 56(84) bytes of data.
  64 bytes from munin-server.obriain.com (78.143.163.182): icmp_req=1 ttl=64 time=0.232 ms
Install the munin node software on the nodes to be monitored.
munin-node01~$ sudo apt-get install munin-node
This install has a configuration file and two configuration directories.
  munin-node01~$ ls -la /etc/munin
  munin-node.conf  plugin-conf.d  plugins

  munin-node01~$ sudo mv /etc/munin/munin-node.conf /etc/munin/munin-node.conf.bak
Edit the configuration file.
  munin-node01~$ sudo vi /etc/munin/munin-node.conf

  # Munin node configuration file

  log_level 4
  log_file /var/log/munin/munin-node.log
  pid_file /var/run/munin/munin-node.pid

  background 1
  setsid 1

  user root
  group root

  # Regexps for files to ignore

  ignore_file [\#~]$
  ignore_file DEADJOE$
  ignore_file \.bak$
  ignore_file %$
  ignore_file \.dpkg-(tmp|new|old|dist)$
  ignore_file \.rpm(save|new)$
  ignore_file \.pod$

  # Local node FQDN
  host_name munin-node01.obriain.com

  # IP Address permitted to connect to node
  ## Localhost addresses

  allow ^127\.0\.0\.1$
  allow ^::1$

  # munin-server IP address

  allow ^78\.143\.163\.182$

  # Which IP address to bind to
  host *

  # TCP port
  port 4949
Map new plugins with symbolic links
Link the Apache webserver plugins.
  munin-node01~$ sudo ln -s /usr/share/munin/plugins/apache_accesses /etc/munin/plugins/apache_accesses
  munin-node01~$ sudo ln -s /usr/share/munin/plugins/apache_processes /etc/munin/plugins/apache_processes
  munin-node01~$ sudo ln -s /usr/share/munin/plugins/apache_volume /etc/munin/plugins/apache_volume
Run the plugins from the command line to see if they work.
  munin-node01~$ sudo /etc/munin/plugins/apache_accesses autoconf yes
  yes
  munin-node01~$ sudo /etc/munin/plugins/apache_processes autoconf yes
  yes
  munin-node01~$ sudo /etc/munin/plugins/apache_volume autoconf yes
  yes
Add plugins to be monitored
  munin-node01~$  sudo -s

  munin-node01~#  cp /etc/munin/plugin-conf.d/munin-node /etc/munin/plugin-conf.d/munin-node.bak

  munin-node01~#  vi /etc/munin/plugin-conf.d/munin-node

  munin-node01~#  cat >> /etc/munin/plugin-conf.d/munin-node << EOF

  [apache_processes]
  env.url http://localhost:%d/server-status?auto
  env.port 80

  [apache_accesses]
  env.url http://localhost:%d/server-status?auto
  env.port 80

  [apache_volume]
  env.url http://localhost:%d/server-status?auto
  env.port 80

  EOF
Enable the new Munin node configuration.
  munin-node01~# exit
  exit

  munin-node01~$ sudo service munin-node restart
  [ ok ] Stopping Munin-Node: done.
  [ ok ] Starting Munin-Node: done.
Testing the node
The following is a commandline test exchange from the the munin-server to the munin-node. The nodes command asks the munin-node which hosts it has information for, then asks it to list the plugins that represent munin-node01.obriain.com. Lastly it fetches the apache_accesses result from munin-node01.obriain.com. This indicates that the node will accept fetch requests from the server.
  ob~$  telnet munin-node01.obriain.com 4949
  Trying 78.143.163.181...
  Connected to munin-node01.obriain.com.
  Escape character is '^]'.
  # munin node at munin-node01.obriain.com
  nodes
  munin-node01.obriain.com
  .
  list munin-node01.obriain.com
  apache_accesses apache_processes apache_volume cpu df df_inode entropy exim_mailqueue exim_mailstats forks fw_packets if_err_eth0 if_eth0 interrupts irqstats load lpstat memory nfs4_client nfs_client nfsd nfsd4 open_files open_inodes proc_pri processes swap threads uptime users vmstat
  fetch apache_accesses
  accesses80.value 37
  .
  quit
  Connection closed by foreign host.
Install the munin server software on the graphing server.
munin-server~$ sudo apt-get install munin apache2
Configure Munin
Edit the global directives and node hosts in the Munin master configuration file /etc/munin/munin.conf on the Munin Server.
The first section to configure is the directories used by Munin and then add Munin nodes.
  munin-server~$ sudo mv /etc/munin/munin.conf /etc/munin/munin.conf.bak
  munin-server~$ sudo vi /etc/munin/munin.conf

  # Munin Server Configuration file

  # Munin directories

  dbdir   /var/lib/munin
  htmldir /var/www/html/munin/
  logdir /var/log/munin
  rundir  /var/run/munin

  # HTML Templates

  tmpldir /etc/munin/templates

  # Munin nodes

  ## munin-node01.obriain.com

  [munin-node01.obriain.com]
     address 78.143.163.181
  ??   port 4949
     use_node_name yes

  [munin-node02.obriain.com]
     address 78.143.163.183
     use_node_name yes

  [munin-node03.obriain.com]
     address 78.143.163.184
     use_node_name yes

  [munin-node04.obriain.com]
     address 78.143.163.185
     use_node_name yes

  # munin-node01.obriain.com (IPv6)
  ## For IPv6 addresses the address must be between [ ]

  # [munin-node01.obriain.com]
  #   address [2a02:aaaa::212:3fff:fedc:ab47]
  #   use_node_name yes
Configure the Apache2 Webserver
  munin-server~$ sudo mkdir /var/www/html/munin
  munin-server~$ sudo chown -R munin:munin /var/www/html/munin
Operation of the Munin Server
The munin-server operates by creating a cronjob (/etc/cron.d/munin) to run every 5 minutes. This cronjob reads the /etc/munin/munin.conf file and extracts the required plugin information from the munin nodes. The last cron to generate webpage updates can be confirmed as follows from the /var/log/munin/munin-html.log log file.
  munin-server$ tail /var/log/munin/munin-html.log

  2014/06/26 17:45:10 [INFO] config generated (0.05 sec)
  2014/06/26 17:45:10 [INFO] Starting munin-html, getting lock /var/run/munin/munin-html.lock
  2014/06/26 17:45:10 [INFO] Creating problem page /var/www/html/munin/problems.html
  2014/06/26 17:45:10 [INFO] Releasing lock file /var/run/munin/munin-html.lock
  2014/06/26 17:45:10 [INFO] munin-html finished (0.32 sec)
Viewing the graphics on the Apache2 server.
http://munin-server.obriain.com/munin/index.html
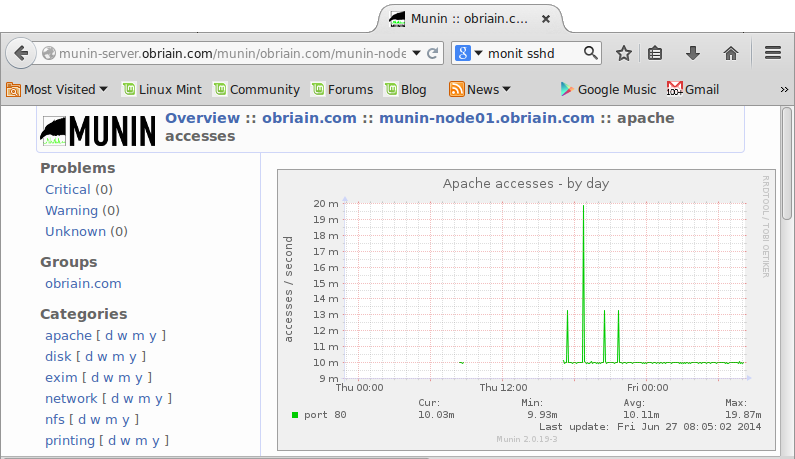 |
On munin-server the log files are:
On munin-node there is also a log file:
monit is a utility for managing and monitoring processes, programs, files, directories and filesystems on a Unix system.
Install monit on the computer to be monitored.
ob:~$ sudo apt-get install monit
Configuration of Monit starts at the Monit control file /etc/monit/monitrc. This file also includes configuration from files located in the /etc/monit/conf.d/ directory.
Monit has an embedded web server to view status of services monitored and manage services from a web interface. To enable the webserver unhash and configure the following lines in the Monit control file /etc/monit/monitrc.
  ob:~$ sudo mv /etc/monit/monitrc /etc/monit/monitrc.bak

  ob:~$ sudo -s

  ob:~# cat >> /etc/monit/monitrc << MON

  # monitrc configuration file

  # [General]

  set daemon 120         		# check services at 2-minute intervals
  set logfile /var/log/monit.log	# set logfile syslog facility log_daemon
  set idfile /var/lib/monit/id	# set idfile /var/.monit.id
  set statefile /var/lib/monit/state   # Set the location of the Monit state file
  set eventqueue                  # Store events even if no mailserver configured
  basedir /var/lib/monit/events 	# set the base directory where events will be stored
  slots 100                     	# optionally limit the queue size

  # [smtp]

  set mailserver smtp.obriain.com    # primary mailserver
  set alert diarmuid@obriain.com  # receive all alerts

  # [Web access]

  set httpd port 2812    # Set webserver access on port 2812
  allow 78.143.163.182   # Web access limited to this IP address
  allow admin:ftamonit   # require user 'admin' with password 'ftamonit'
  allow @monit           # allow users of group 'monit' to connect (rw)
  allow @users readonly  # allow users of group 'users' to connect readonly

  # Include files with individual configurations from '/etc/monit/conf.d/'

  include /etc/monit/conf.d/*

  MON
Check Apache2 Server
  ob:~# cat >> /etc/monit/conf.d/check_apache << APACHE

  # [check_apache2]

  check process apache with pidfile /var/run/apache2.pid
  start program = "/etc/init.d/apache2 start" with timeout 60 seconds
  stop program  = "/etc/init.d/apache2 stop"

  APACHE
Check SSH
  ob:~# cat >> /etc/monit/conf.d/check_sshd << SSHD

  # [check_sshd]

  check process sshd with pidfile /var/run/sshd.pid
  start program = "/etc/init.d/ssh start" with timeout 60 seconds
  stop program  = "/etc/init.d/ssh stop"

  SSHD
Check /var directory
  ob:~# cat >> /etc/monit/conf.d/check_var << VAR

  check device var with path /var
  if space usage > 85% then alert

  VAR
Tidy up and start monit
Exit out of supersuer mode and change the permissions of the created files.
  ob:~# exit

  ob:~$ sudo chmod 600 /etc/monit/monitrc
  ob:~$ sudo chmod 600 /etc/monit/conf.d/*
Start the monit service.
  ob:~$ sudo service monit start
  [ ok ] Starting daemon monitor: monit.

  ob:~$ sudo service monit status
  [ ok ] monit is running.
http://munin-node01.obriain.com:2812
 |
Enter Username: admin with password ftamonit as configured in the web section of the /etc/monit/monitrc file.
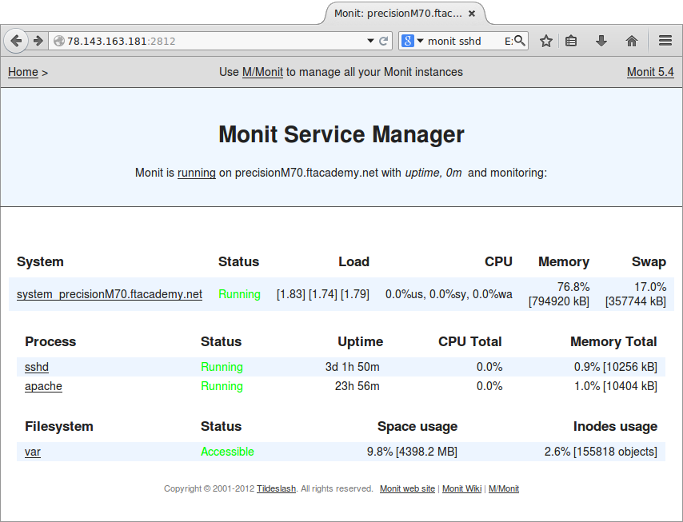 |
MPI is a specification for a message passing library that is used to establish a portable, efficient, and flexible standard for message passing that will be widely used on High-Performance Computing (HPC) platforms. Such platforms aim to use a large number of dedicated processors in close proximity to each other to form a computer cluster. MPI is the communications agent that links these together as it permits data to be moved from the address space of one process to that of another process through cooperative operations on each process.
MPICH is a high performance and widely portable implementation of the Message Passing Interface (MPI) standard. MPICH has a Free Software license and is available for most flavours of Unix, Linux Mac OS X and Microsoft Windows.
The implementation is in a number of steps:
/mirror directory.
/mirror directory to the local /mirror directory.
build-essential package.
hosts file with a list of nodes in the cluster.
mpicc to compile and mpiexec to execute jobs.
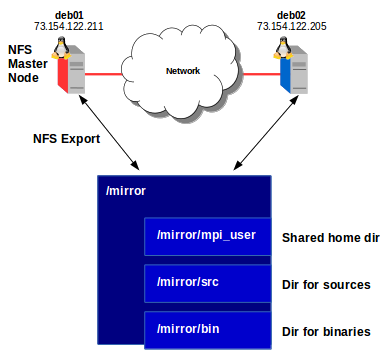 |
On the first computer deb01 map the other cluster machines.
  hostname~$ sudo cp /etc/hosts /etc/hosts.bak

  hostname~$ sudo bash -c "echo 'deb01' > /etc/hostname"
Logout of the shell and log back in.
  deb01:~$ sudo -s

  deb01~# cat > /etc/hosts << HOST
  127.0.0.1     localhost
  73.154.122.211 deb01
  73.154.122.205 deb02
  HOST

  deb01~# exit

  deb01:~$ ping -c1 deb01
  PING deb01 (78.143.163.181) 56(84) bytes of data.
  64 bytes from deb01 (78.143.163.181): icmp_seq=1 ttl=64 time=0.339 ms
Repeat the process for the other computers like deb02 map the other cluster machines.
  hostname~$ sudo cp /etc/hosts /etc/hosts.bak

  hostname~$ sudo bash -c "echo 'deb02' > /etc/hostname"
Logout of the shell and log back in.
  deb02:~$ sudo -s

  deb02~# cat > /etc/hosts << HOST
  127.0.0.1     localhost
  73.154.122.211 deb01
  73.154.122.205 deb02
  HOST

  deb02~# exit

  deb02:~$ ping -c1 deb02
  PING deb02 (78.143.163.182) 56(84) bytes of data.
  64 bytes from deb02 (78.143.163.182): icmp_req=1 ttl=64 time=0.360 ms
NFS on the Master node
Install Network File System (NFS) Server on the first (Master) node in the cluster.
deb01:~$ sudo apt-get install nfs-kernel-server nfs-common rpcbind
Edit the /etc/idmapd.conf file and add a domain name that is in common with the NFS clients.
  deb01:~$ sudo vi /etc/idmapd.conf
  ...
  # Domain = localdomain
  Domain=obriain.com
  ...
  ...

  deb01:~$ $ sudo service rpcbind restart
  [ ok ] Stopping rpcbind daemon....
  [ ok ] Starting rpcbind daemon....
Make a directory on the master node to store the data and programs. Data and programs are stored only on the master node and the other nodes will access them via NFS.
  deb01:~$ sudo mkdir /mirror

  deb01:~$ sudo bash -c "echo '/mirror deb02(rw,sync,no_subtree_check)' > /etc/exports

  deb01:~$ sudo service nfs-kernel-server start
  . ok
  [ ok ] Starting NFS kernel daemon: nfsd mountd.
Define a user that will have the same User ID (UID) and Group ID (GID) at that configured on the other nodes. It is essential that users have the same User ID (UID) and Group ID (GID) at each side as NFS uses the ID numbers to implement permissions.
  deb01:~$ sudo useradd -m -d /mirror/mpi_user -s /bin/bash mpi_user
  deb01:~$ sudo passwd mpi_user
  Enter new UNIX password: mpi_pass
  Retype new UNIX password: mpi_pass
  passwd: password updated successfully
Change the ownership of the /mirror directory to mpi_user.
deb01:~$ sudo chown mpi_user:mpi_user /mirror
Logout and logback in as the mpi_user. Check the id.
  deb01:~$ id
  uid=1001(mpi_user) gid=1001(mpi_user) groups=1001(mpi_user)
NFS Client on the other nodes
Install the Network File System (NFS) Client on the other nodes in the cluster.
deb02:~$ sudo apt-get install nfs-common rpcbind
Edit the /etc/idmapd.conf file and add a domain name that is in common with the NFS Server.
  deb02:~$ sudo vi /etc/idmapd.conf
  ...
  # Domain = localdomain
  Domain=obriain.com
  ...
  ...

  deb02:~$ $ sudo service rpcbind restart
  rpcbind stop/waiting
  rpcbind start/running, process 5798
Make a directory on the other nodes that will be used to mount the remote NFS export on the master node.
deb02:~$ sudo mkdir /mirror
Define a user that will have the same User ID (UID) and Group ID (GID) at that configured on the master node. It is essential that users have the same User ID (UID) and Group ID (GID) at each side as NFS uses the ID numbers to implement permissions.
  deb02:~$ sudo useradd -m -d /mirror/mpi_user -s /bin/bash mpi_user
  deb02:~$ sudo passwd mpi_user
  Enter new UNIX password: mpi_pass
  Retype new UNIX password: mpi_pass
  passwd: password updated successfully
Change the ownership of the /mirror directory to mpi_user.
deb02:~$ sudo chown mpi_user:mpi_user /mirror
Logout and logback in as the mpi_user. Check the id.
  deb02:~$ id
  uid=1001(mpi_user) gid=1001(mpi_user) groups=1001(mpi_user)
The UID 1001 and GID 1001 for the user mpi_user on each side match.
Mount the other nodes to the master node.
  deb02:~$ sudo -s

  deb02~# cat >> /etc/fstab << FSTAB

  # /Mount to deb01:/mirror
  deb01:/mirror    /mirror    nfs    user,rw,nosuid,exec    0    0
  FSTAB

  deb02~# mount -v deb01:/mirror

  deb02~# exit
Testing the NFS Setup
Login to the client as the mpi_user and generate a test file.
  deb02:~$ echo "This is a client side write test" > /mirror/clienttestfile
  deb02:~$ cat /mirror/clienttestfile
  This is a client side write test
Login to the master node as the mpi_user review the client test file and generate a test file.
  deb01:~$ cat /mirror/clienttestfile
  This is a client side write test

  deb01:~$ echo "This is a master side write test" > /mirror/mastertestfile
  deb01:~$ cat /mirror/mastertestfile
Now back on the client test the mastertestfile and then delete both test files.
  deb02:~$ cat /mirror/mastertestfile
  deb02:~$ rm /mirror/mastertestfile
  deb02:~$ rm /mirror/clienttestfile
Install on master node.
deb01:~$ sudo apt-get install openssh-server
Disable strictmodes authentication. As NFS assigns a user of nobody to the mounted export, the client SSH cannot establish a password-less login with strictmodes set to yes as it expects the user to be mpi_user.
  deb01:~$ sudo vi /etc/ssh/sshd_config

  ...
  StrictModes no
  ...
Reset the ssh daemon.
  deb01:~$ sudo service ssh restart
  [ ok ] Restarting OpenBSD Secure Shell server: sshd.
Install on other nodes.
deb02:~$ sudo apt-get install openssh-server
Disable strictmodes authentication.
  deb02:~$ sudo vi /etc/ssh/sshd_config

  ...
  StrictModes no
  ...
Reset the ssh daemon.
  deb02:~$ sudo service ssh restart
  [ ok ] Restarting OpenBSD Secure Shell server: sshd.
Setup SSH to connect without passwords, using a keyfile instead. When asked leave the passphrase empty. This creates an ID file called id_rsa.
  deb01:~$ ssh-keygen -t rsa

  Generating public/private dsa key pair.
  Generating public/private rsa key pair.
  Enter file in which to save the key (/mirror/mpi_user/.ssh/id_rsa):
  Created directory '/mirror/mpi_user/.ssh'.
  Enter passphrase (empty for no passphrase):
  Enter same passphrase again:
  Your identification has been saved in /mirror/mpi_user/.ssh/id_rsa.
  Your public key has been saved in /mirror/mpi_user/.ssh/id_rsa.pub.
  The key fingerprint is:
  d5:17:f1:29:83:be:ed:db:7c:b6:bb:41:35:c7:17:32 mpi_user@deb01
  The key's randomart image is:
  +--[ RSA 2048]----+
  |             Eoo |
  |           .. o+o|
  |          ...o.o*|
  |         ..  .o =|
  |        S  .   . |
  |            o .  |
  |           . . . |
  |            . o +|
  |             o.B=|
  +-----------------+
Copy the contents of the id_rsa key to the authorized_keys file.
  deb01:~$ cat /mirror/mpi_user/.ssh/id_rsa.pub >> /mirror/mpi_user/.ssh/authorized_keys
  deb01:~$ chmod 700 /mirror/mpi_user/.ssh; chmod 640 /mirror/mpi_user/.ssh/authorized_keys
There is no need to copy the keys to the other nodes in the cluster because of the NFS mounts all nodes are actually using the same /mirror/mpi_user home directory.
Test the password-less login. Running the ssh command followed by the hostname command means the hostname command is executed after the ssh connection atthe remote side and the result is passed back to the source of the ssh connection.
  deb01:~$ ssh mpi_user@deb02 hostname
  deb02


  deb02:~$ ssh mpi_user@deb01 hostname
  deb01
Install the build-essential package on the master node.
deb01:~$ sudo apt-get install build-essential
Install MPICH2 on all nodes.
  deb01:~$ sudo apt-get install mpich2

  deb02:~$ sudo apt-get install mpich2
For testing our installation run:
  deb01:~$ which mpiexec
  /usr/bin/mpiexec

  deb01:~$ which mpirun
  /usr/bin/mpiexec

  deb01:~$ which mpicc
  /usr/bin/mpicc

  deb01:~$ mpich2version
  MPICH2 Version:    	1.4.1
  MPICH2 Release date:	Wed Aug 24 14:40:04 CDT 2011
  MPICH2 Device:    	ch3:nemesis
  MPICH2 configure: 	--build=x86_64-linux-gnu --prefix=/usr --includedir=${prefix}/include --mandir=${prefix}/share/man --infodir=${prefix}/share/info --sysconfdir=/etc --localstatedir=/var --libexecdir=${prefix}/lib/mpich2 --srcdir=. --disable-maintainer-mode --disable-dependency-tracking --disable-silent-rules --enable-shared --prefix=/usr --enable-fc --disable-rpath --sysconfdir=/etc/mpich2 --includedir=/usr/include/mpich2 --docdir=/usr/share/doc/mpich2 --with-hwloc-prefix=system --enable-checkpointing --with-hydra-ckpointlib=blcr
  MPICH2 CC: 	gcc  -g -O2 -fstack-protector --param=ssp-buffer-size=4 -Wformat -Werror=format-security -Wall  -O2
  MPICH2 CXX: 	c++  -g -O2 -fstack-protector --param=ssp-buffer-size=4 -Wformat -Werror=format-security -Wall -O2
  MPICH2 F77: 	gfortran  -g -O2 -O2
  MPICH2 FC: 	gfortran   -O2
Now create hosts file in the /mirror/mpi_user/hosts directory.
  deb01:~$ cat > /mirror/mpi_user/hosts << HOSTS
  deb01
  deb02

  HOSTS
Add the MPICH2 Library path to the /mirror/mpi_user/.bashrc file.
  deb01:~$ ln -s /usr/lib/mpich2/lib /mirror/lib

  deb01:~$ echo LD_LIBRARY_PATH=/mirror/lib > /mirror/mpi_user/.bashrc
The Hydra Process Manager starts parallel jobs. Hydra is designed to natively work with multiple daemons such as ssh, rsh, pbs, slurm and sge however in this case ssh is being used.
Set the HYDRA_HOST_FILE variable to point to the new hosts file.
deb01:~$ echo HYDRA_HOST_FILE=/mirror/mpi_user/hosts >> /mirror/mpi_user/.bashrc
Copy the cpi.c source code to a directory on the /mirror, in this case src.
  deb01:~$ mkdir /mirror/src
  deb01:~$ mkdir /mirror/bin

  deb01:~$ sudo cp /usr/share/doc/mpich2-doc/examples/examples_graphics/cpi.c /mirror/src
Compile the cpi.c into a binary using the MPI specific mpicc compiler. Confirm the binary is operational.
  deb01:~$ mpicc /mirror/src/cpi.c -o /mirror/bin/cpi

  deb01:~$ /mirror/bin/cpi
  Process 0 of 1 is on deb01
  pi is approximately 3.1415926544231341, Error is 0.0000000008333410
  wall clock time = 0.000818
Run cpi again, this time with the mpiexec as a single core.
  deb01:~$ mpiexec -np 1 /mirror/bin/cpi
  Process 0 of 1 is on deb01
  pi is approximately 3.1415926544231341, Error is 0.0000000008333410
  wall clock time = 0.021460
Run cpi on deb02.
  deb02:~$ mpiexec -np 1 /mirror/bin/cpi
  Process 0 on deb02
  pi is approximately 3.1416009869231254, Error is 0.0000083333333323
  wall clock time = 0.000376
Run cpi on deb01.
-f ~/hosts option switch points to the file containing the host names in the cluster.
-n 6 defines the number of processes to run.
  deb01:~$ mpiexec -f ~/hosts -n 6 /mirror/bin/cpi
  Process 2 on deb01
  Process 1 on deb02
  Process 4 on deb01
  Process 5 on deb02
  Process 3 on deb02
  Process 0 on deb01
  pi is approximately 3.1416009869231245, Error is 0.0000083333333314
  wall clock time = 0.004053
Initial attempts to compile monte.c failed. The example referred to in the assignment are related to v1.2.1 of mpich from 2003. In the version that currently installs on Debian GNU/Linux, mpich2 - version 1.4.1 this example has been removed. Trying to compile the v1.2.1 of monte.c produced errors due to the lack of MPI Parallel Environment (MPE) related header files. An attempt to meet the dependencies by copying the header files one by one proved to be a thankless task.
Install MPE2
Installing the MPI Parallel Environment version 2(MPE2) seemed to be a better choice. MPE is a package with a number of useful tools for the MPI. It provides:
Install Java
MPE requires Java Runtime Environment (JRE) and Java Development Kit (JDK).
  deb01:~$ sudo apt-get install openjdk-7-jre
  deb01:~$ sudo apt-get install openjdk-7-jdk
Install MPE2
Before installing MPE2 it is essential to know:
mpich2 include files.
mpich2 library files.
mpicc binary file.
  deb01~# find / -name mpich2
  /usr/share/doc/mpich2
  /usr/include/mpich2
  /usr/lib/mpich2
  /etc/mpich2

  deb01~#  find / -name mpicc
  /usr/bin/mpicc
So /usr/include/mpich2 and /usr/bin/mpicc then. Extract the MPE2 tarball to a suitable directory and create a build directory.
  deb01:/mirror/src/~$ tar -xzvf mpe2.tar.gz

  deb01:/mirror/src/~$ cd mpe2-1.3.0

  deb01:/mirror/src/mpe2-1.3.0/~$ mkdir build

  deb01:/mirror/src/mpe2-1.3.0/build/~$ cd build
Execute the configure with the option switches below using the information gained above. Then make to build. I copied the build to /opt and added to the $PATH and $CPATH variables.
  deb01:/mirror/src/mpe2-1.3.0/build/~$ sudo ../configure --with-mpilibs="-L/usr/lib/mpich2 -lmpich -lmpl" --with-mpiinc="-I/usr/include/mpich2" --with-mpicc=/usr/bin/mpicc --enable-f77=no

  deb01:/mirror/src/mpe2-1.3.0/build/~$ sudo make

  deb01:~$ ls /mirror/src/mpe2-1.3.0/build/
  bin  config.log  config.status  etc  include  lib  Makefile  mpe_conf.h  sbin  src

  deb01:~$ sudo mv /mirror/src/mpe2-1.3.0/build /opt/mpe2

  deb01:~$ echo "export PATH=/opt/mpe2/bin:$PATH" >> /mirror/mpi_user/.bashrc
  deb01:~$ echo "export CPATH=/opt/mpe2/include:$CPATH" >> /mirror/mpi_user/.bashrc

  deb01:~$ source /mirror/mpi_user/.bashrc
So to a compile of monte.c. Well some problems due to the lack of <stdio.h> header.
  deb01:~$ mpicc /mirror/src/monte.c -o /mirror/bin/monte
  /mirror/src/monte.c: In function ‘main’:
  /mirror/src/monte.c:32:9: warning: incompatible implicit declaration of built-in function ‘sscanf’ [enabled by default]
  /mirror/src/monte.c:83:3: warning: incompatible implicit declaration of built-in function ‘printf’ [enabled by default]
  /mirror/src/monte.c:97:9: warning: incompatible implicit declaration of built-in function ‘printf’ [enabled by default]
Add #include <stdio.h> at top of the monte.c code file.
  deb01:~$ vi /mirror/src/monte.c
  /* compute pi using Monte Carlo method */
  #include <stdio.h>
  #include <math.h>
  #include "mpi.h"
  #include "mpe.h"
Another recompile.
  deb01:~$ mpicc /mirror/src/monte.c -o /mirror/bin/monte

  deb01:~$  /mirror/bin/monte
  Segmentation fault
It is not looking like mpich2 - v1.4.1 with MPE2 - v1.3 is monte.c friendly.
Performance in MPI environment
Running the CPI program out of the MPI environment and with multiple hosts specified. (It must be noted that this performance evaluation is somewhat suspect in that it involved just two machines).
  deb01:~$  /mirror/bin/cpi
  Process 0 on deb01
  pi is approximately 3.1416009869231254, Error is 0.0000083333333323
  wall clock time = 0.000336

  deb01:/$ mpiexec -f ~/hosts -n 1 /mirror/bin/cpi
  Process 0 on deb01
  pi is approximately 3.1416009869231254, Error is 0.0000083333333323
  wall clock time = 0.000334

  deb01:/$ mpiexec -f ~/hosts -n 2 /mirror/bin/cpi
  Process 0 on deb01
  Process 1 on deb02
  pi is approximately 3.1416009869231241, Error is 0.0000083333333309
  wall clock time = 0.002426

  deb01:/$ mpiexec -f ~/hosts -n 4 /mirror/bin/cpi
  Process 2 on deb01
  Process 3 on deb02
  Process 0 on deb01
  Process 1 on deb02
  pi is approximately 3.1416009869231249, Error is 0.0000083333333318
  wall clock time = 0.002807

  deb01:/$ mpiexec -f ~/hosts -n 8 /mirror/bin/cpi
  Process 0 on deb01
  Process 5 on deb02
  Process 2 on deb01
  Process 1 on deb02
  Process 7 on deb02
  Process 4 on deb01
  Process 3 on deb02
  Process 6 on deb01
  pi is approximately 3.1416009869231245, Error is 0.0000083333333314
  wall clock time = 0.030493

  deb01:/$ mpiexec -f ~/hosts -n 16 /mirror/bin/cpi
  Process 6 on deb01
  Process 14 on deb01
  Process 4 on deb01
  Process 1 on deb02
  Process 3 on deb02
  Process 8 on deb01
  Process 15 on deb02
  Process 0 on deb01
  Process 7 on deb02
  Process 9 on deb02
  Process 13 on deb02
  Process 10 on deb01
  Process 11 on deb02
  Process 12 on deb01
  Process 5 on deb02
  Process 2 on deb01
  pi is approximately 3.1416009869231249, Error is 0.0000083333333318
  wall clock time = 0.005708
This produced the following results.
| # Hosts | Error | Time | |
|---|---|---|---|
| 1 (not MPI) | 0.0000083333333323 | 0.000336 | |
| 1 | 0.0000083333333323 | 0.000334 | |
| 2 | 0.0000083333333309 | 0.002426 | |
| 4 | 0.0000083333333318 | 0.002807 | |
| 8 | 0.0000083333333314 | 0.030493 | |
| 16 | 0.0000083333333318 | 0.005708 | |
From the figures obtained the resultant error difference is minuscule, with a maximum difference of 1.4 x 10^-15. The maximum processing time difference observed was 30.16 mS with no apparent pattern showing, however it is a small sample of tests and there were only two computers involved.
After building an mpich2 cluster with two nodes and despite the fact that all looked OK the binaries would not run on the "other" nodes. After a lot of troubleshooting the problem was identified as a difference in architecture between the Master node and the 'other' node. The master was a 32-bit processor architecture while the 'other' node was a 64-bit architecture. It appears that libmpich does not have multiarch support. Lesson learnt, use nodes with the same processor architecture because each node is running the same file shared via NFS but it is only compiled on one node.
(2014). MariaDB Documentation. (Accessed: 11/06/2014).
(2014). MySQL 5.7 Reference Manual. (Accessed: 11/06/2014).
Alemi, O. (2008). Ubuntu. Mpich Cluster. (Accessed: 27/6/2014).
Axiom Computer Algebra system. (Accessed: 24/06/2014).
Balaj, P., Bland, W., et all. (2014).
Conde, S. (2011). My Mathematical Exploration. (Accessed: 27/6/2014).
Debian Help UK. Monitoring Servers and Clients using Munin in Debian Linux. (Accessed: 24/6/2014).
Debian Help UK. Monitoring Your Server Services With Monit. (Accessed: 24/6/2014).
Debian Spam Assassin. (Accessed 06/07/2014).
Debianhelp - spam. (Accessed 06/07/2014).
DebianScience. ComputerAlgebraSystems. (Accessed: 24/06/2014).
Dovecot website. (Accessed: 18/6/2014).
Exim Internet Mailer website. (Accessed: 18/6/2014).
Interactive Online SQL Training. (Accessed: 11/06/2014).
Introduction to Yacas. (Accessed: 26/06/2014).
Kali Linux website. (Accessed: 02/07/2014).
Linode. Monitoring Servers with Munin on Debian 6 (Squeeze).(Accessed: 24/6/2014).
Maxima. Computer Algebra System. (Accessed: 24/06/2014).
Message Passing Interface (MPI). (Accessed: 27/6/2014).
Metasploit website. (Accessed: 02/07/2014).
Nmap website. (Accessed: 02/07/2014).
Open Vulnerability Assessment System (OpenVAS). (Accessed: 02/07/2014).
OpenAxiom. The Open Scientific Computation Platform. (Accessed: 24/06/2014).
OpenVAS Vulnerability Scanning with the Raspberry Pi. (Accessed: 02/07/2014).
ownCloud website. (Accessed: 18/06/2014).
Performance Visualization for Parallel Programs. (Accessed: 30/6/2014).
SQL Tutorial. (Accessed: 11/06/2014).
SquirrelMail - Webmail for Nuts!. (Accessed 06/07/2014).
Virtual hosting with Exim. (Accessed: 18/6/2014).
Wilkinson, D. (2011). Parallel Monte Carlo with an Intel i7 Quad Core. Accessed: 28/6/2014).
YACAS. (Accessed: 24/06/2014).
Bartholomew, D. (2013). Getting Started with MariaDB.
Bartholomew, D. (2014). MariaDB Cookbook.
Beaulieu A (2009). Learning SQL. 2nd Edition. O'Reilly Media.
Forta, B. (2011). MariaDB Crash Course.
Kline K (2008). SQL in a Nutshell (In a Nutshell (O'Reilly)). Third Edition Edition. O'Reilly Media.
Nixon R, (2012). Learning PHP, MySQL, JavaScript, and CSS: A Step-by-Step Guide to Creating Dynamic Websites. Second Edition Edition. O'Reilly Media.
Schwartz B, Zaitsev P, Tkachenko V (2012). High Performance MySQL, 3rd Edition. O'Reilly Media.
| << Back | HOME |